An AI agent writes code fast. It can also be wrong. When it is wrong, it still writes as if it is right. In this exercise you practise finding its mistakes.
You will ask GitHub Copilot to add a small function to Multiplication Maestro, with unit tests. Then you check its work, the way you should check any code an agent writes for you. Every step here also works on your Create task.
Optional
This exercise takes about 45 minutes. It uses a few of your monthly Copilot credits.
Do it in Multiplication Maestro, not in your Create task app.
What College Board expects
College Board allows you to use AI to help you understand code, write code, and debug it. In our class, that includes your list and your procedure on the Create task. College Board also says:
It is the student’s responsibility to review and understand any code co-written with AI tools, ensuring its functionality. Additionally, students must be prepared to explain their code in detail, as required on the end-of-course exam.
In plain words:
- You must understand it. Read every line the agent writes.
- You must make sure it works. Test it yourself. Do not trust “all tests pass” from the agent.
- You must explain it, alone. On the AP Exam in May, you answer written questions about your own list and procedure, with no AI. If you cannot explain a line, you can lose marks.
- You must say where it came from. College Board’s Create task directions say that AI code you do not acknowledge counts as plagiarism. Acknowledging AI in Your Code shows how.
In this exercise you practise all four.
Before you start
You need GitHub Copilot CLI, installed and signed in, as in Installing GitHub Copilot.
You also need Multiplication Maestro. Use one of these: your own Multiplication Maestro from the first day of Thread 2, or my finished copy. To get my copy:
-
Open Multiplication Maestro Practice on GitHub. Make sure you are signed in to GitHub.
-
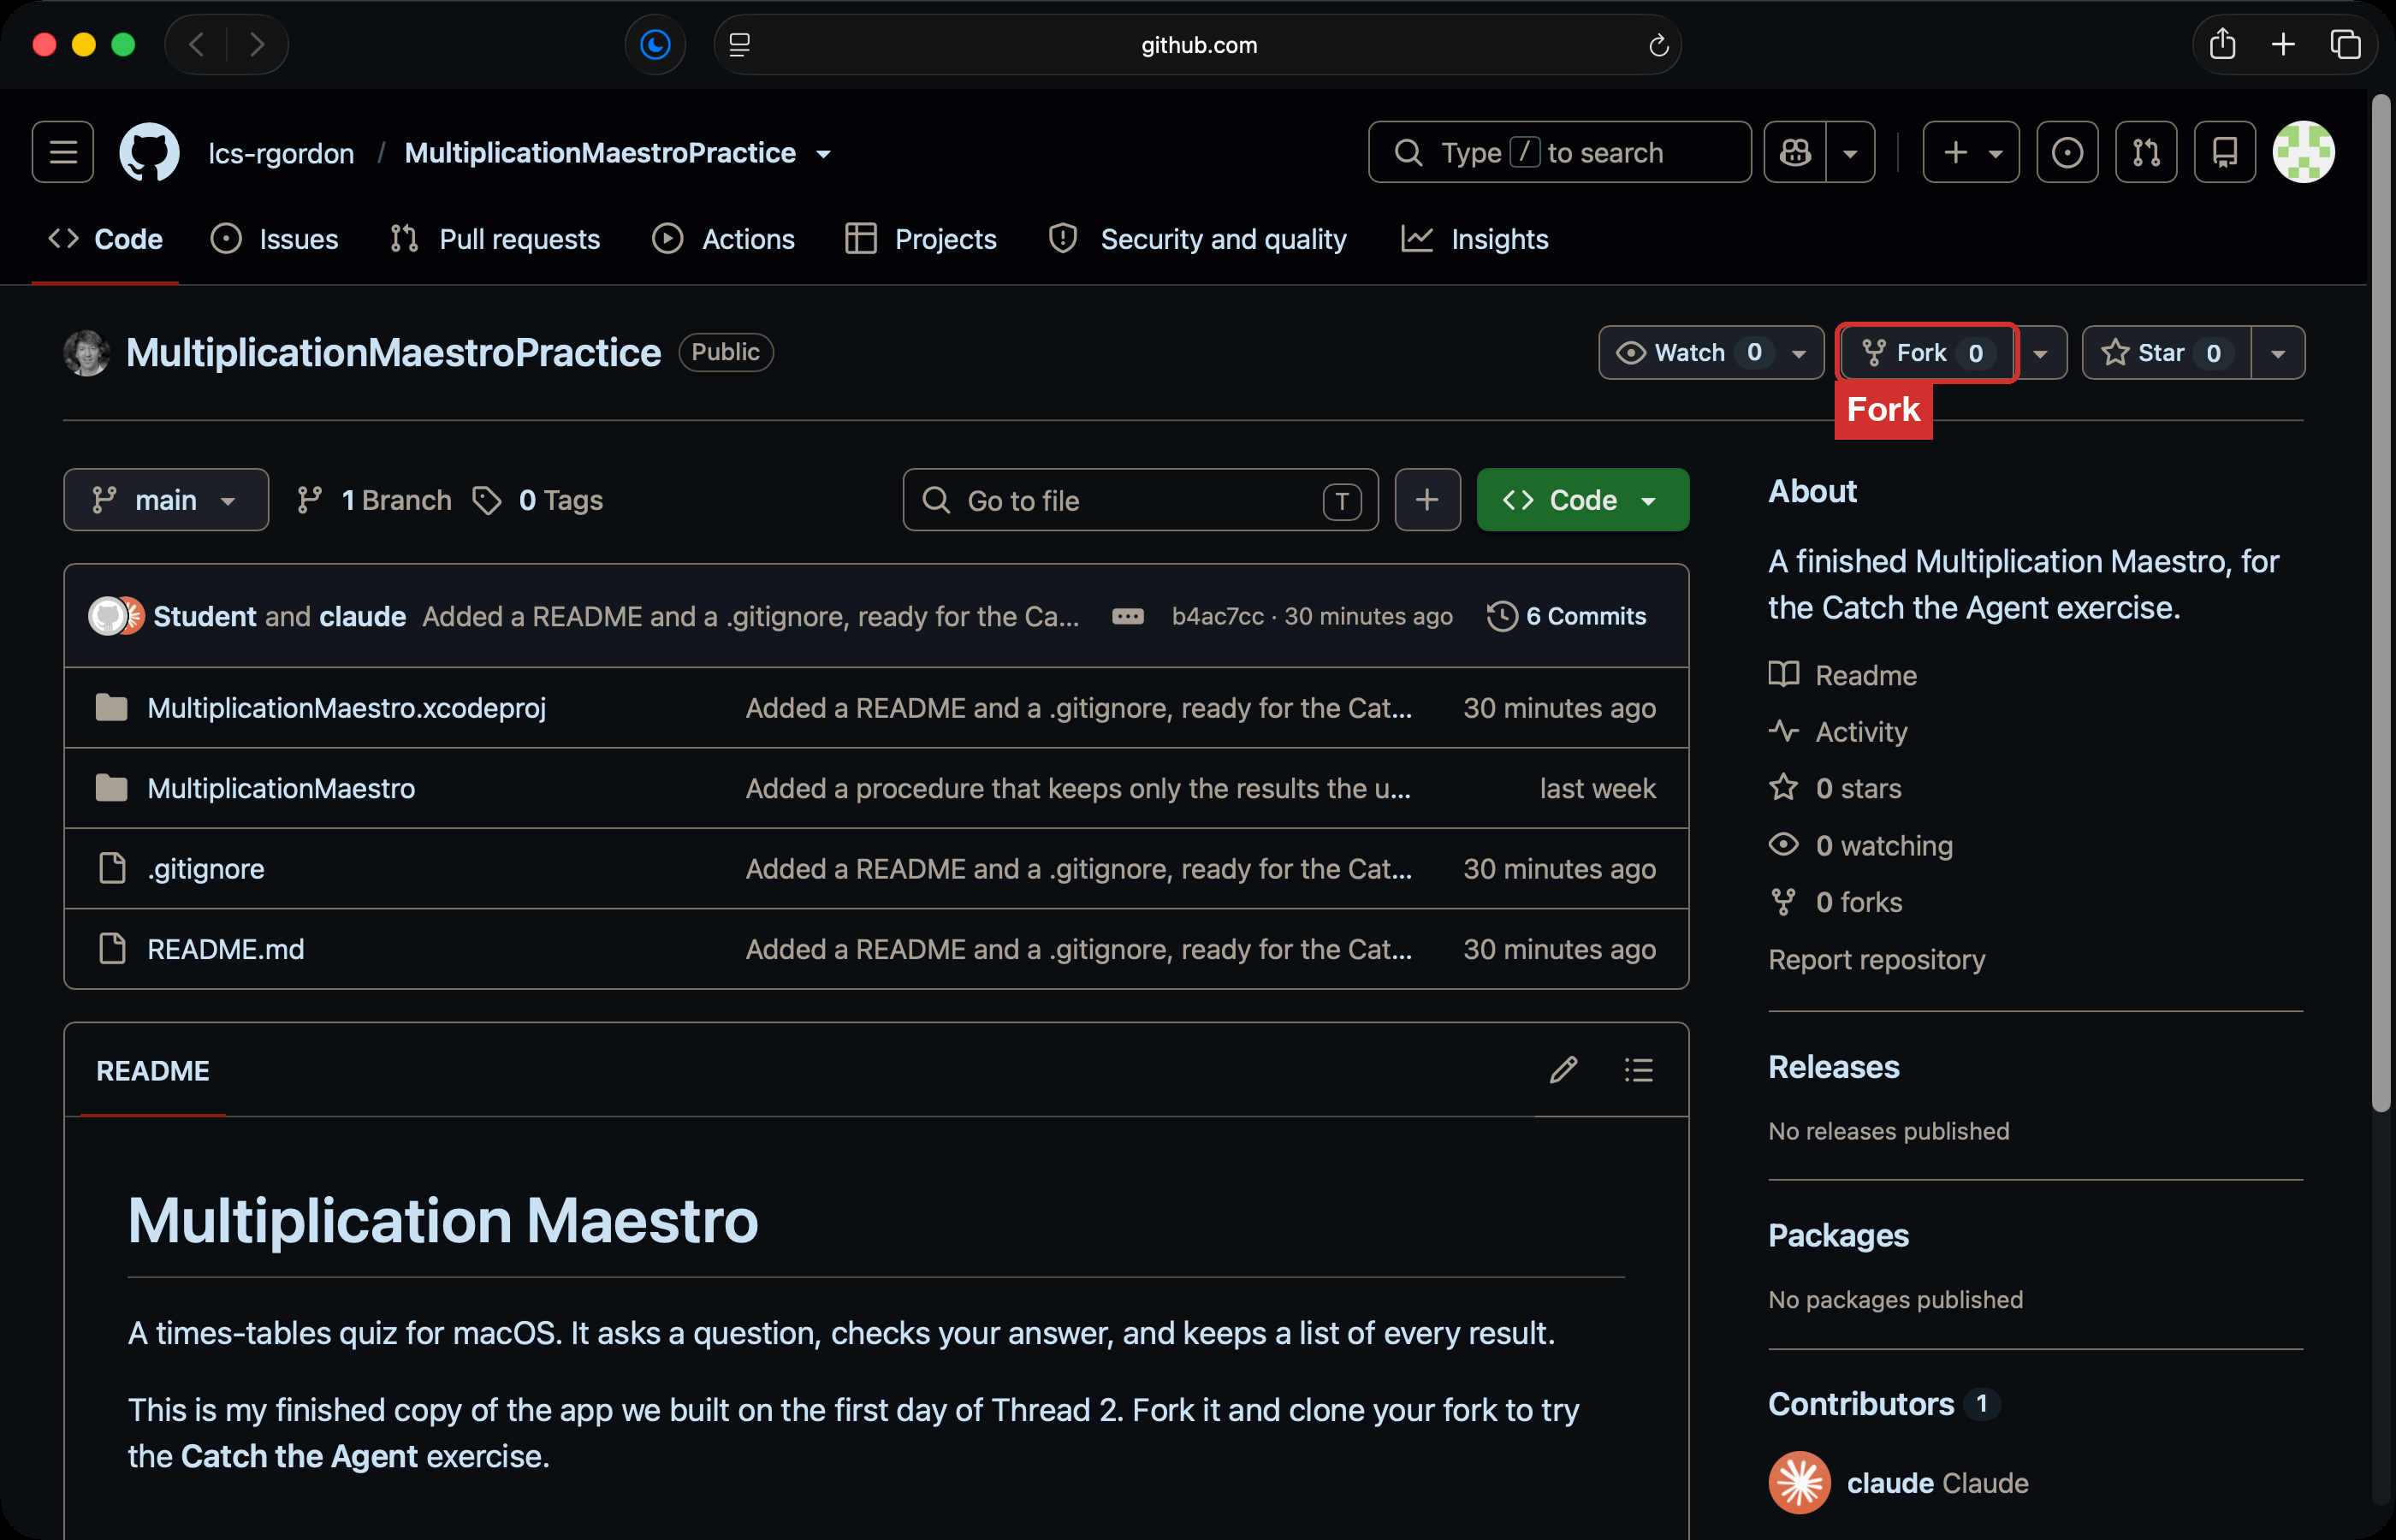
Press Fork.
-
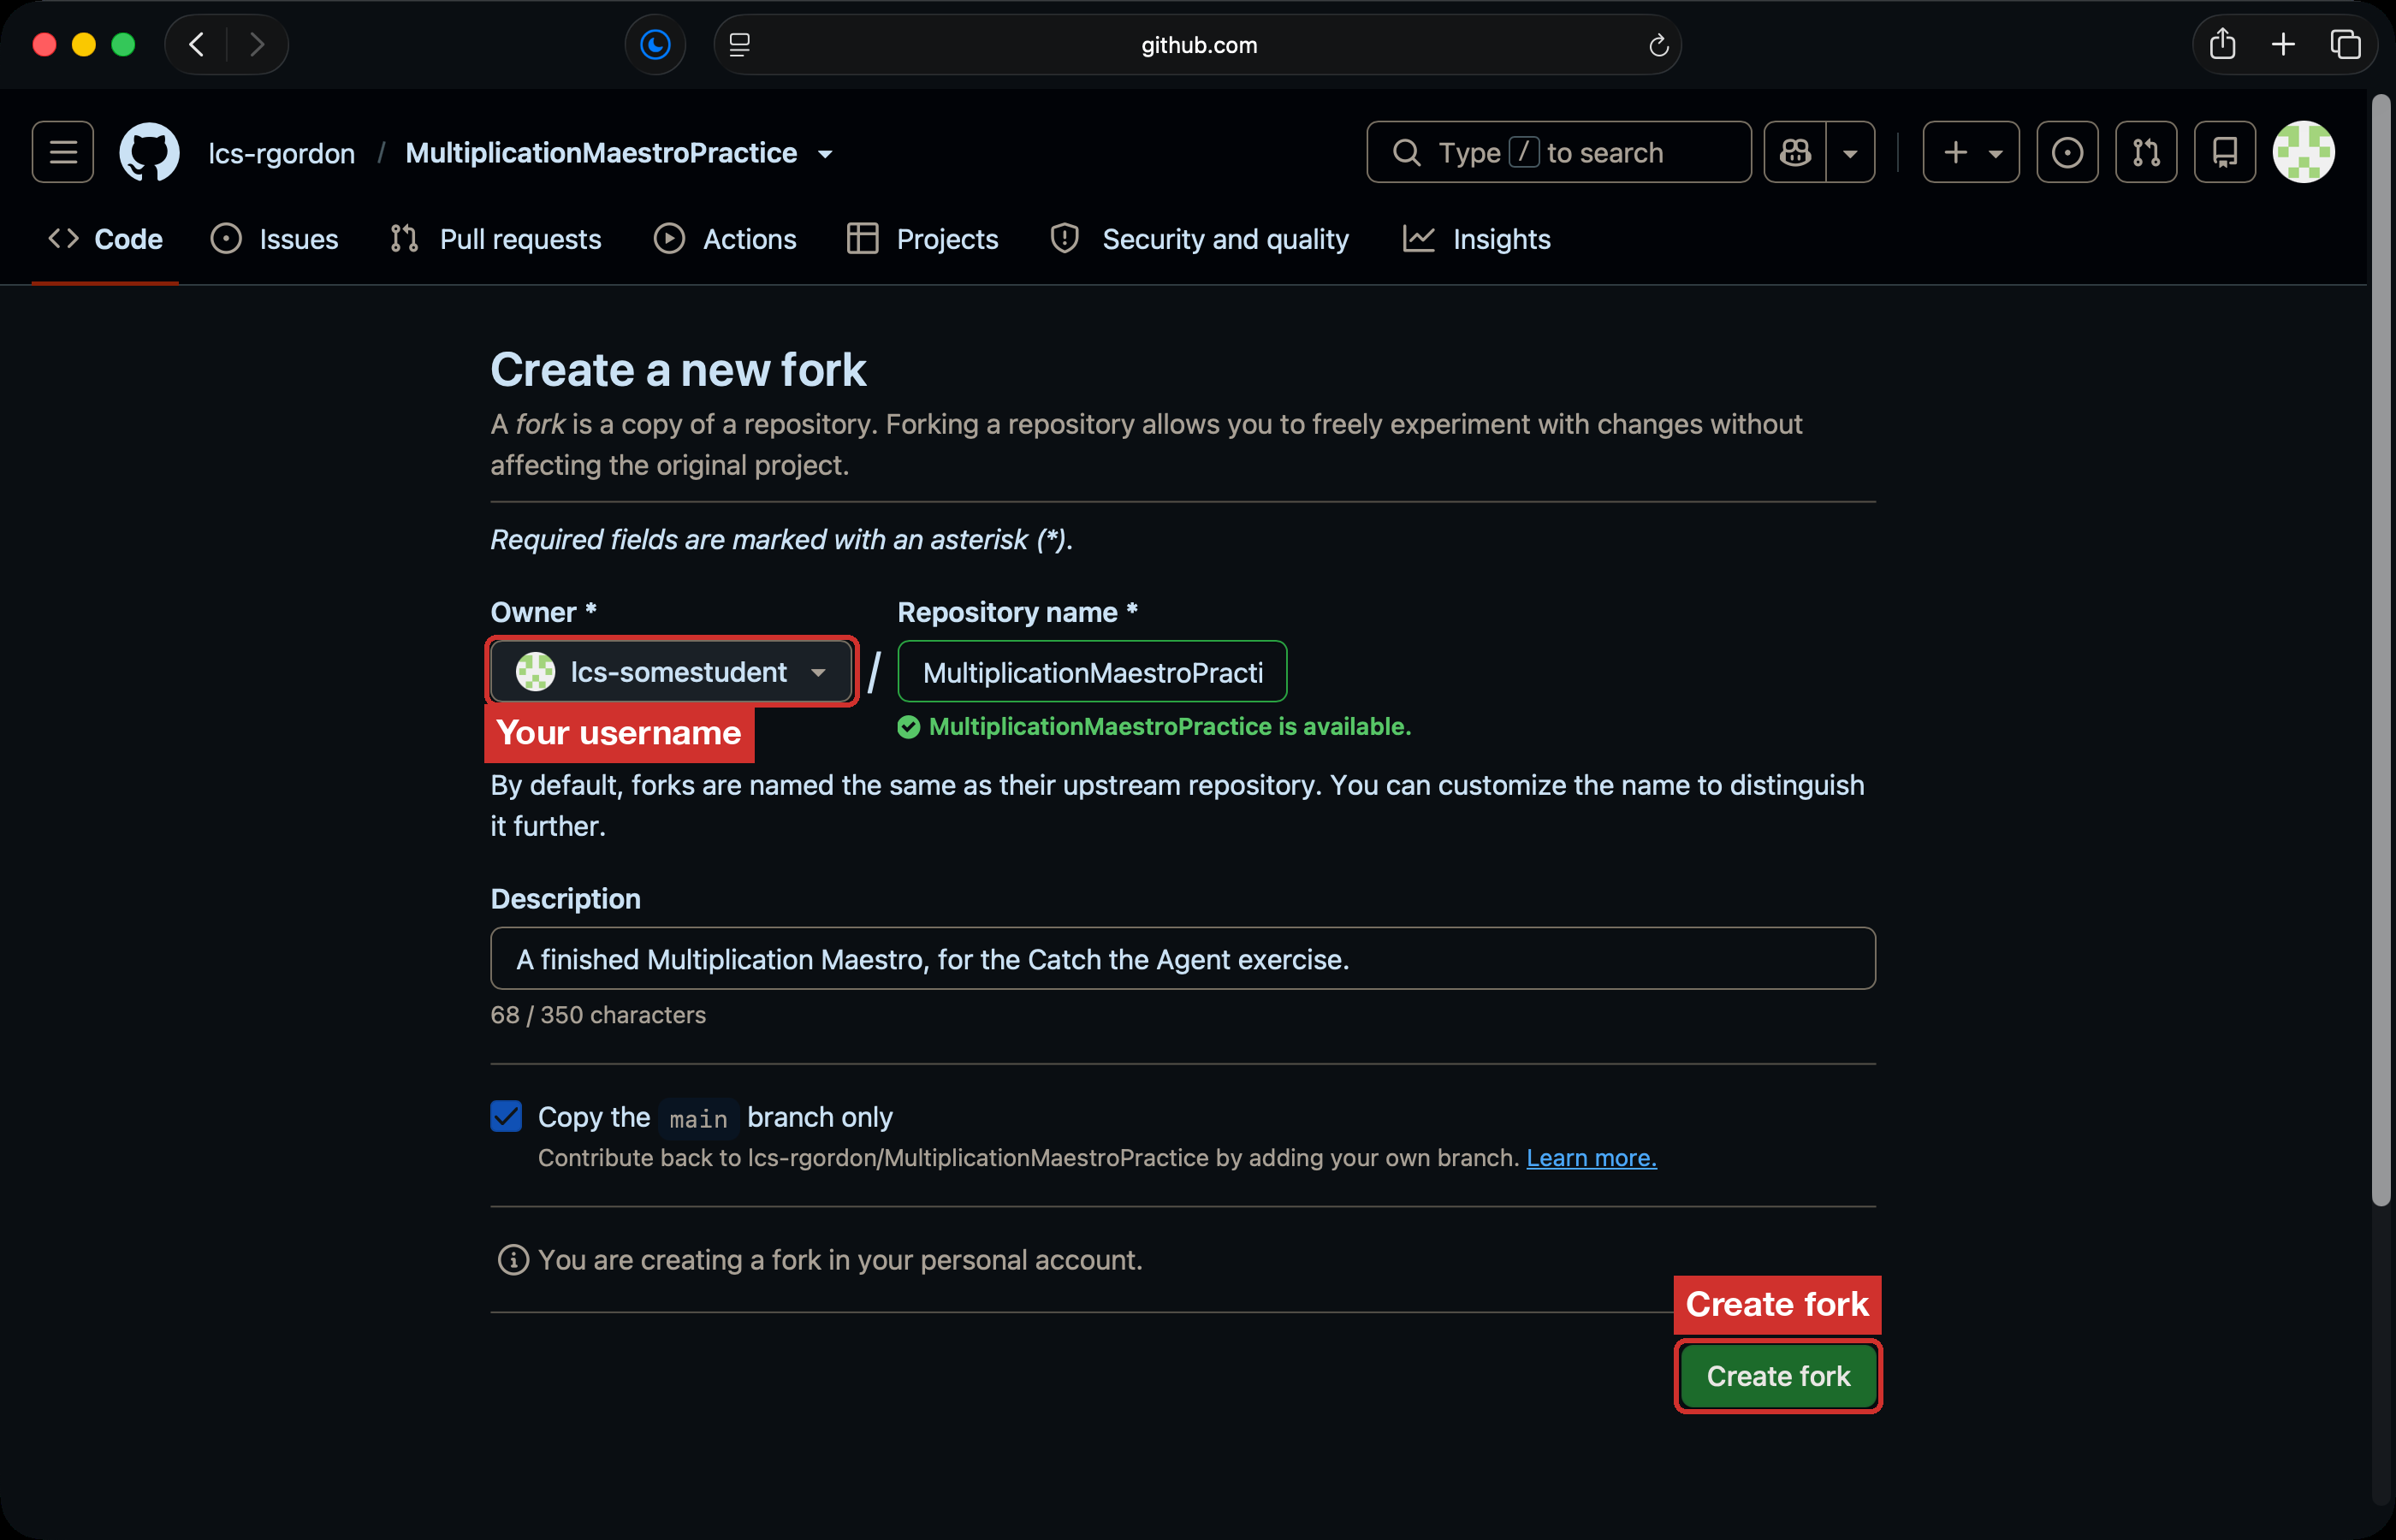
Check that Owner is your username. Leave everything else as it is. Press Create fork.
-
GitHub shows your fork. Check that your username is at the top left, and forked from lcs-rgordon/MultiplicationMaestroPractice is under the name.
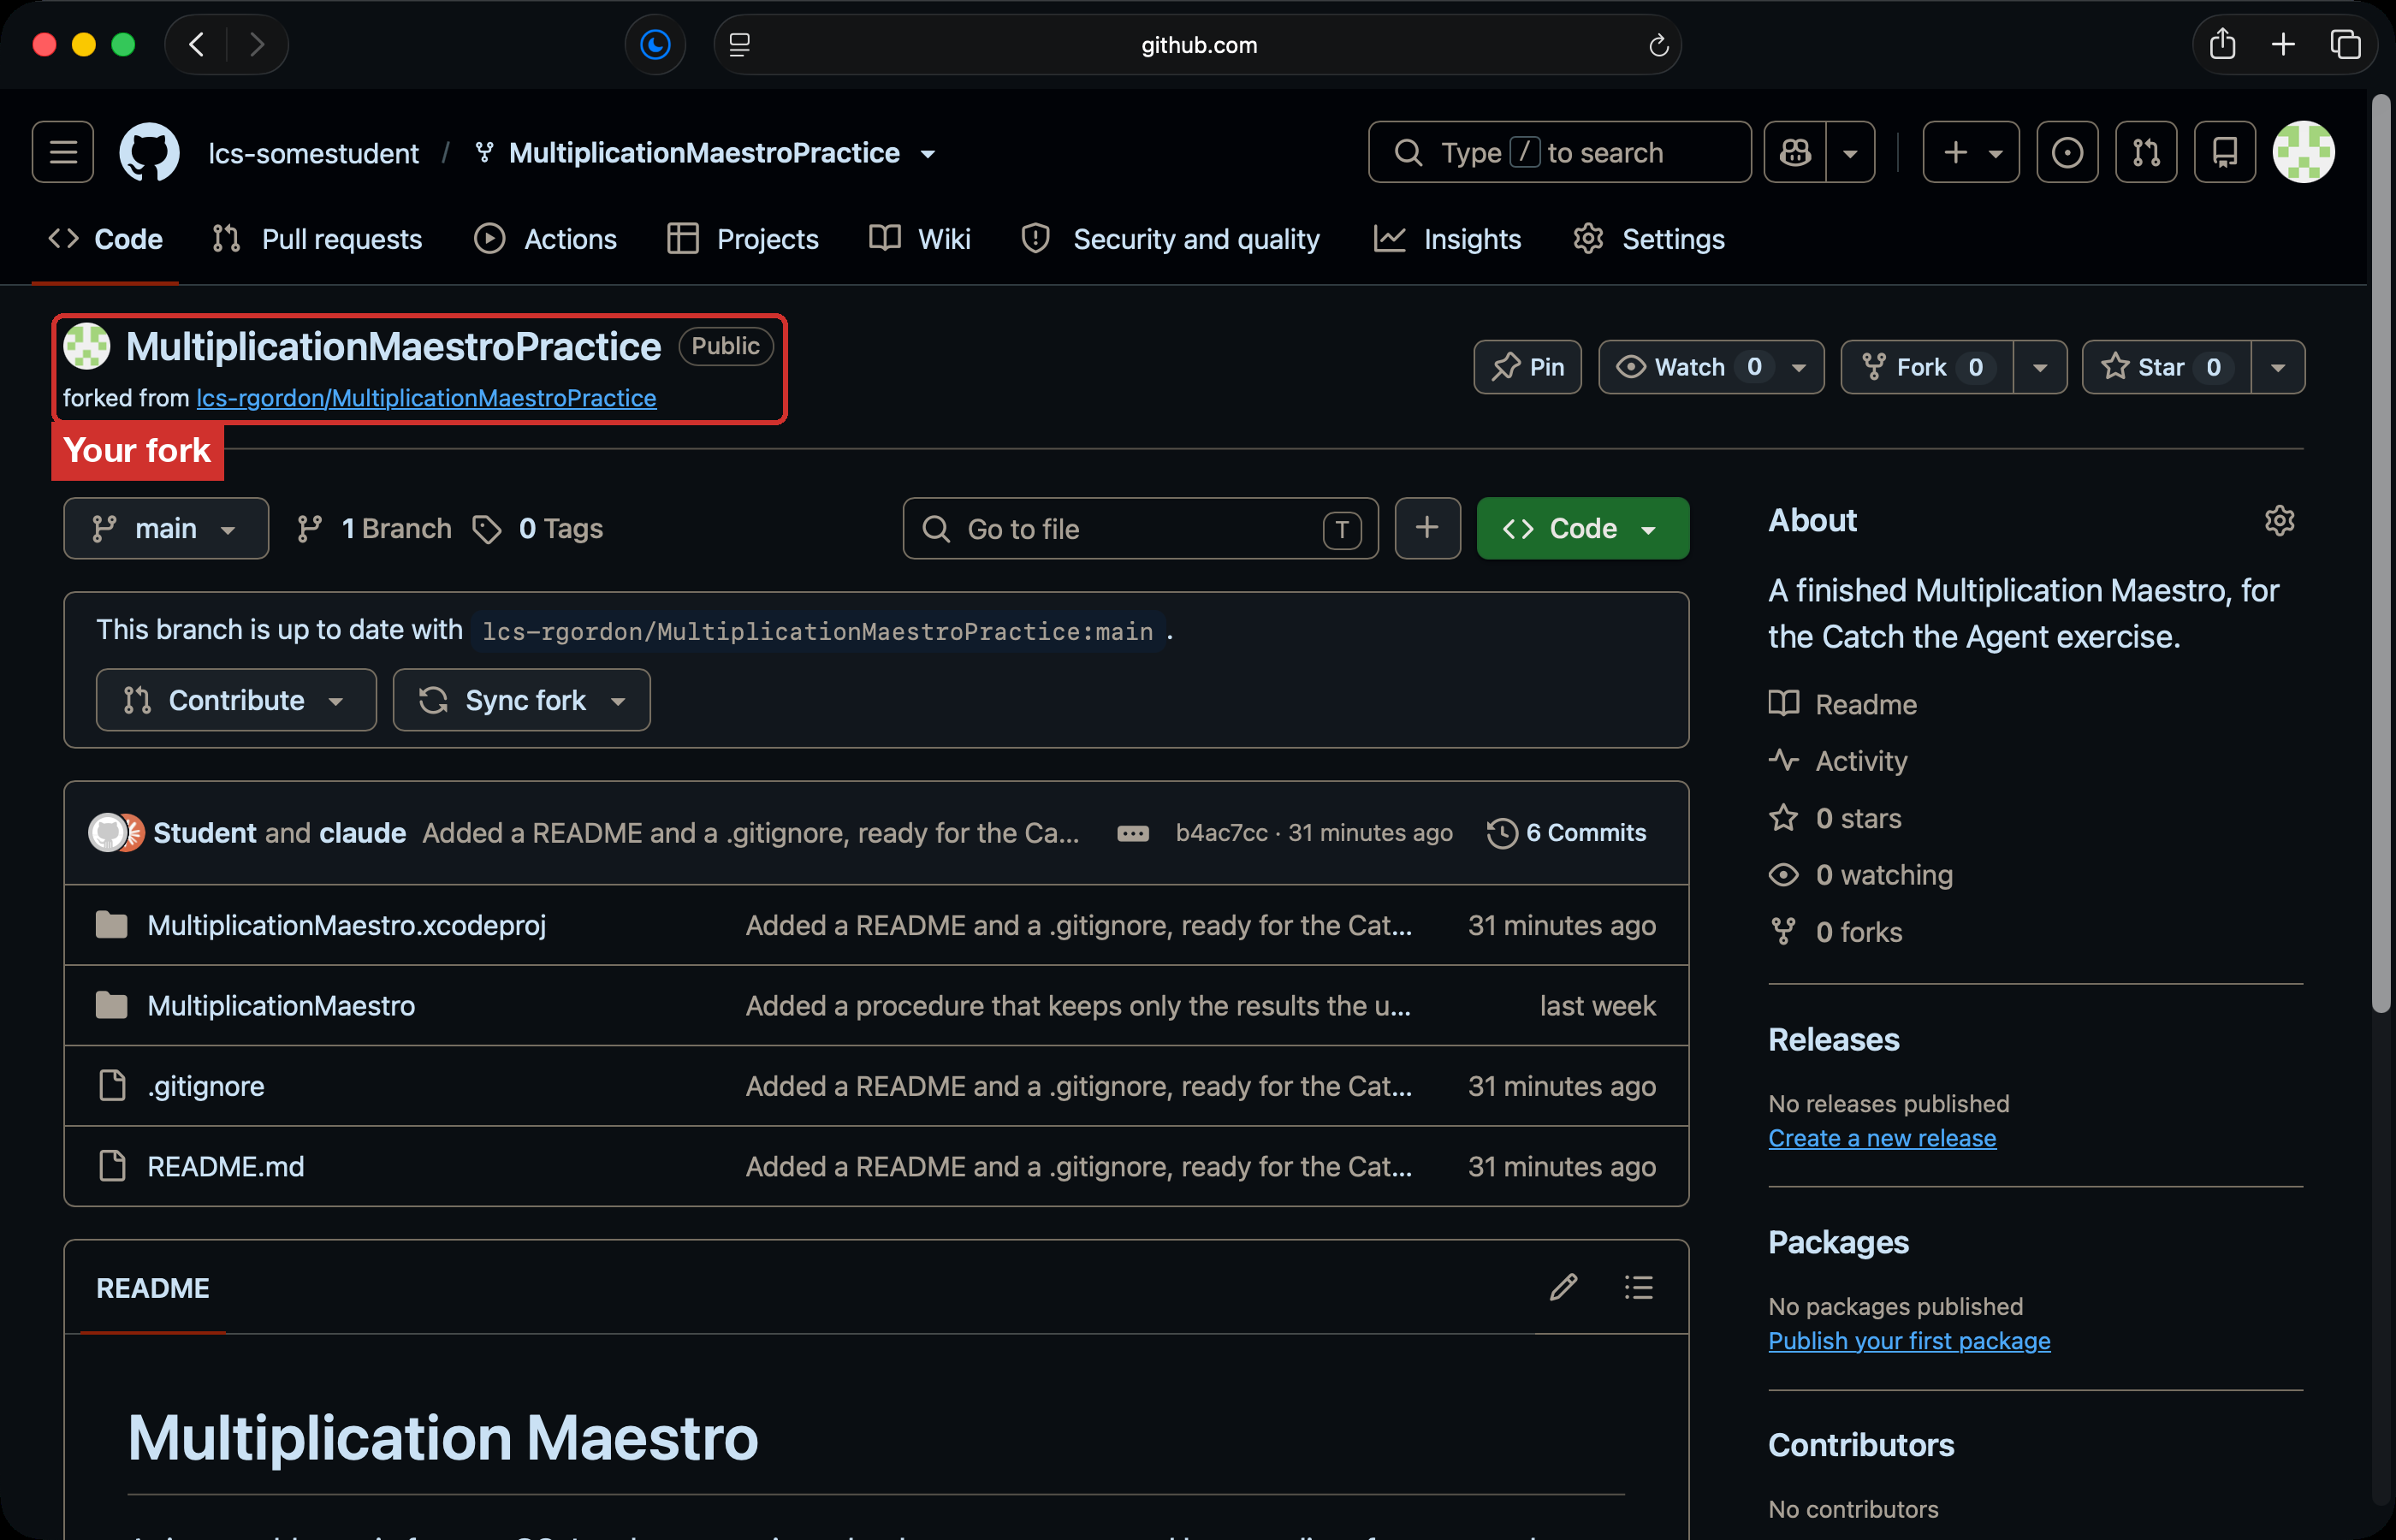
Do not press Sync fork or Contribute.
-
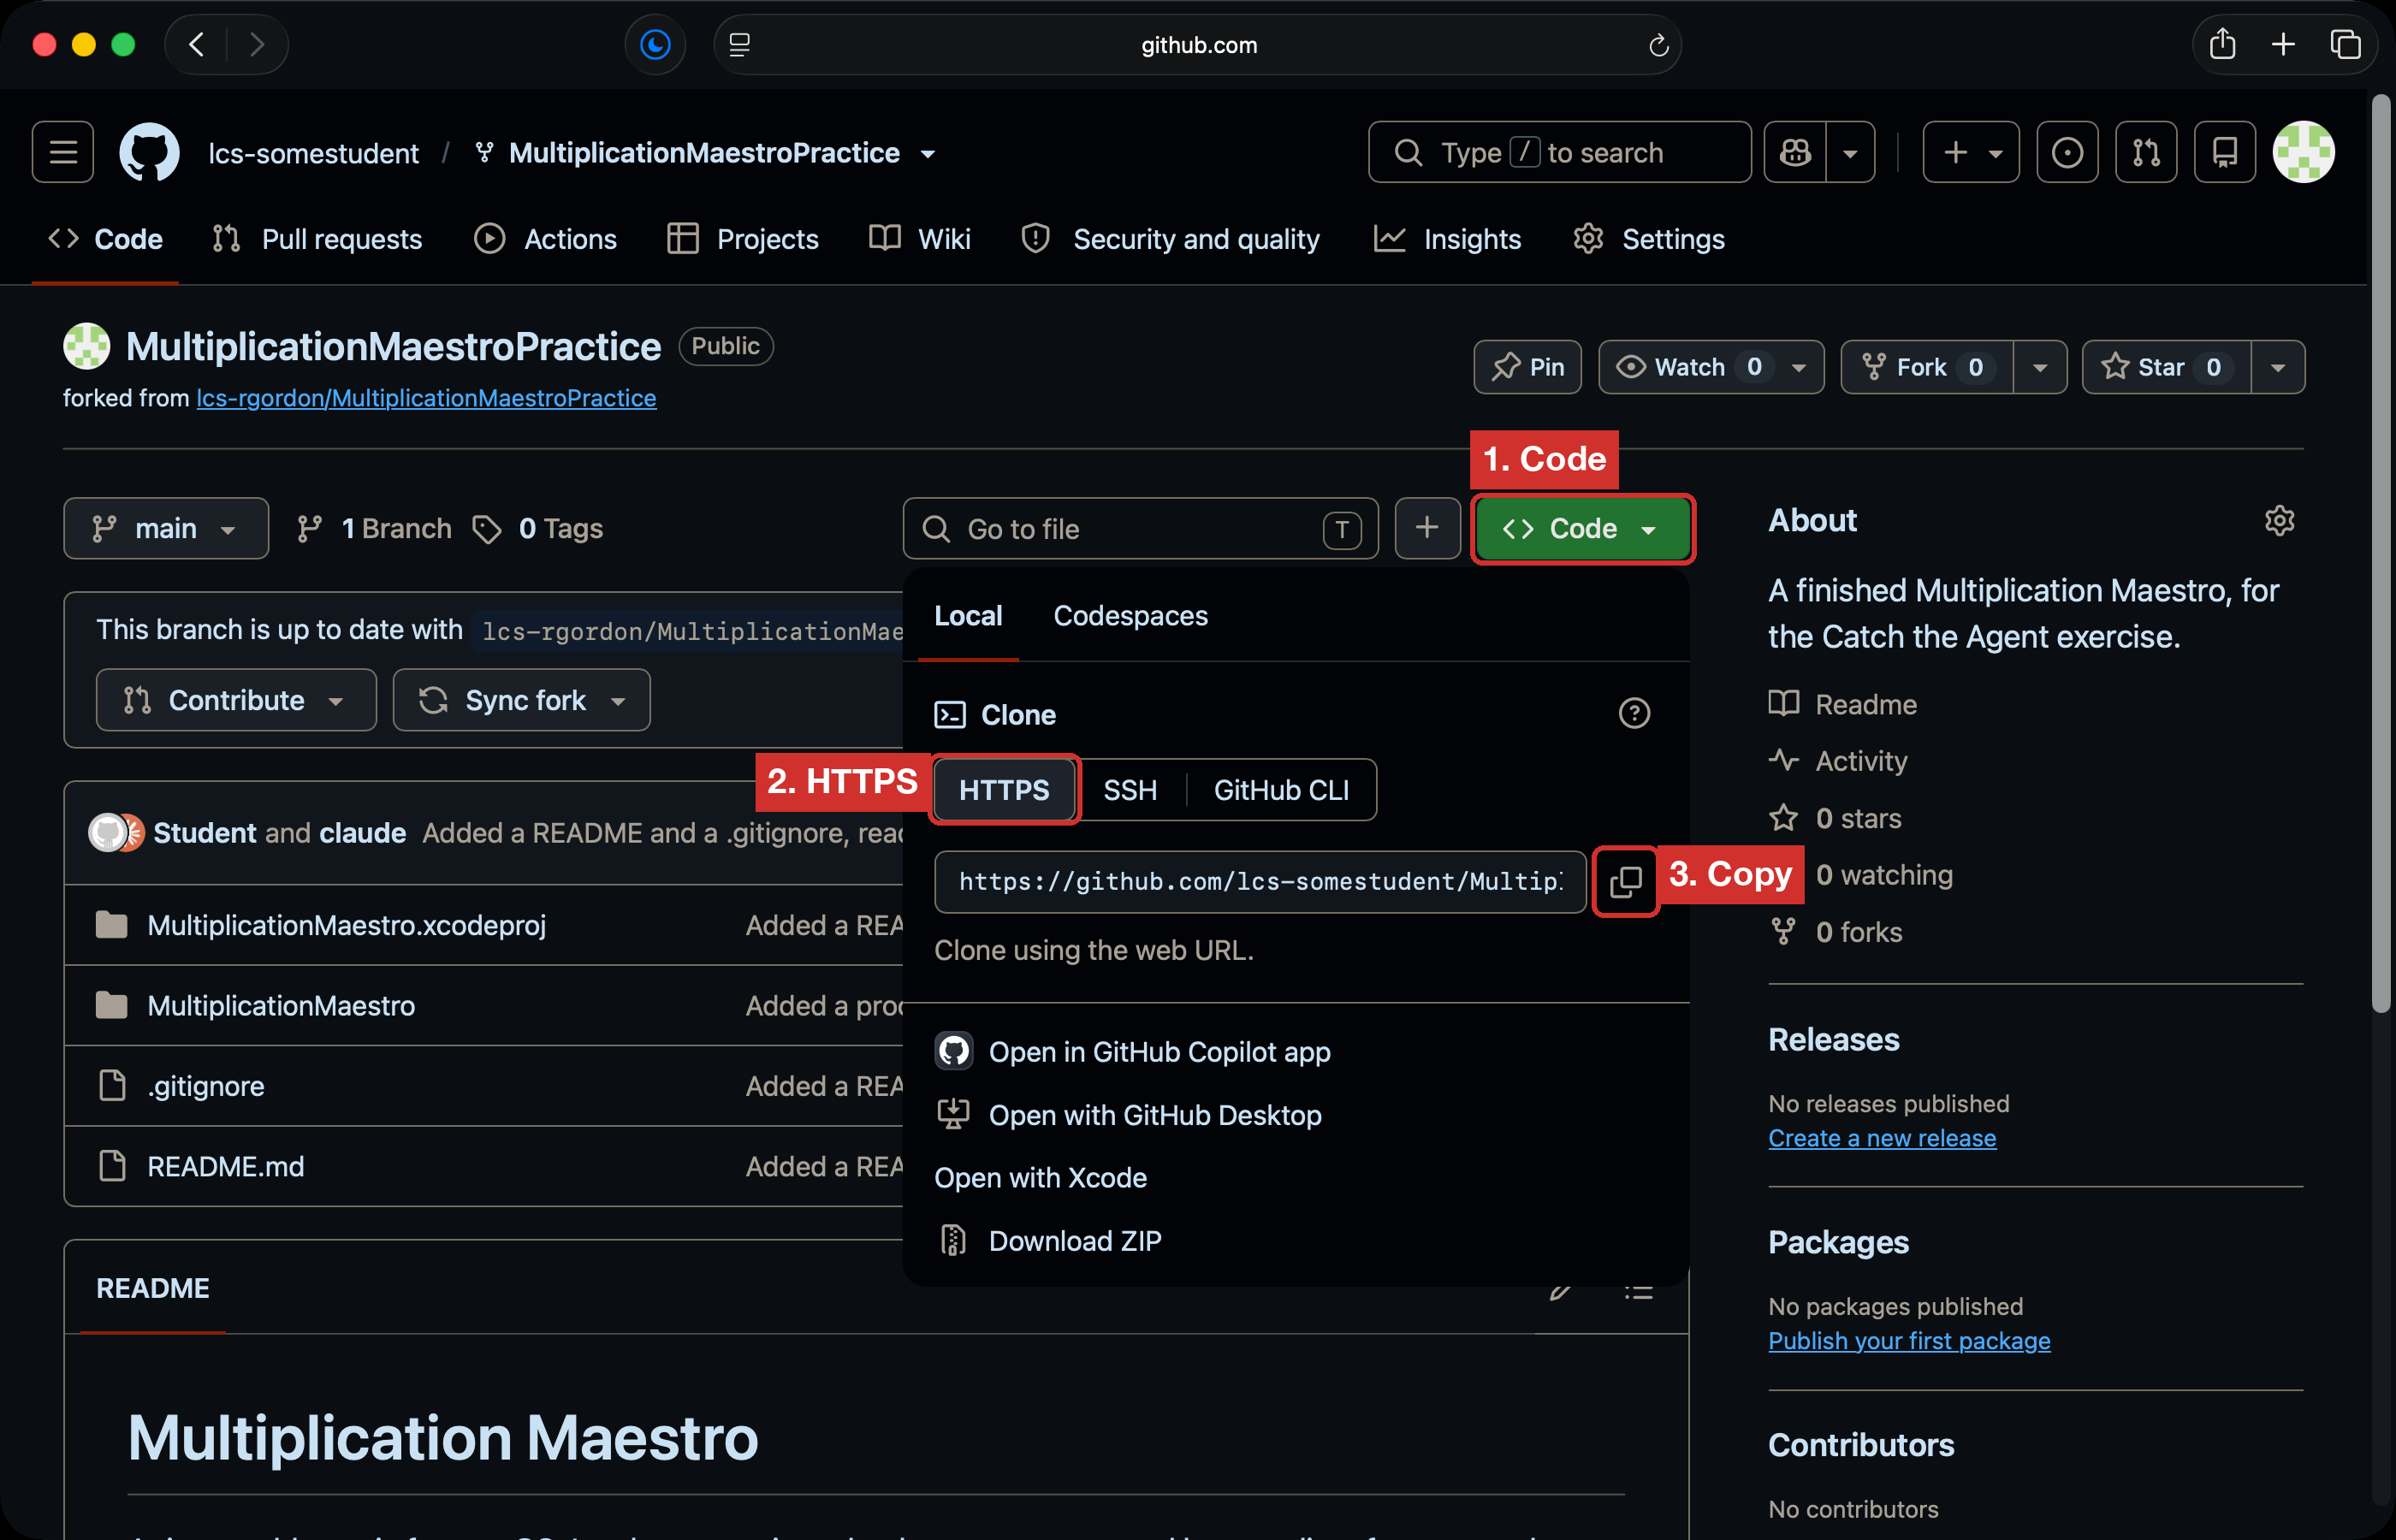
On your fork’s page, press the green Code button. Make sure HTTPS is chosen. Press the copy button beside the address.
-
In Xcode, choose Integrate > Clone….
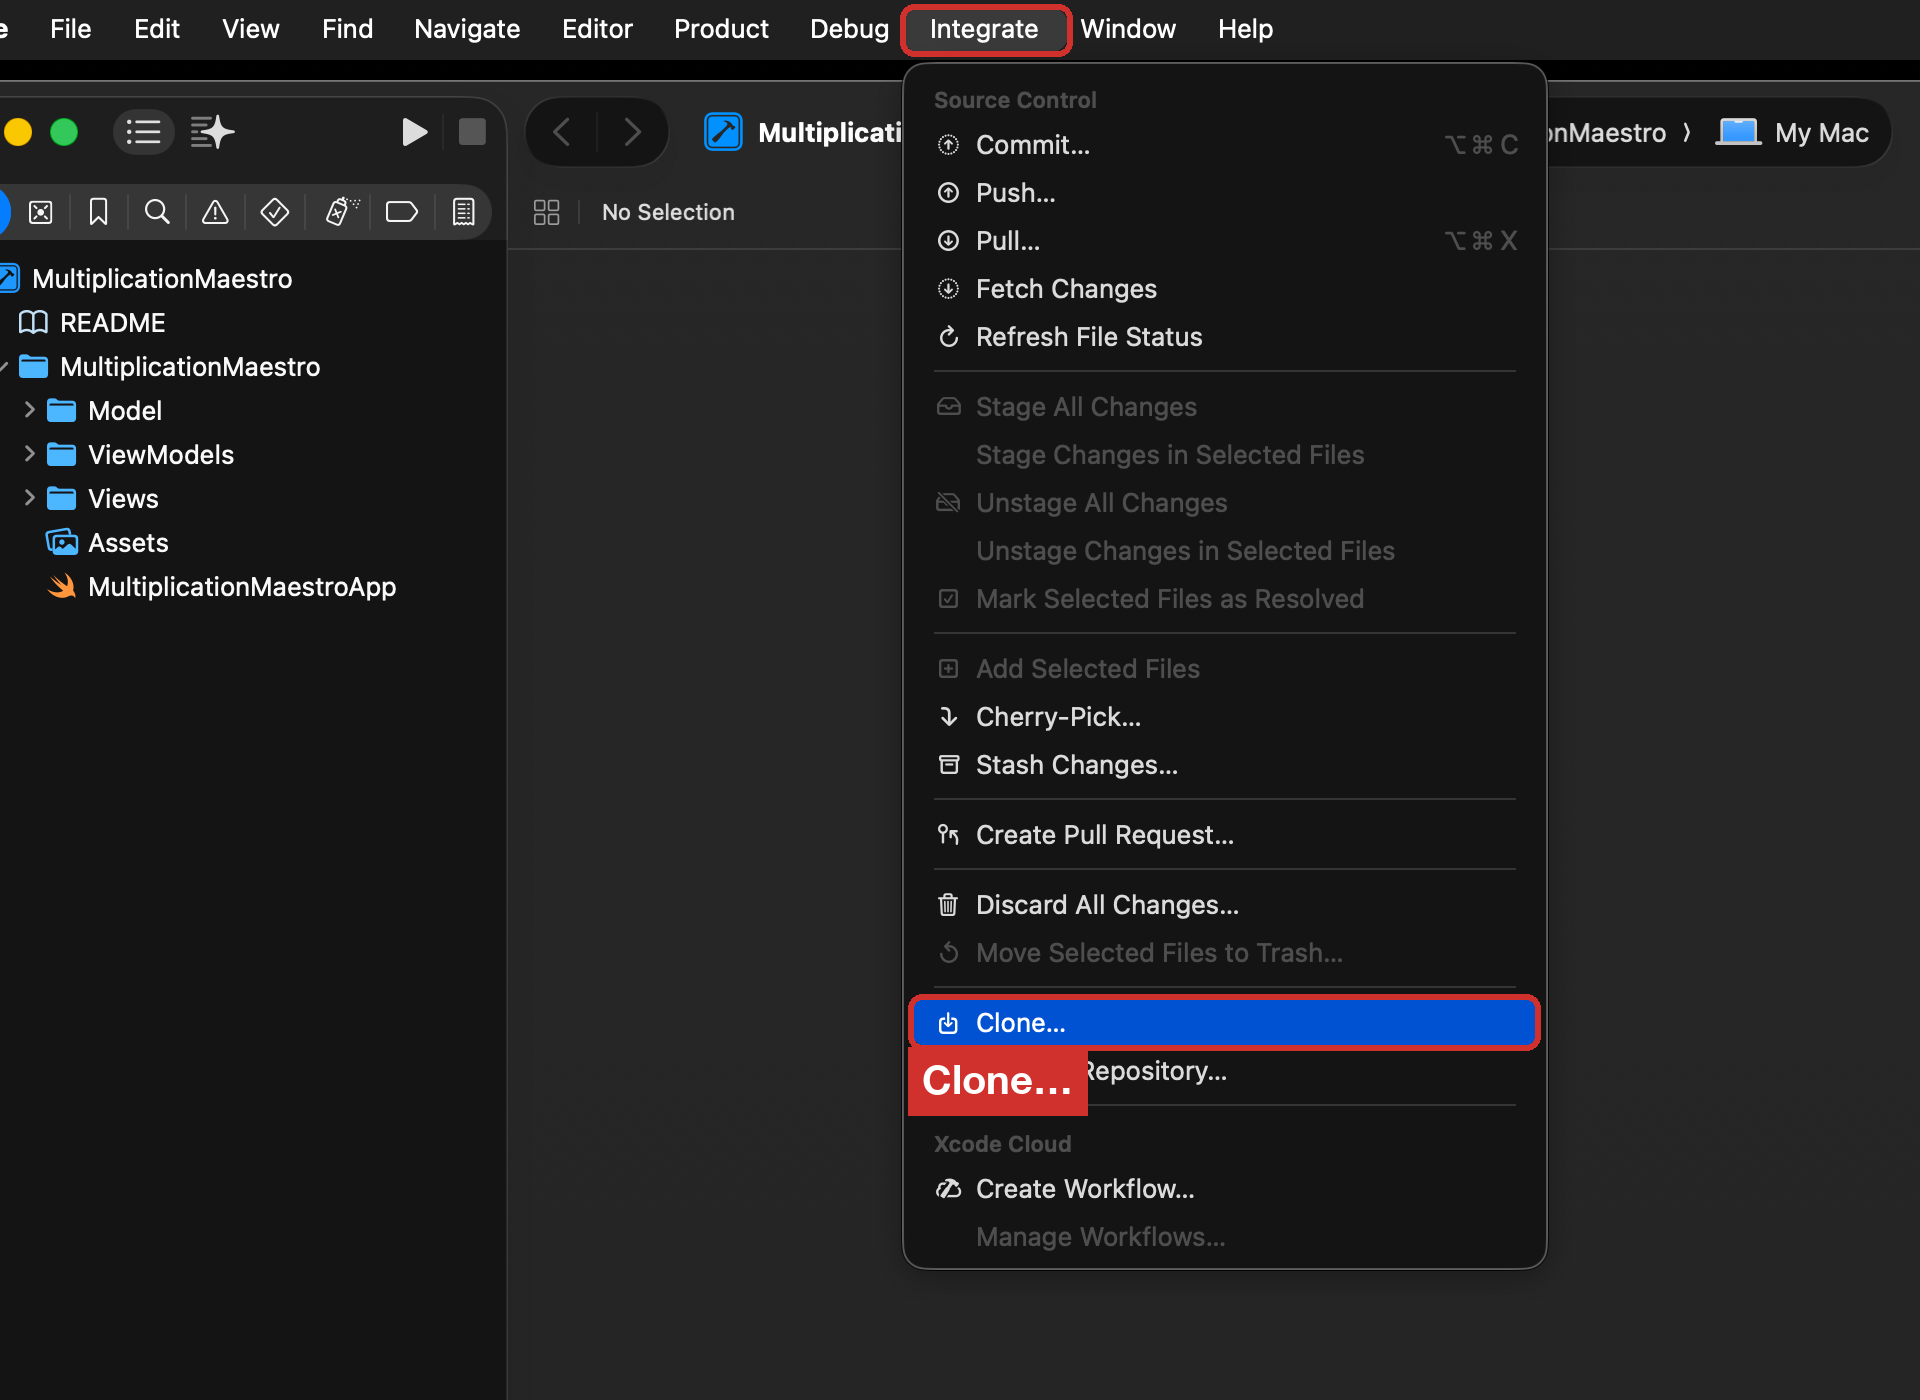
-
Paste the address into the box at the top. Press Clone.
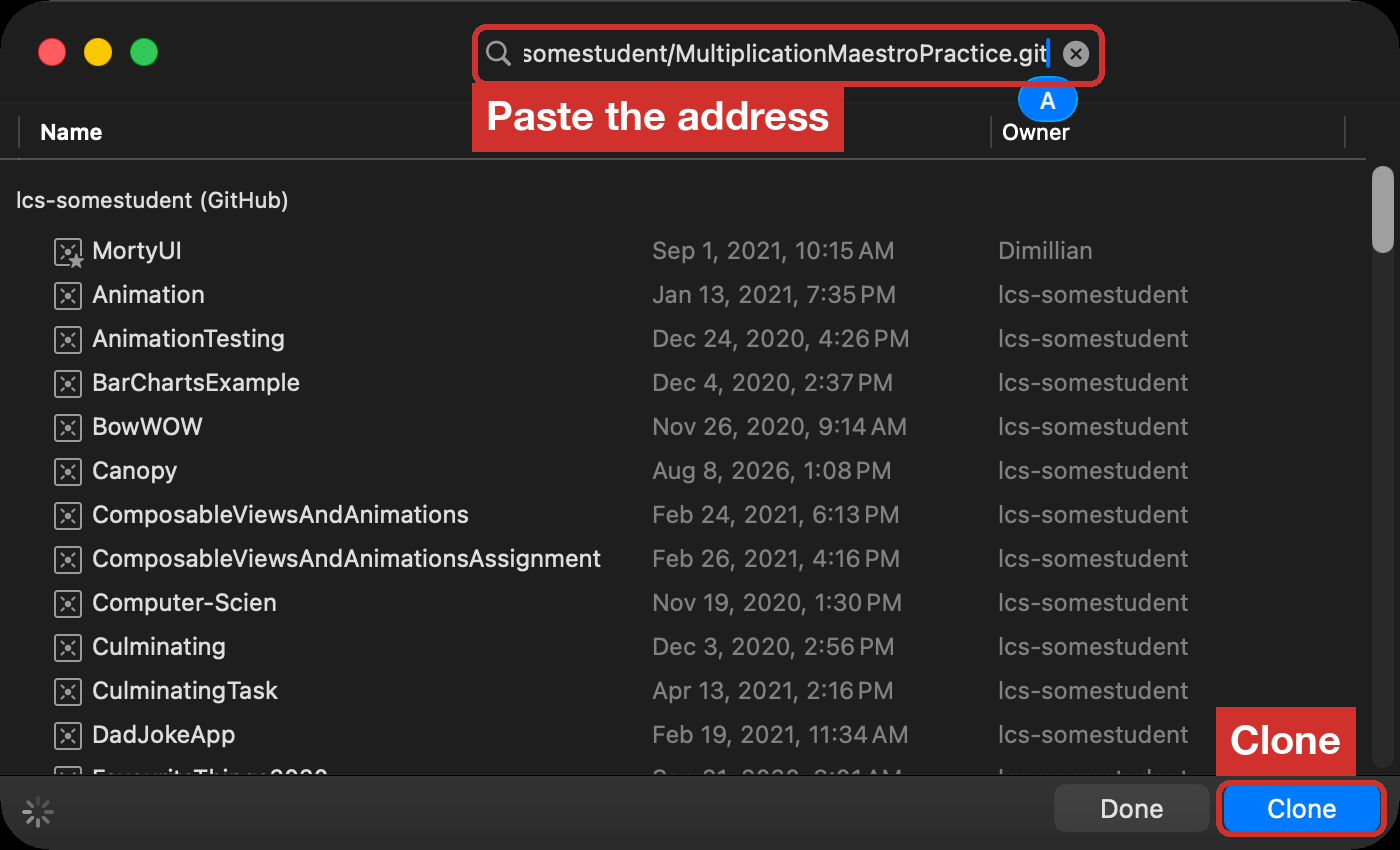
-
Keep the name. Choose the folder where you keep your Xcode projects, not iCloud. Press Clone.
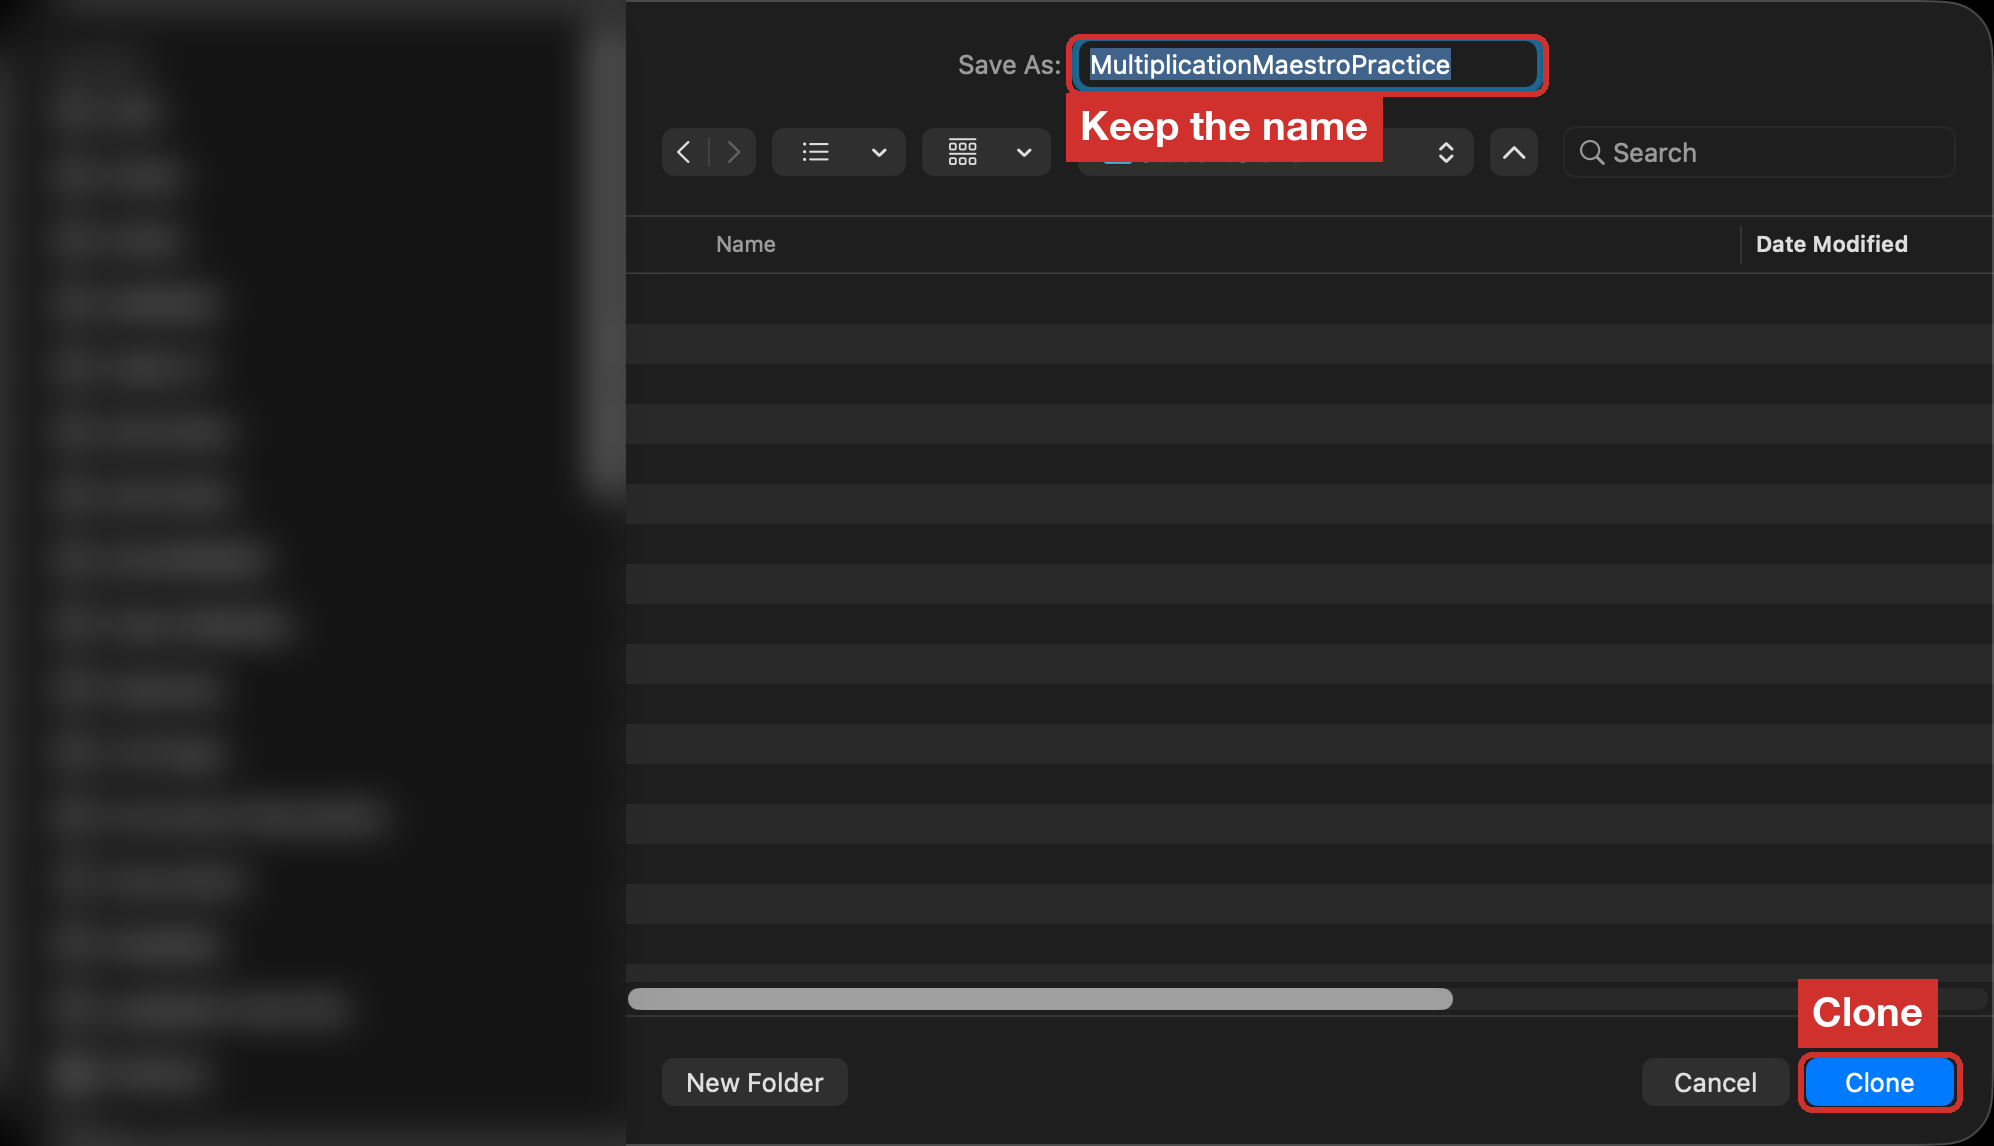
-
The project opens in Xcode. Check that the run destination says My Mac.
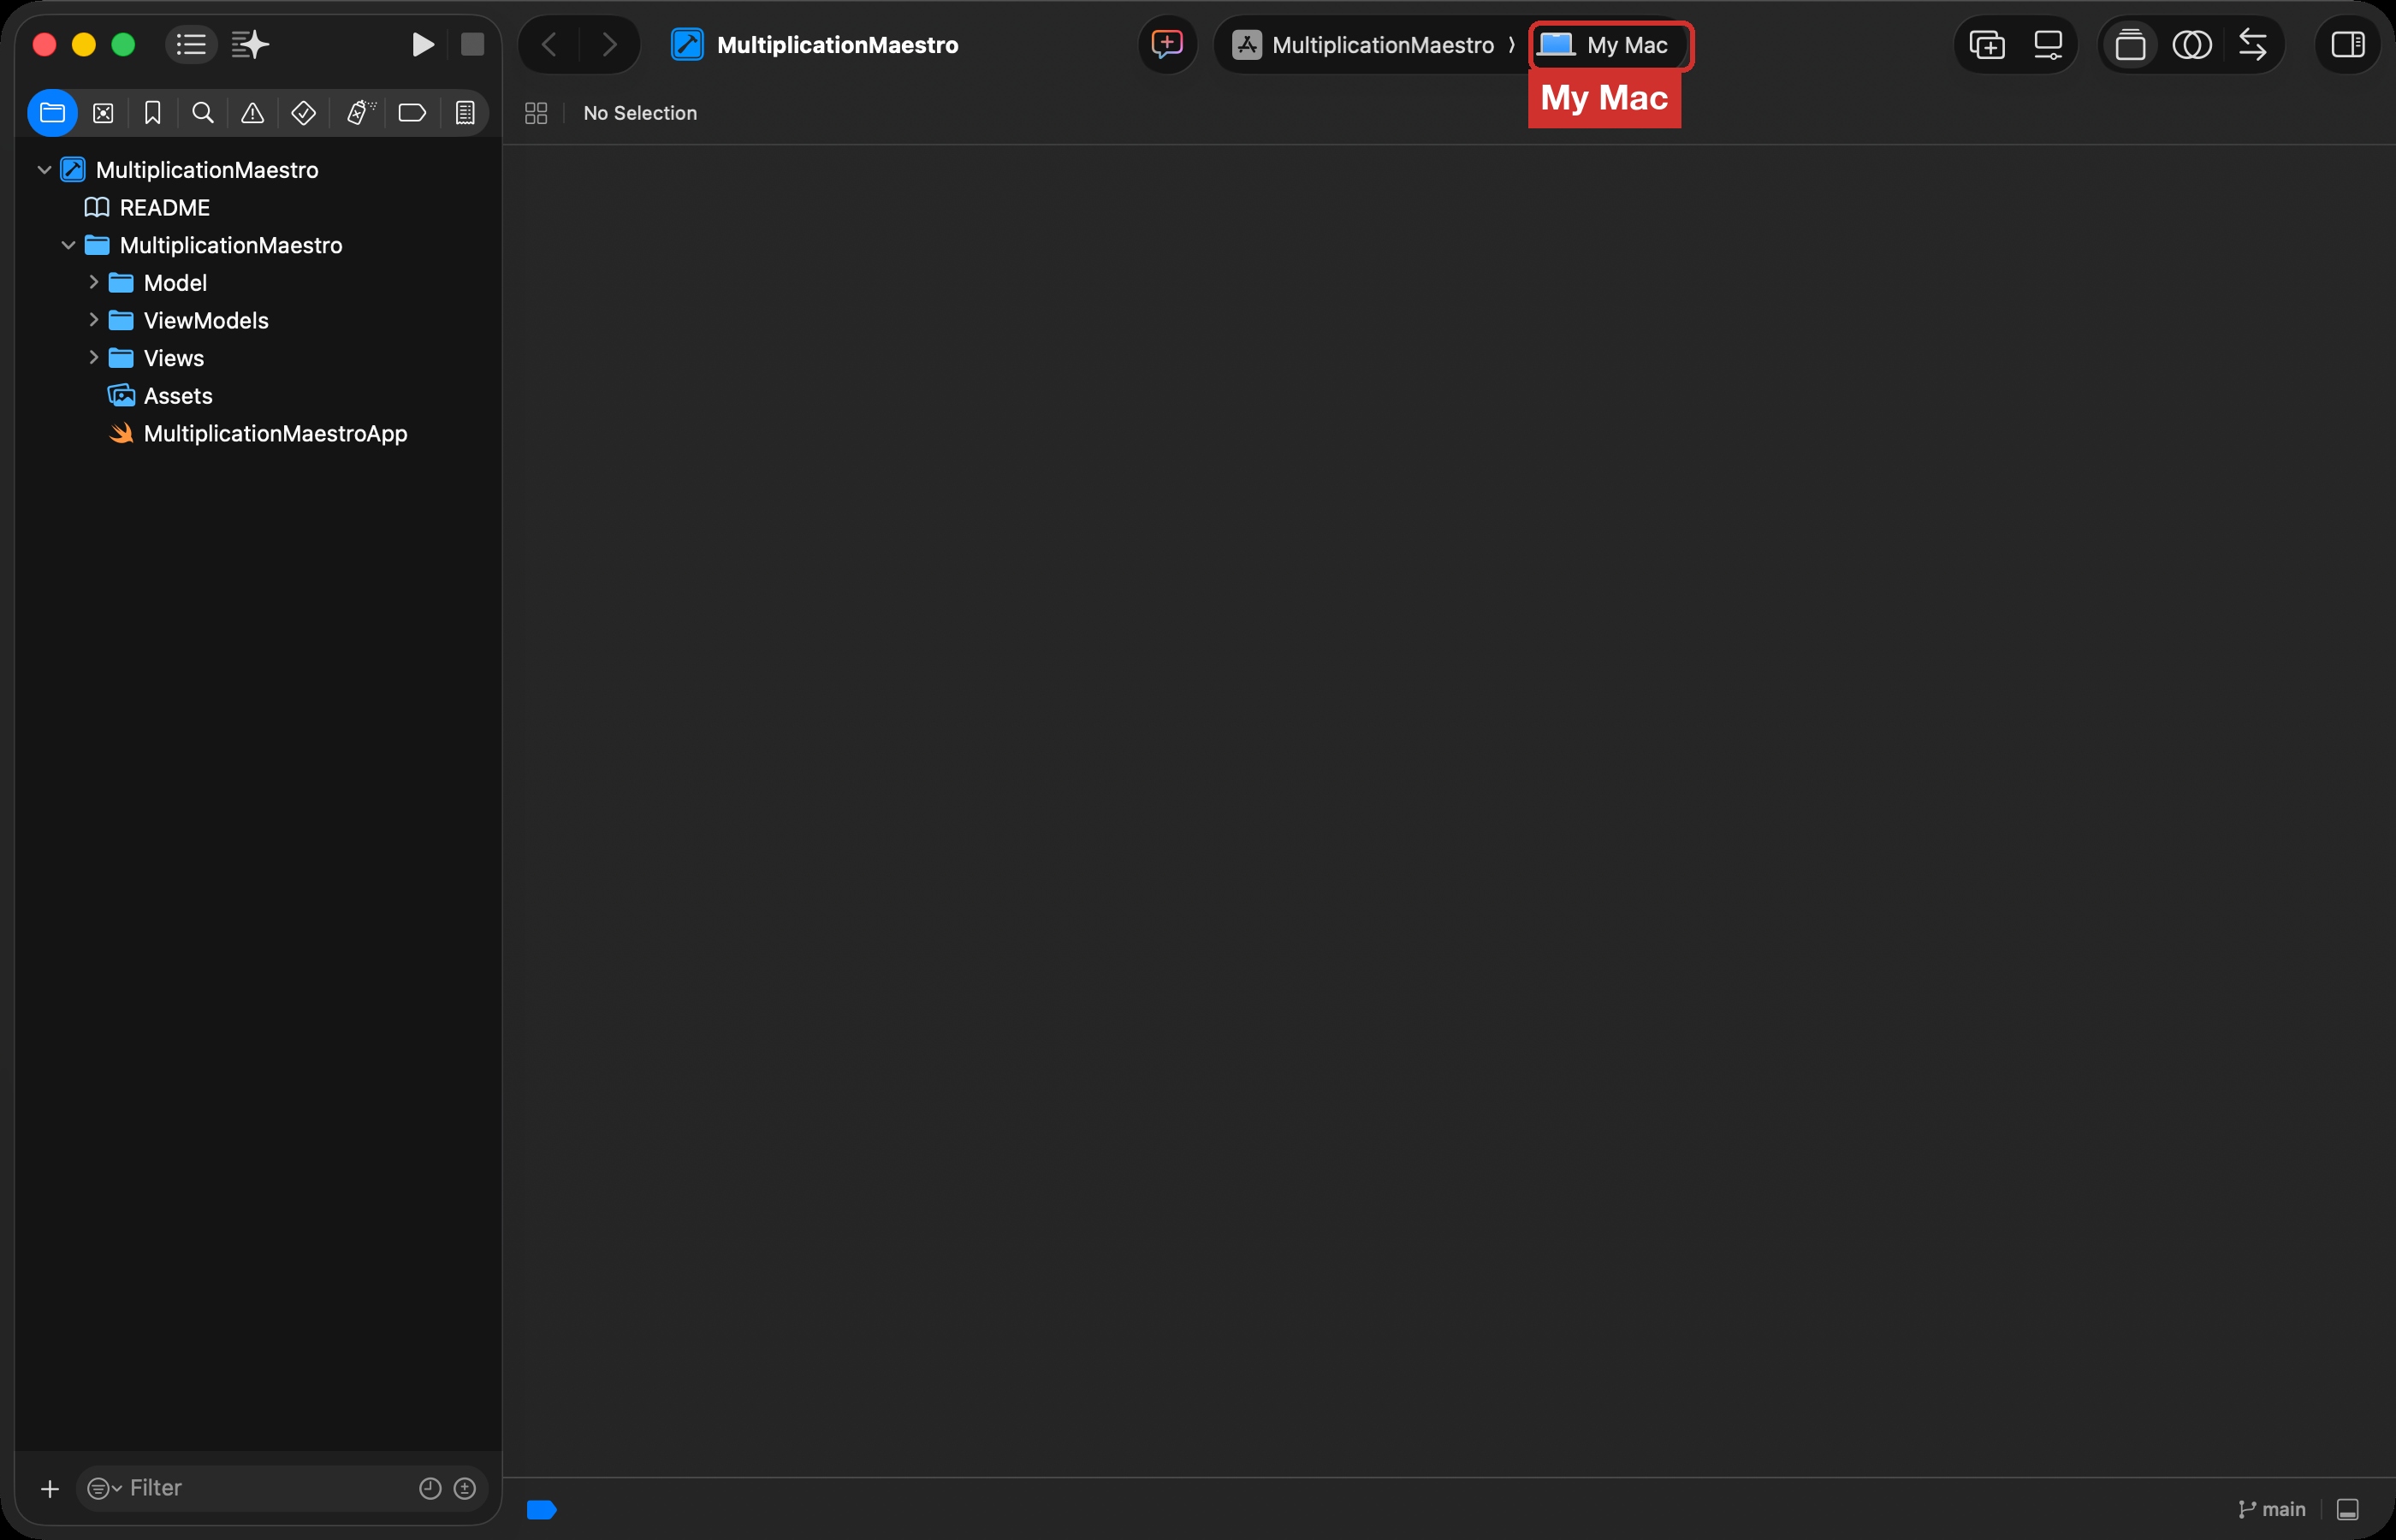
1. Add a test target
Unit tests live in a test target. If your project already has a folder called MultiplicationMaestroTests, skip to part 2, Start Copilot in your project.
-
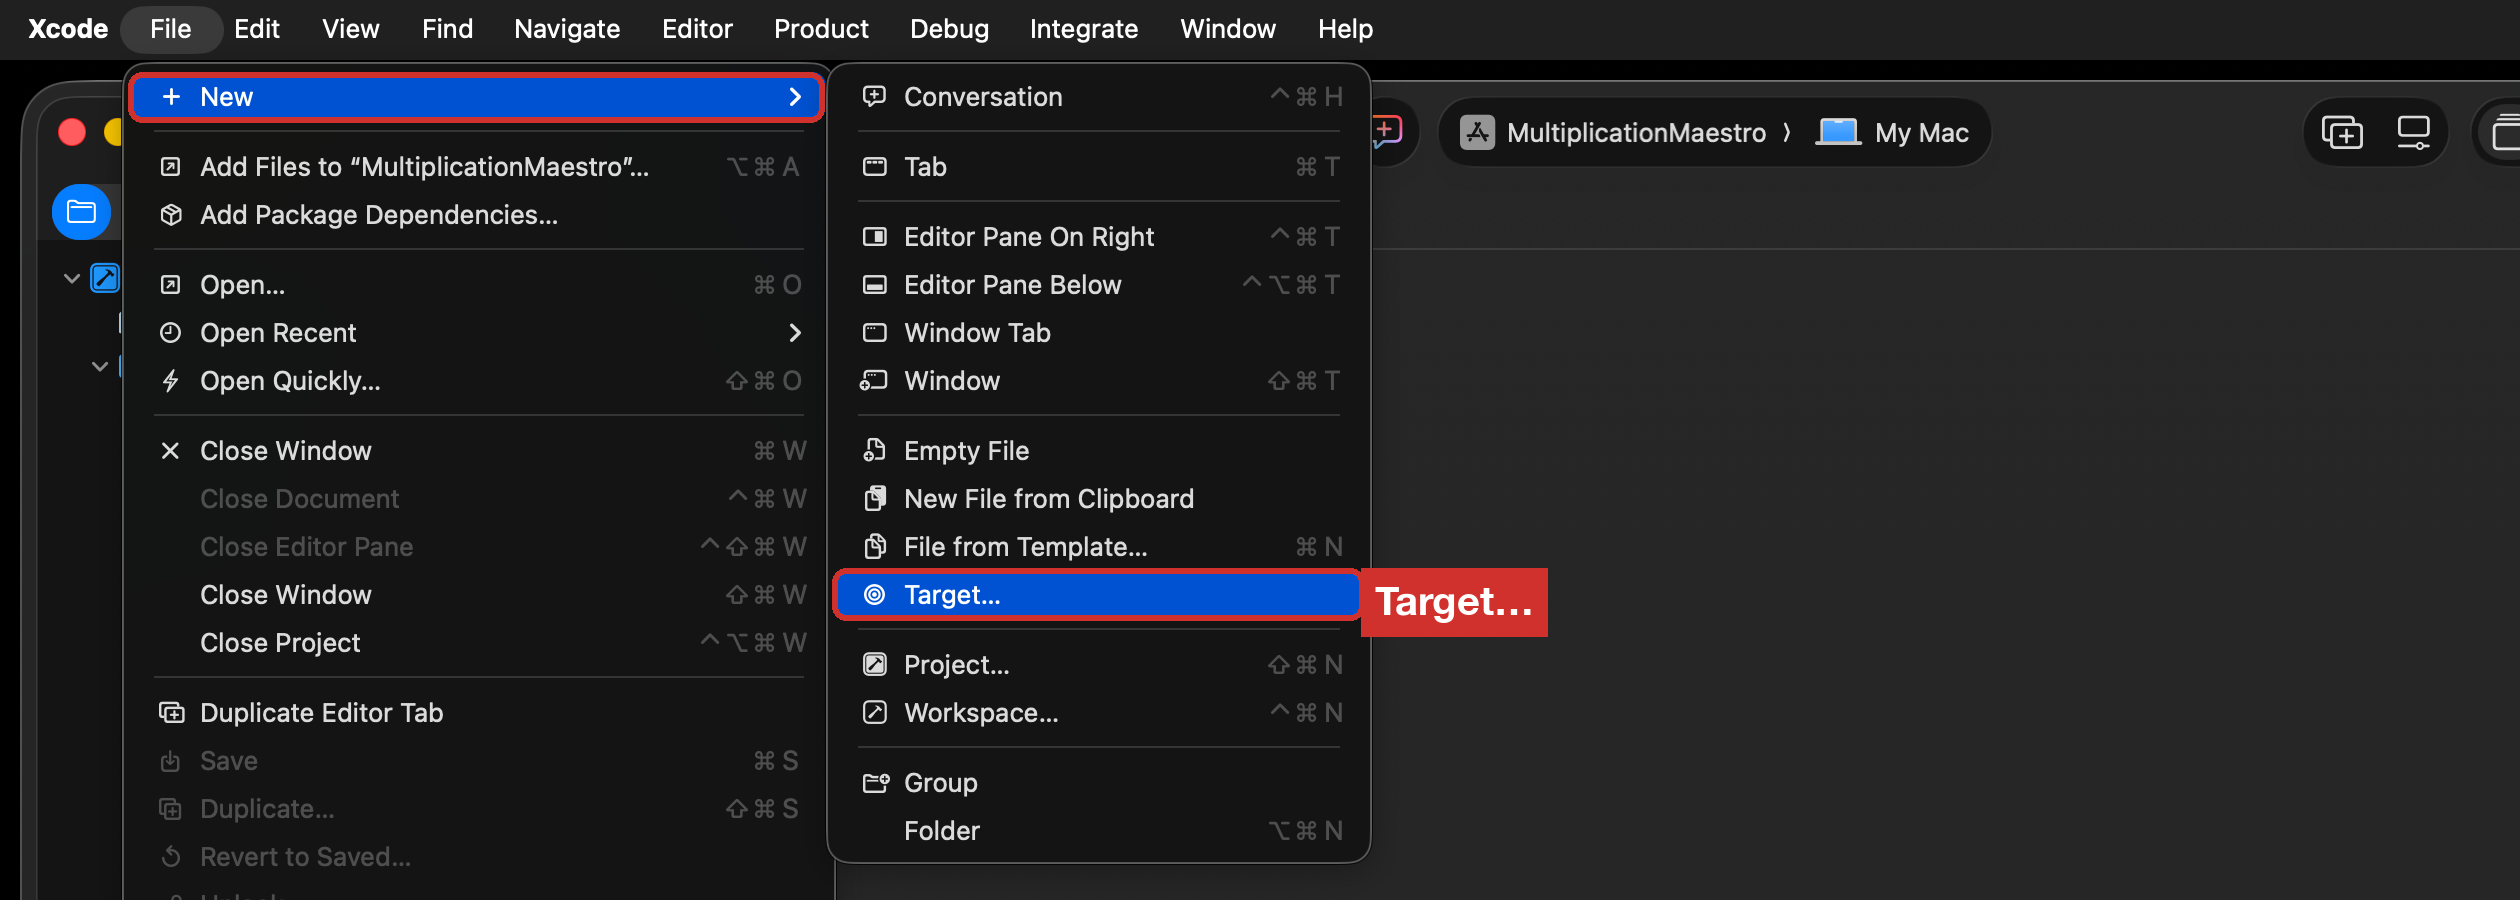
In Xcode, choose File > New > Target….
-
Make sure macOS is chosen at the top. Type
unitin the filter box. Choose Unit Testing Bundle, then press Next.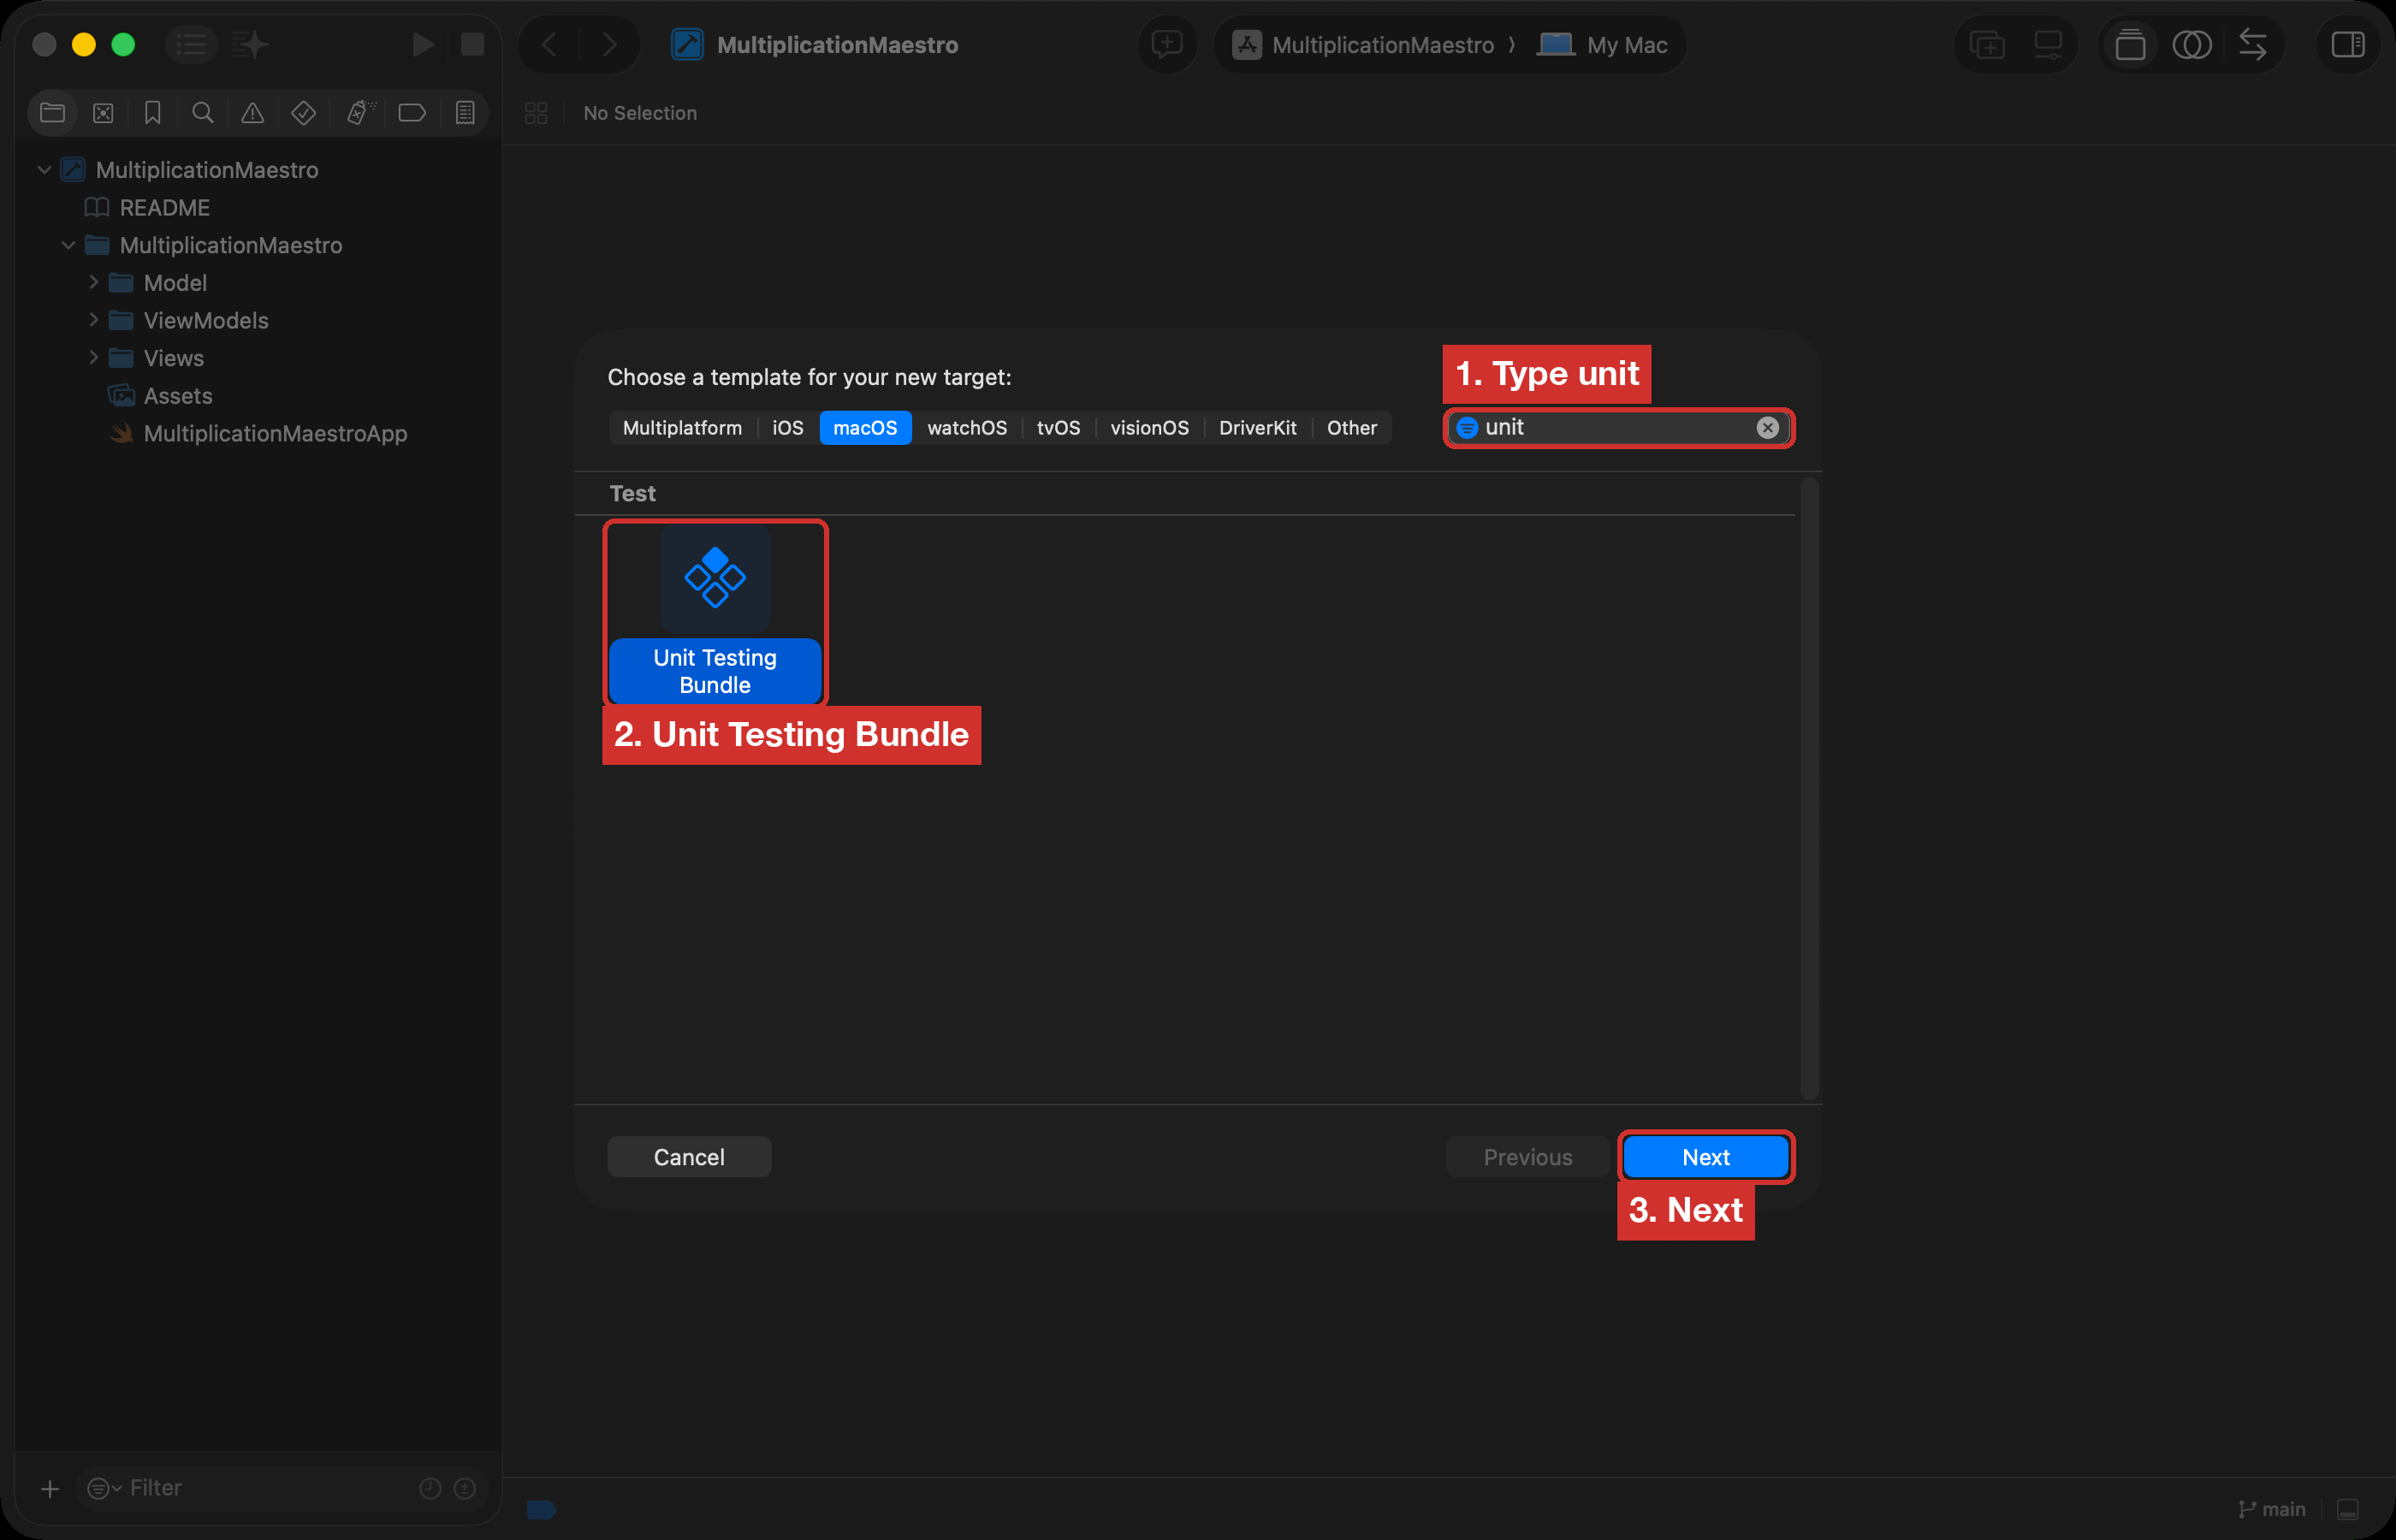
-
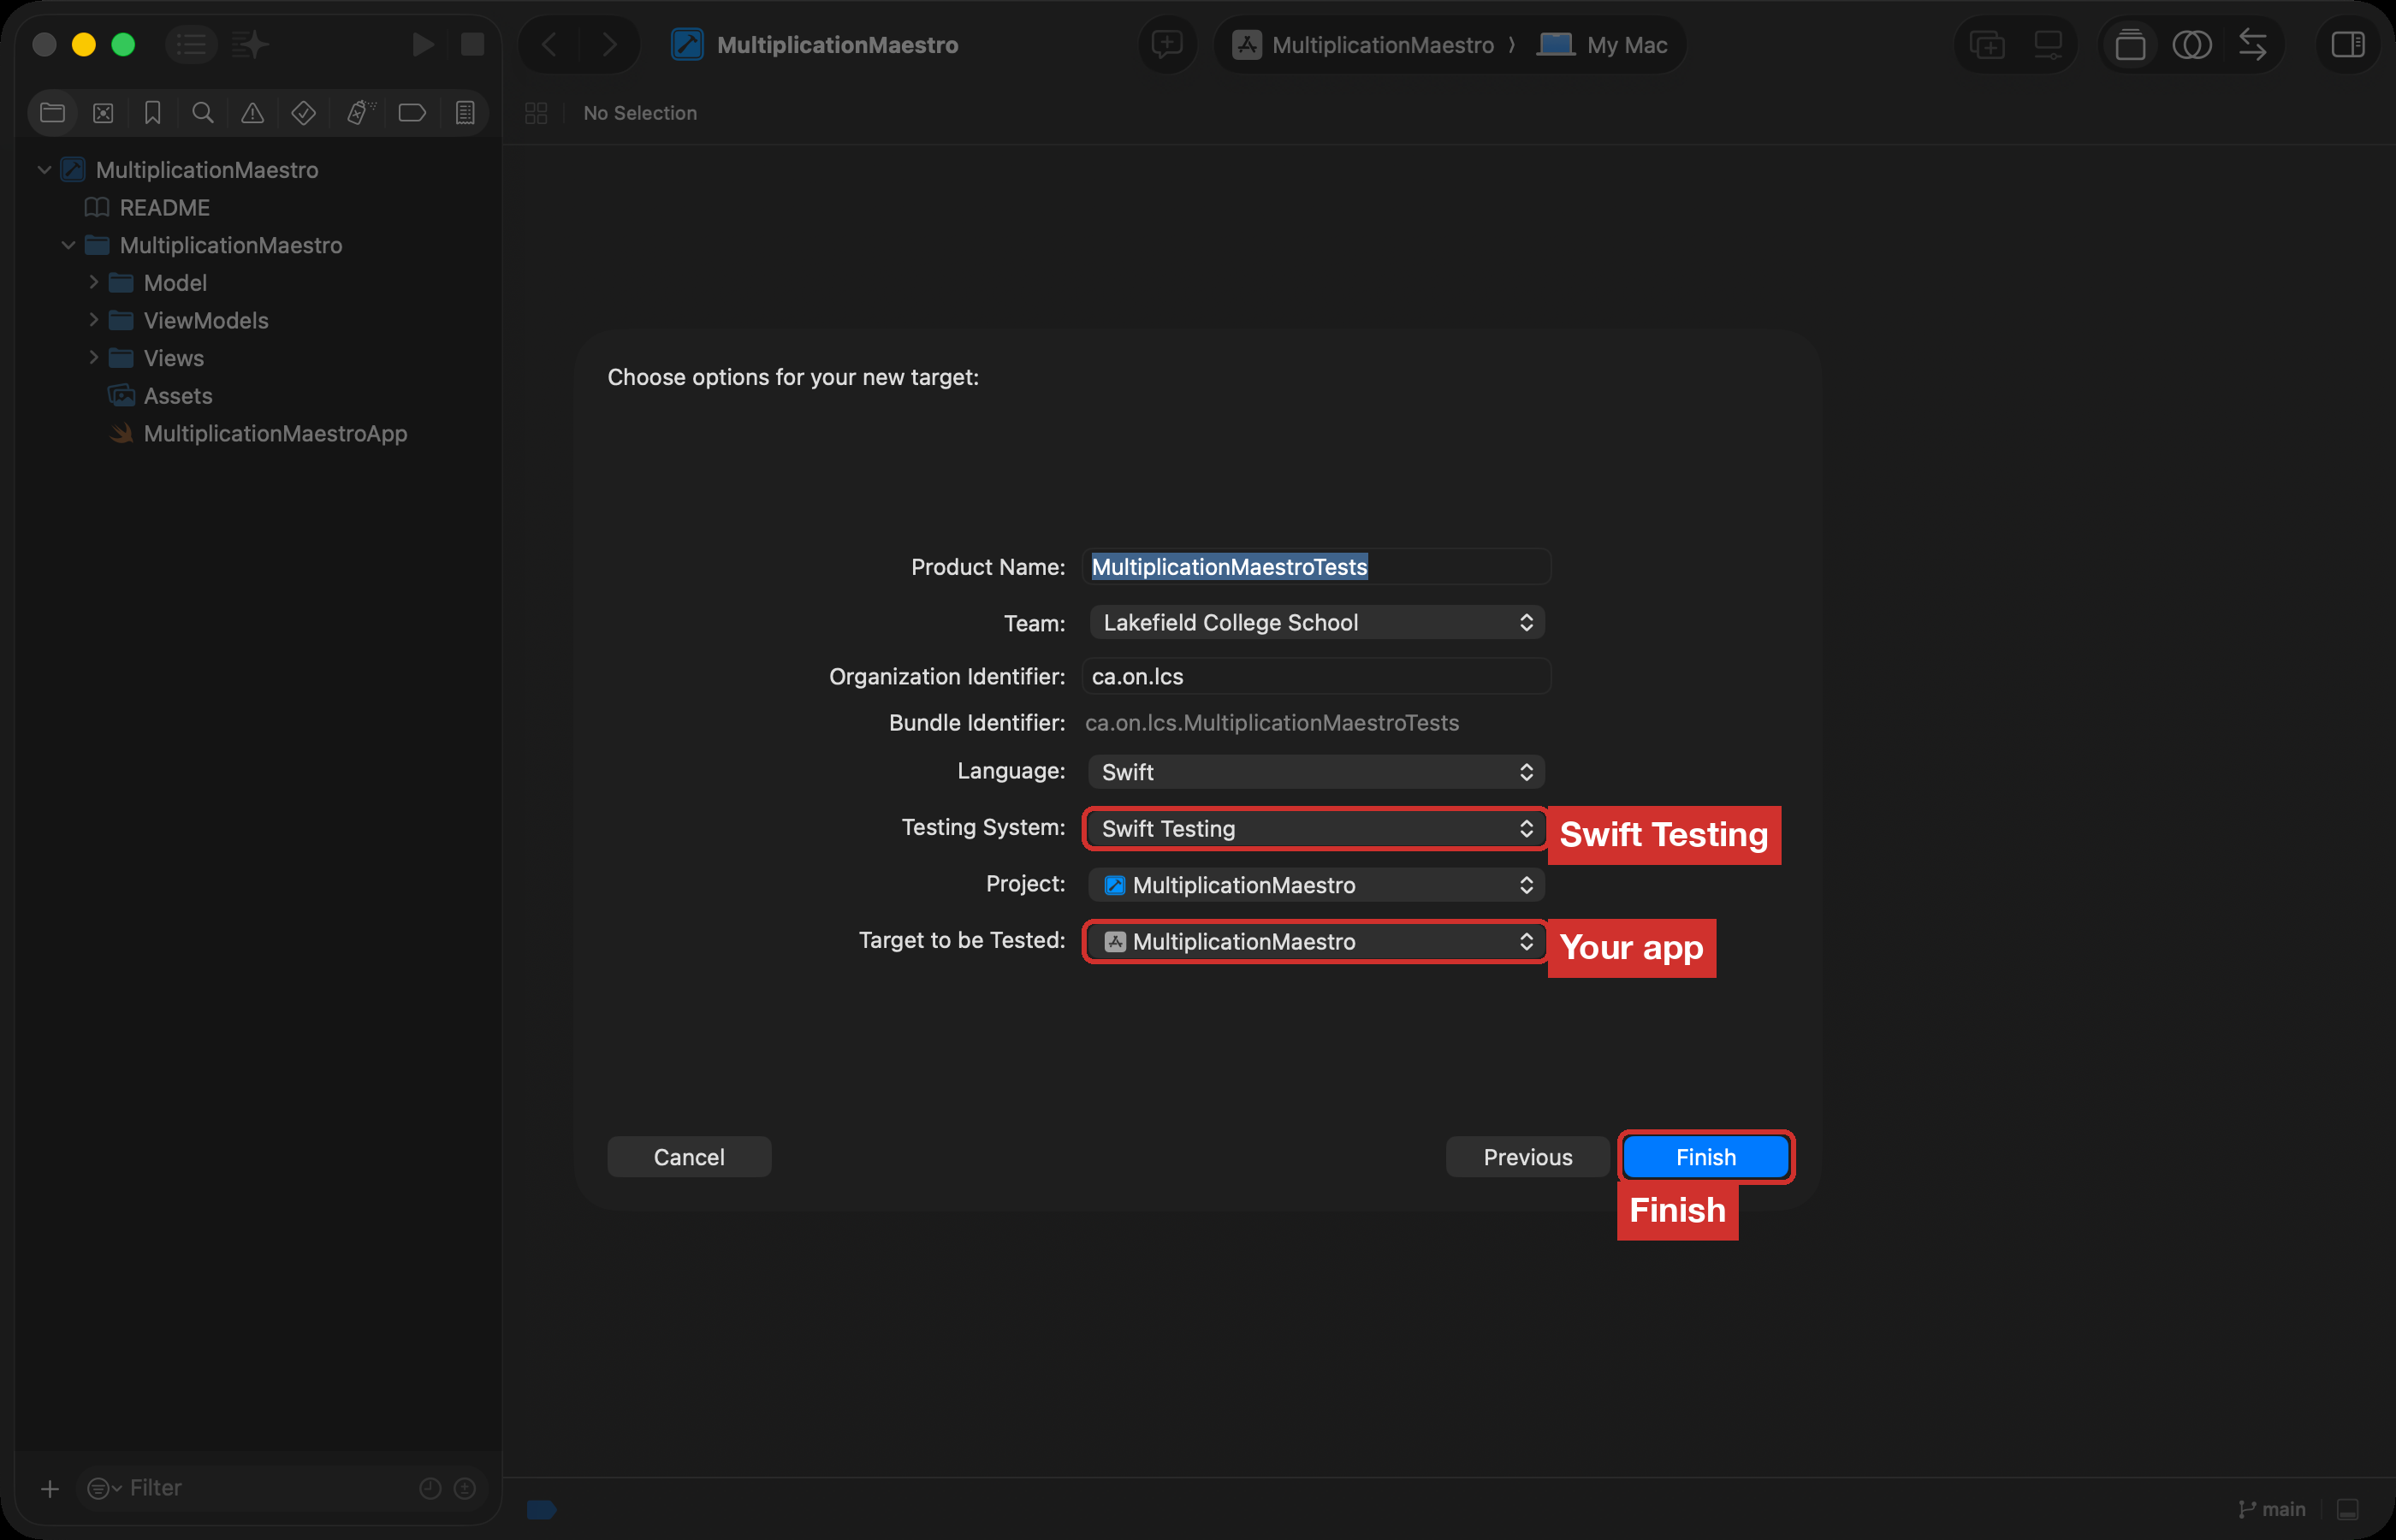
Check that Testing System is Swift Testing, and Target to be Tested is MultiplicationMaestro. Leave everything else as it is. Press Finish.
-
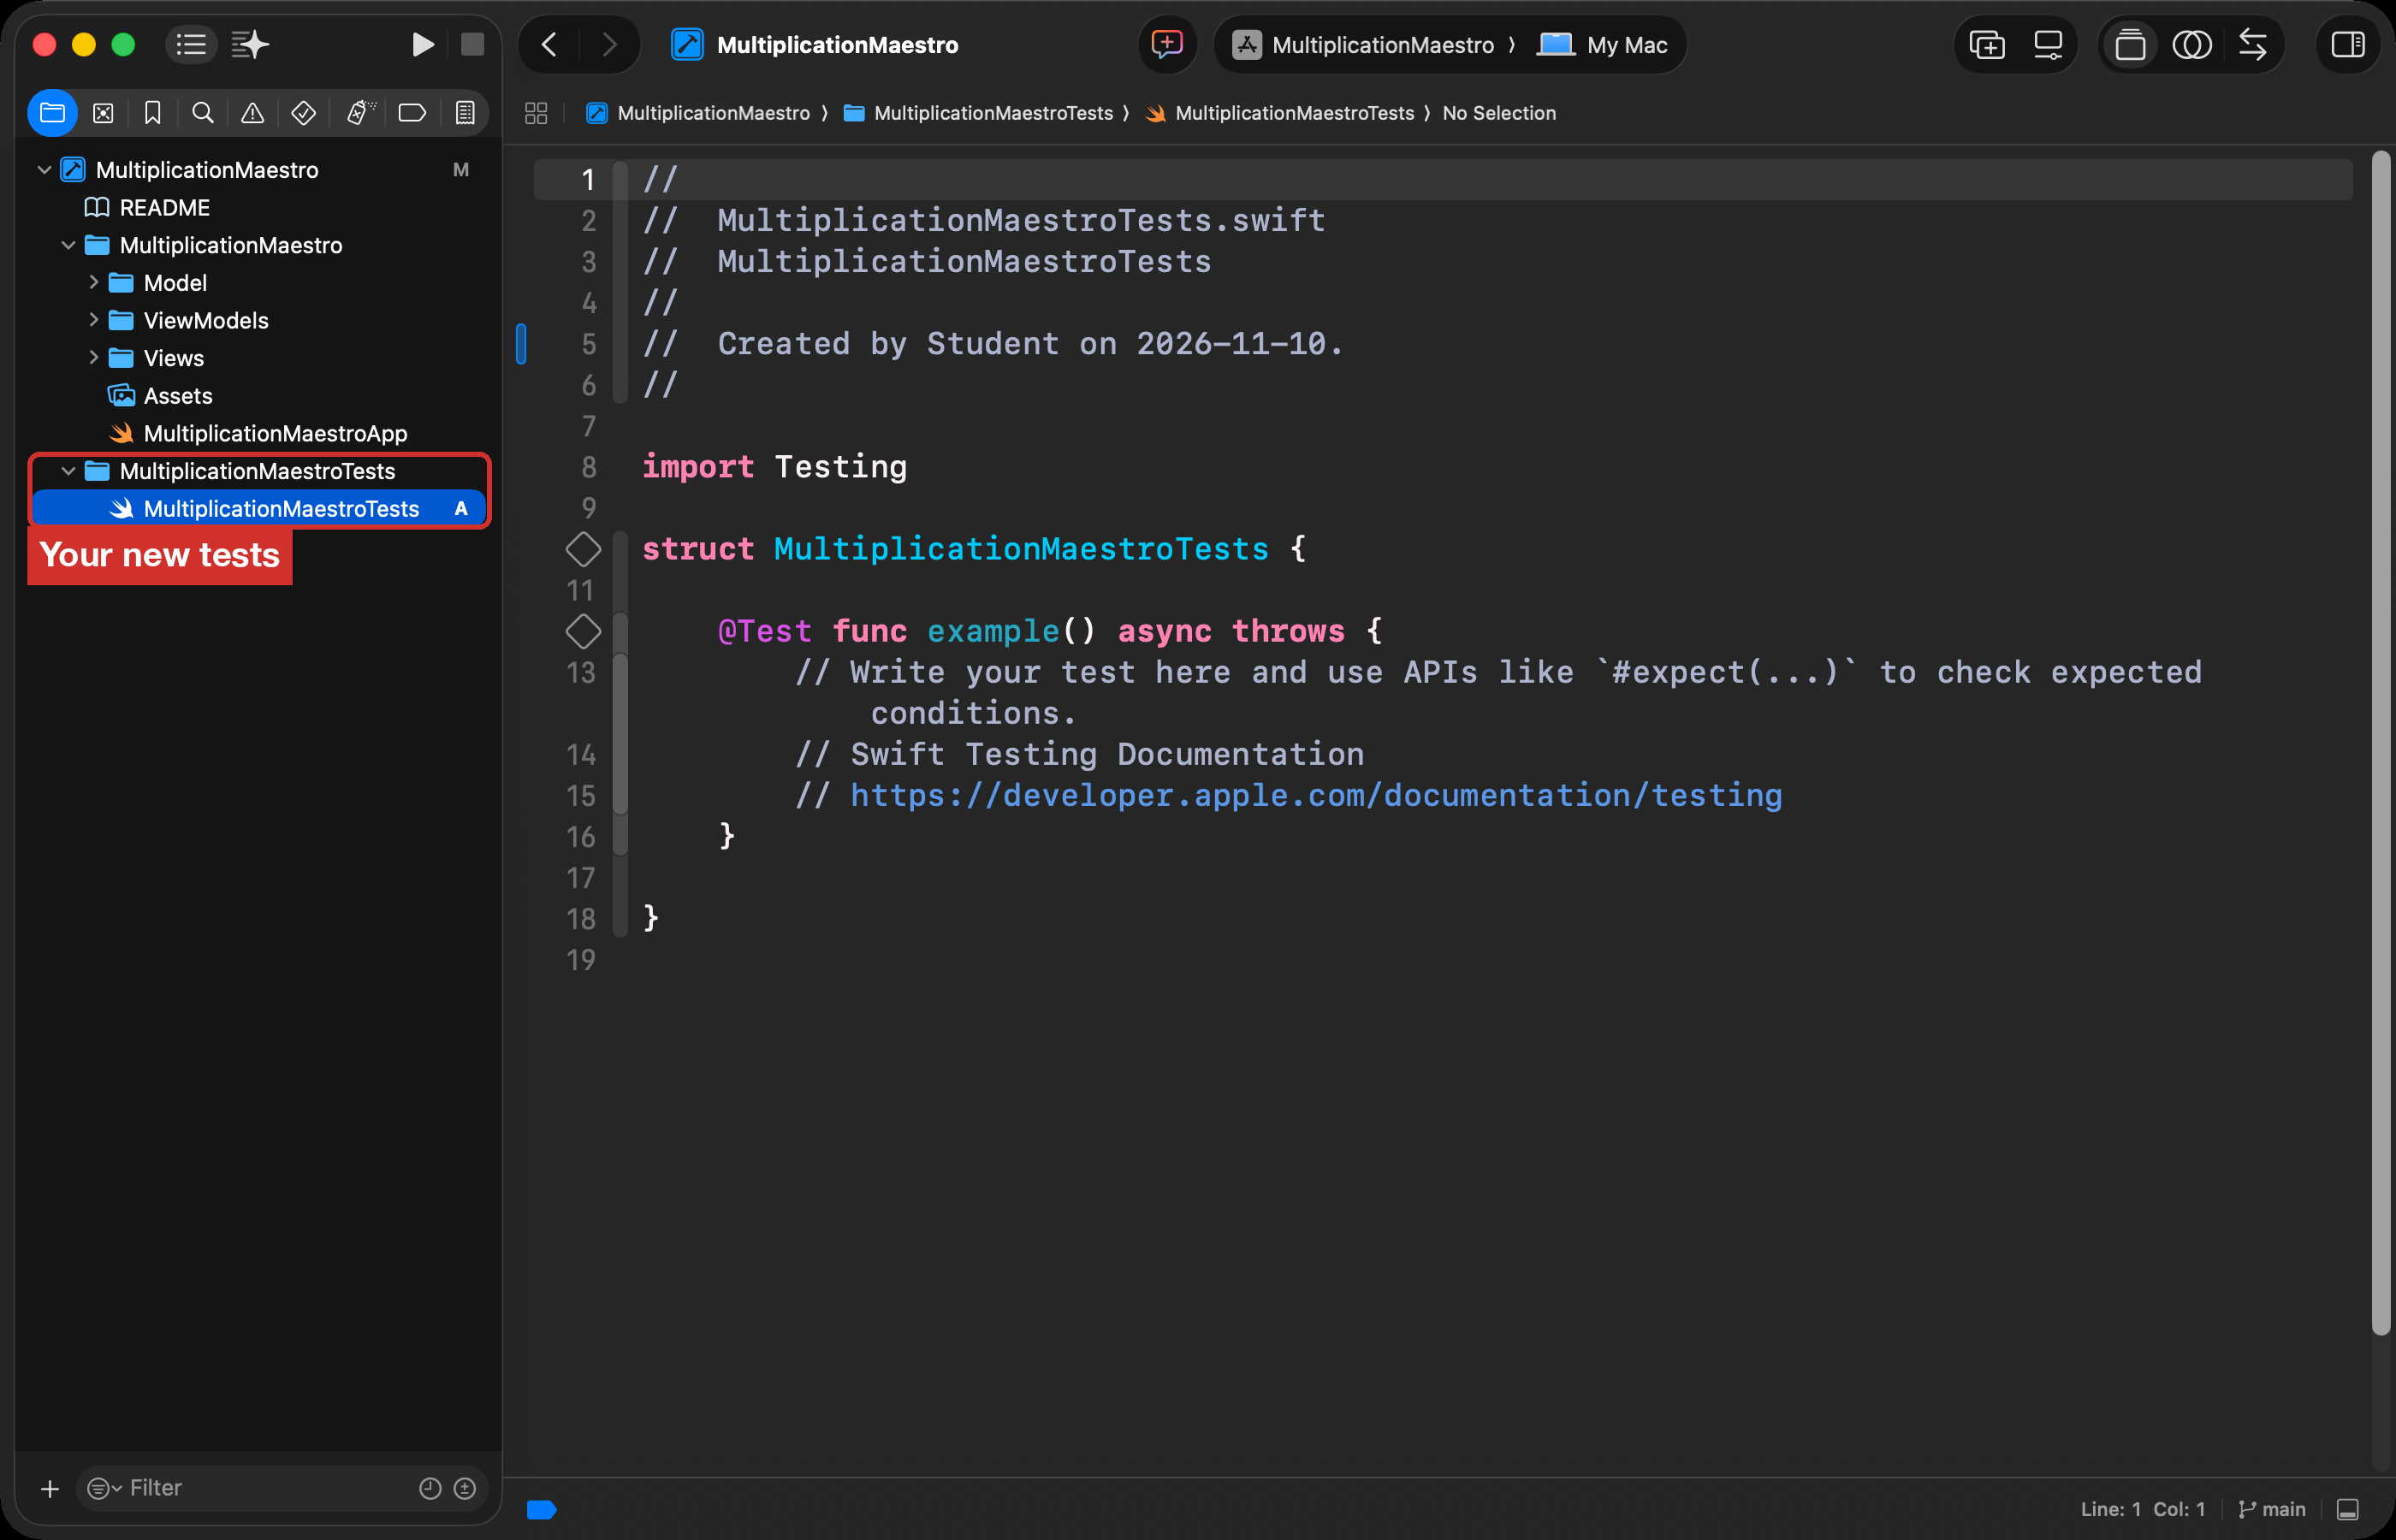
Check that a new folder, MultiplicationMaestroTests, is in the Project navigator. It holds one file with an empty example test.
Now commit and push the test target:
-
Open the Changes navigator and click Uncommitted Changes.
-
Copy this commit message into the message box, then press Stage All:
Added a test target, ready to test new code.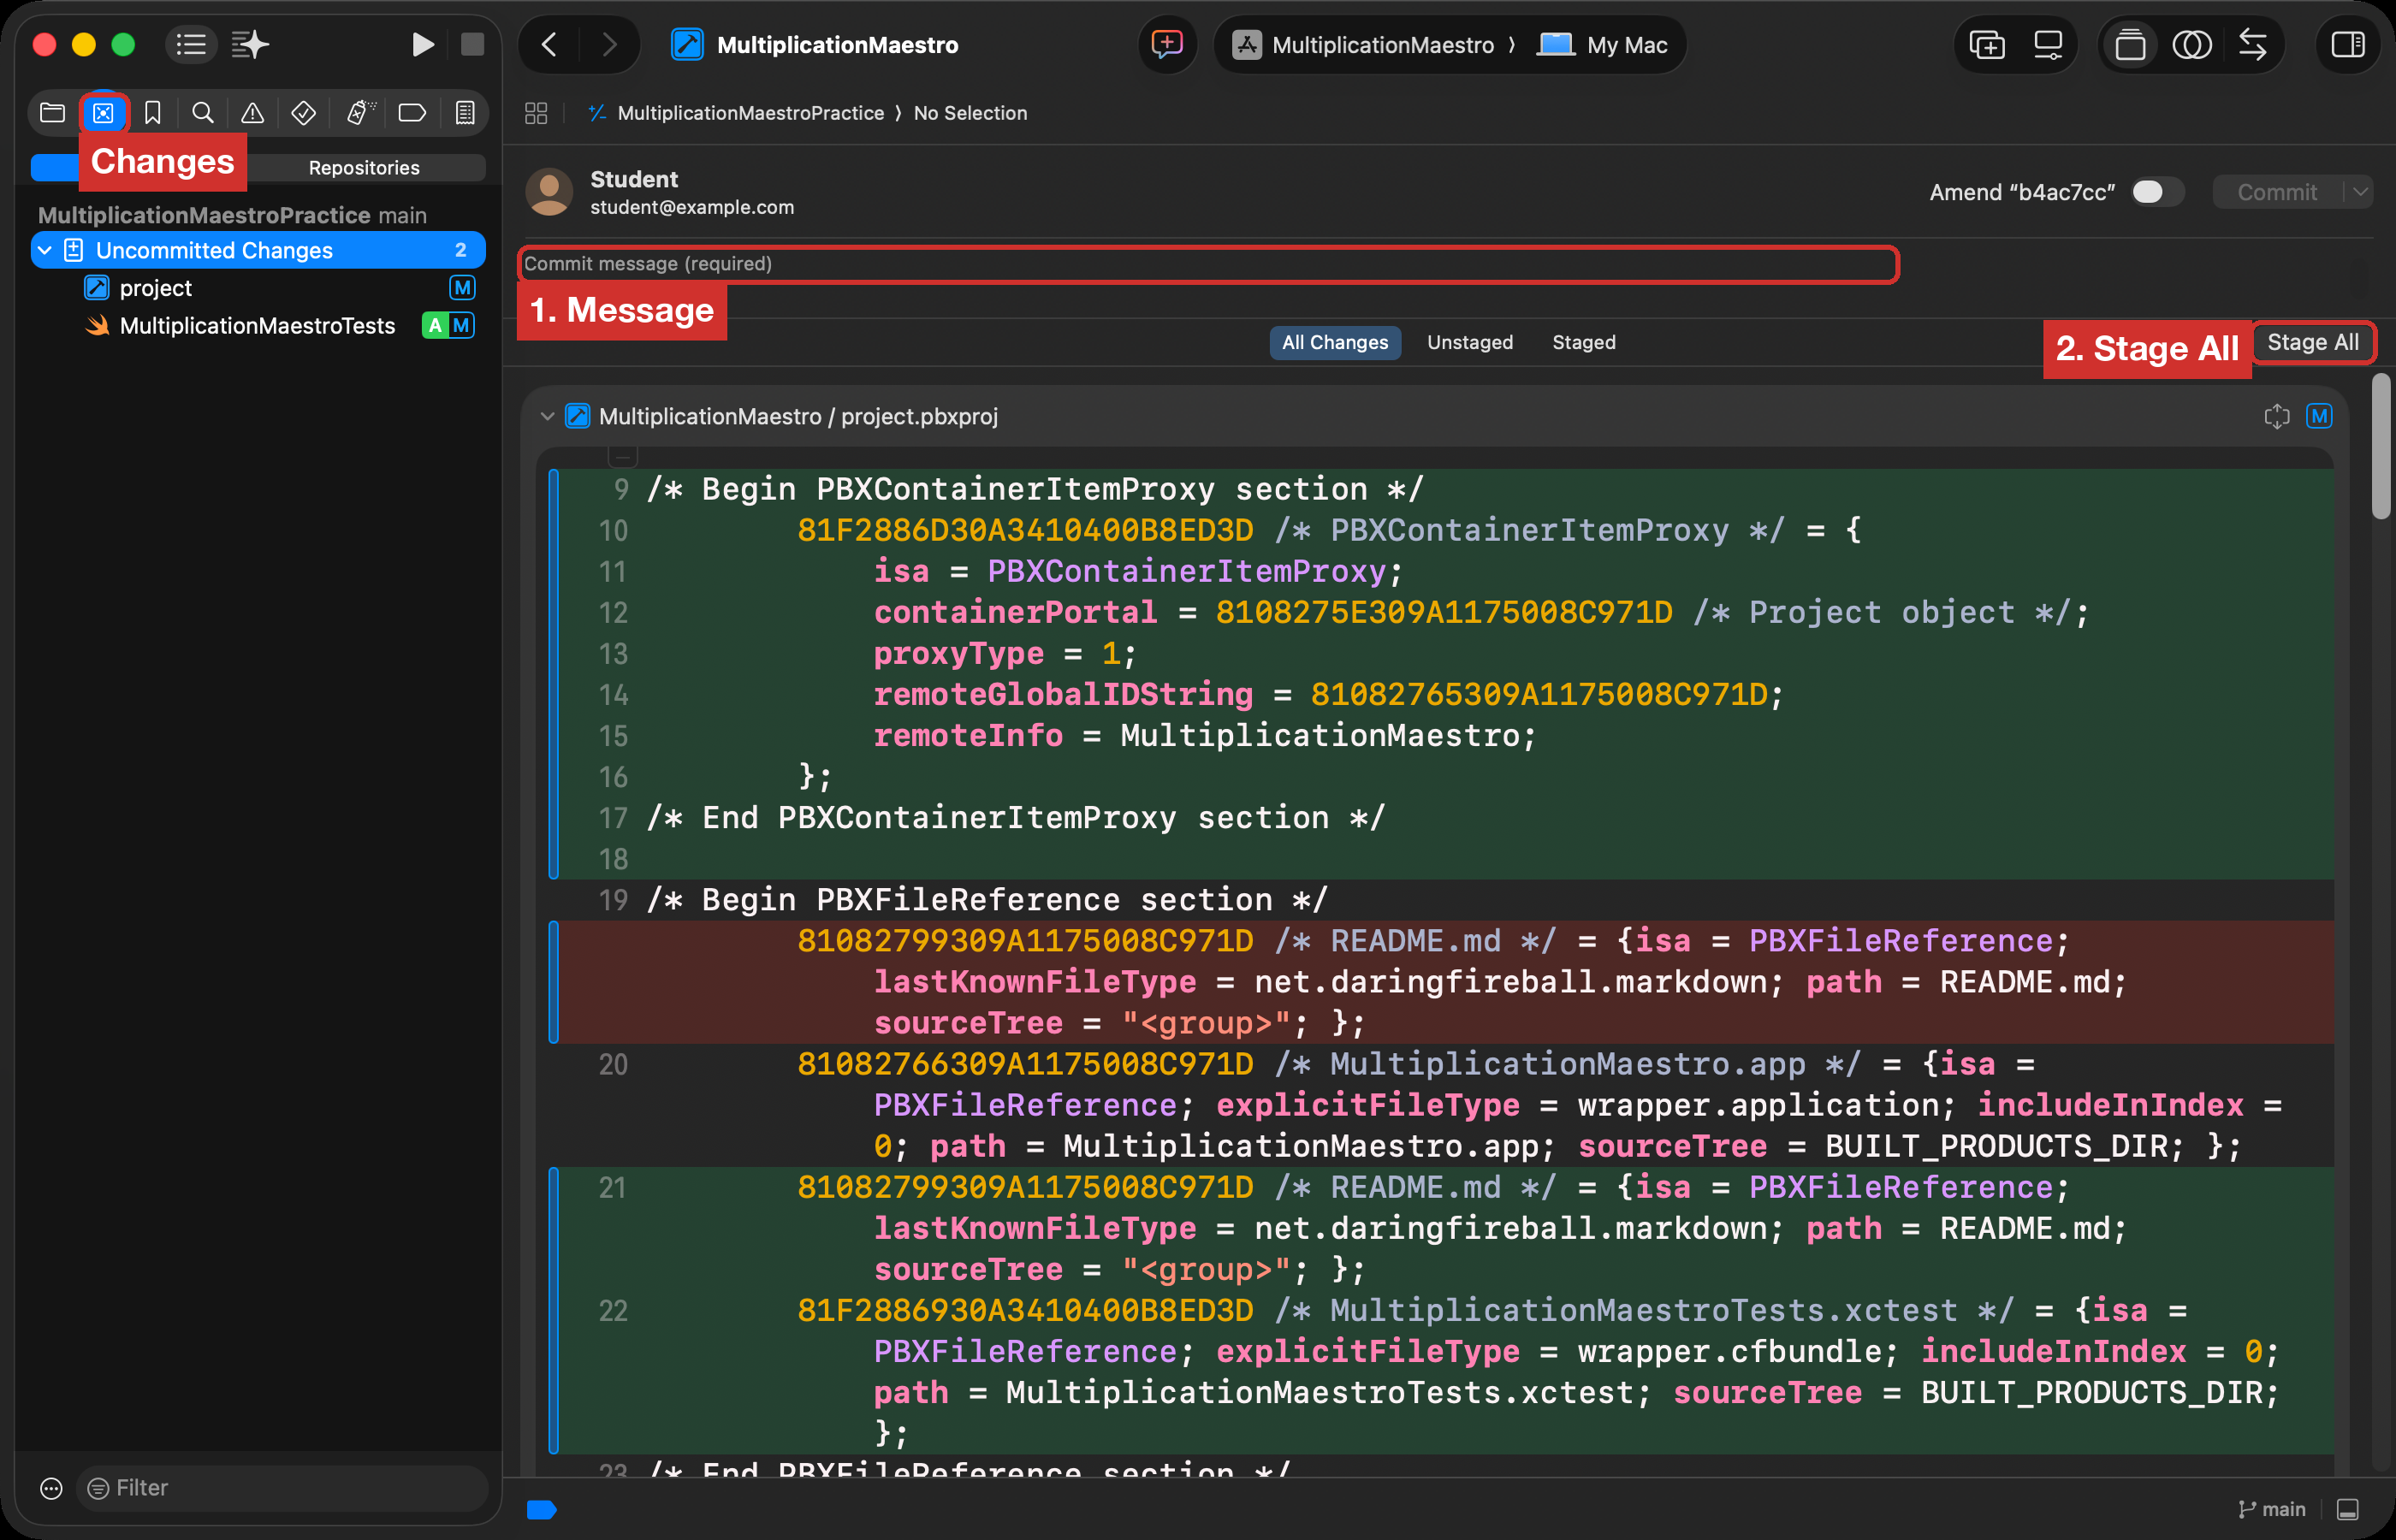
-
Press the arrow beside Commit, and choose Commit and Push….
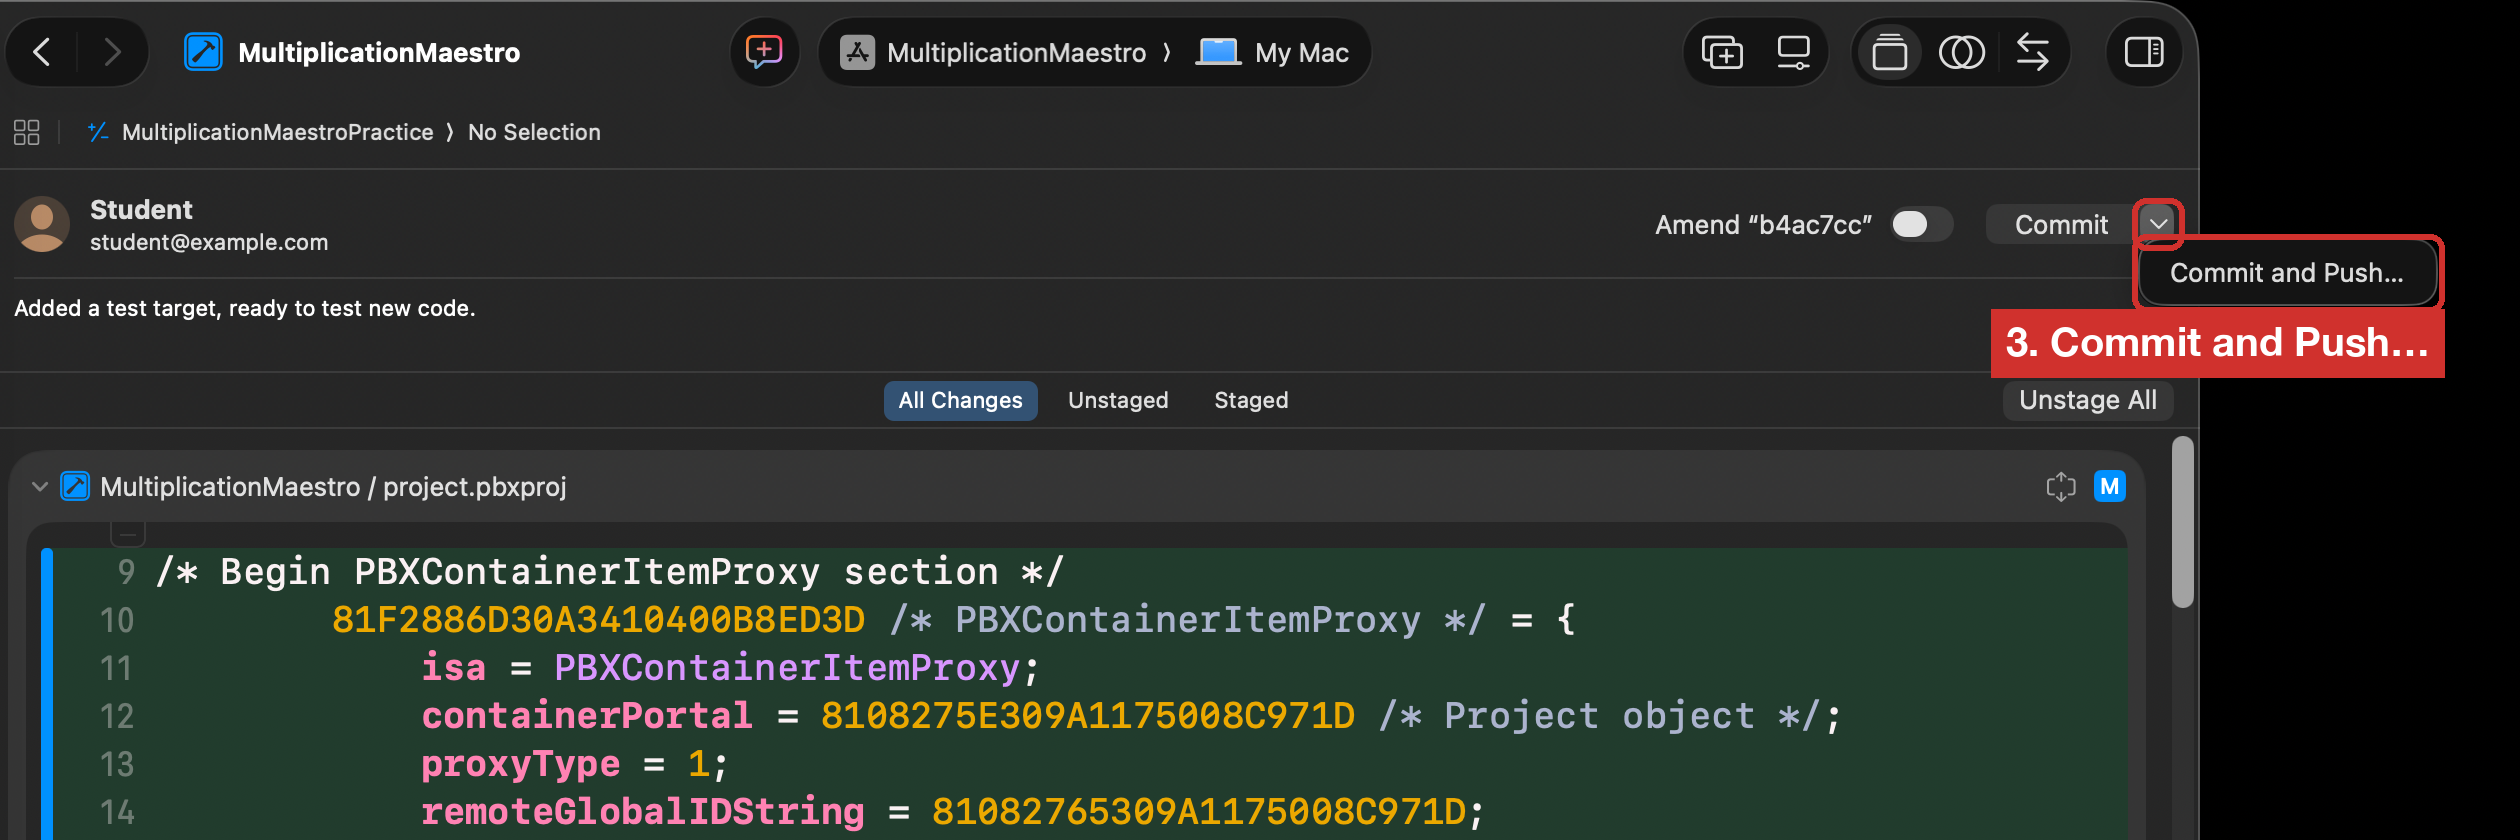
-
Press Push.
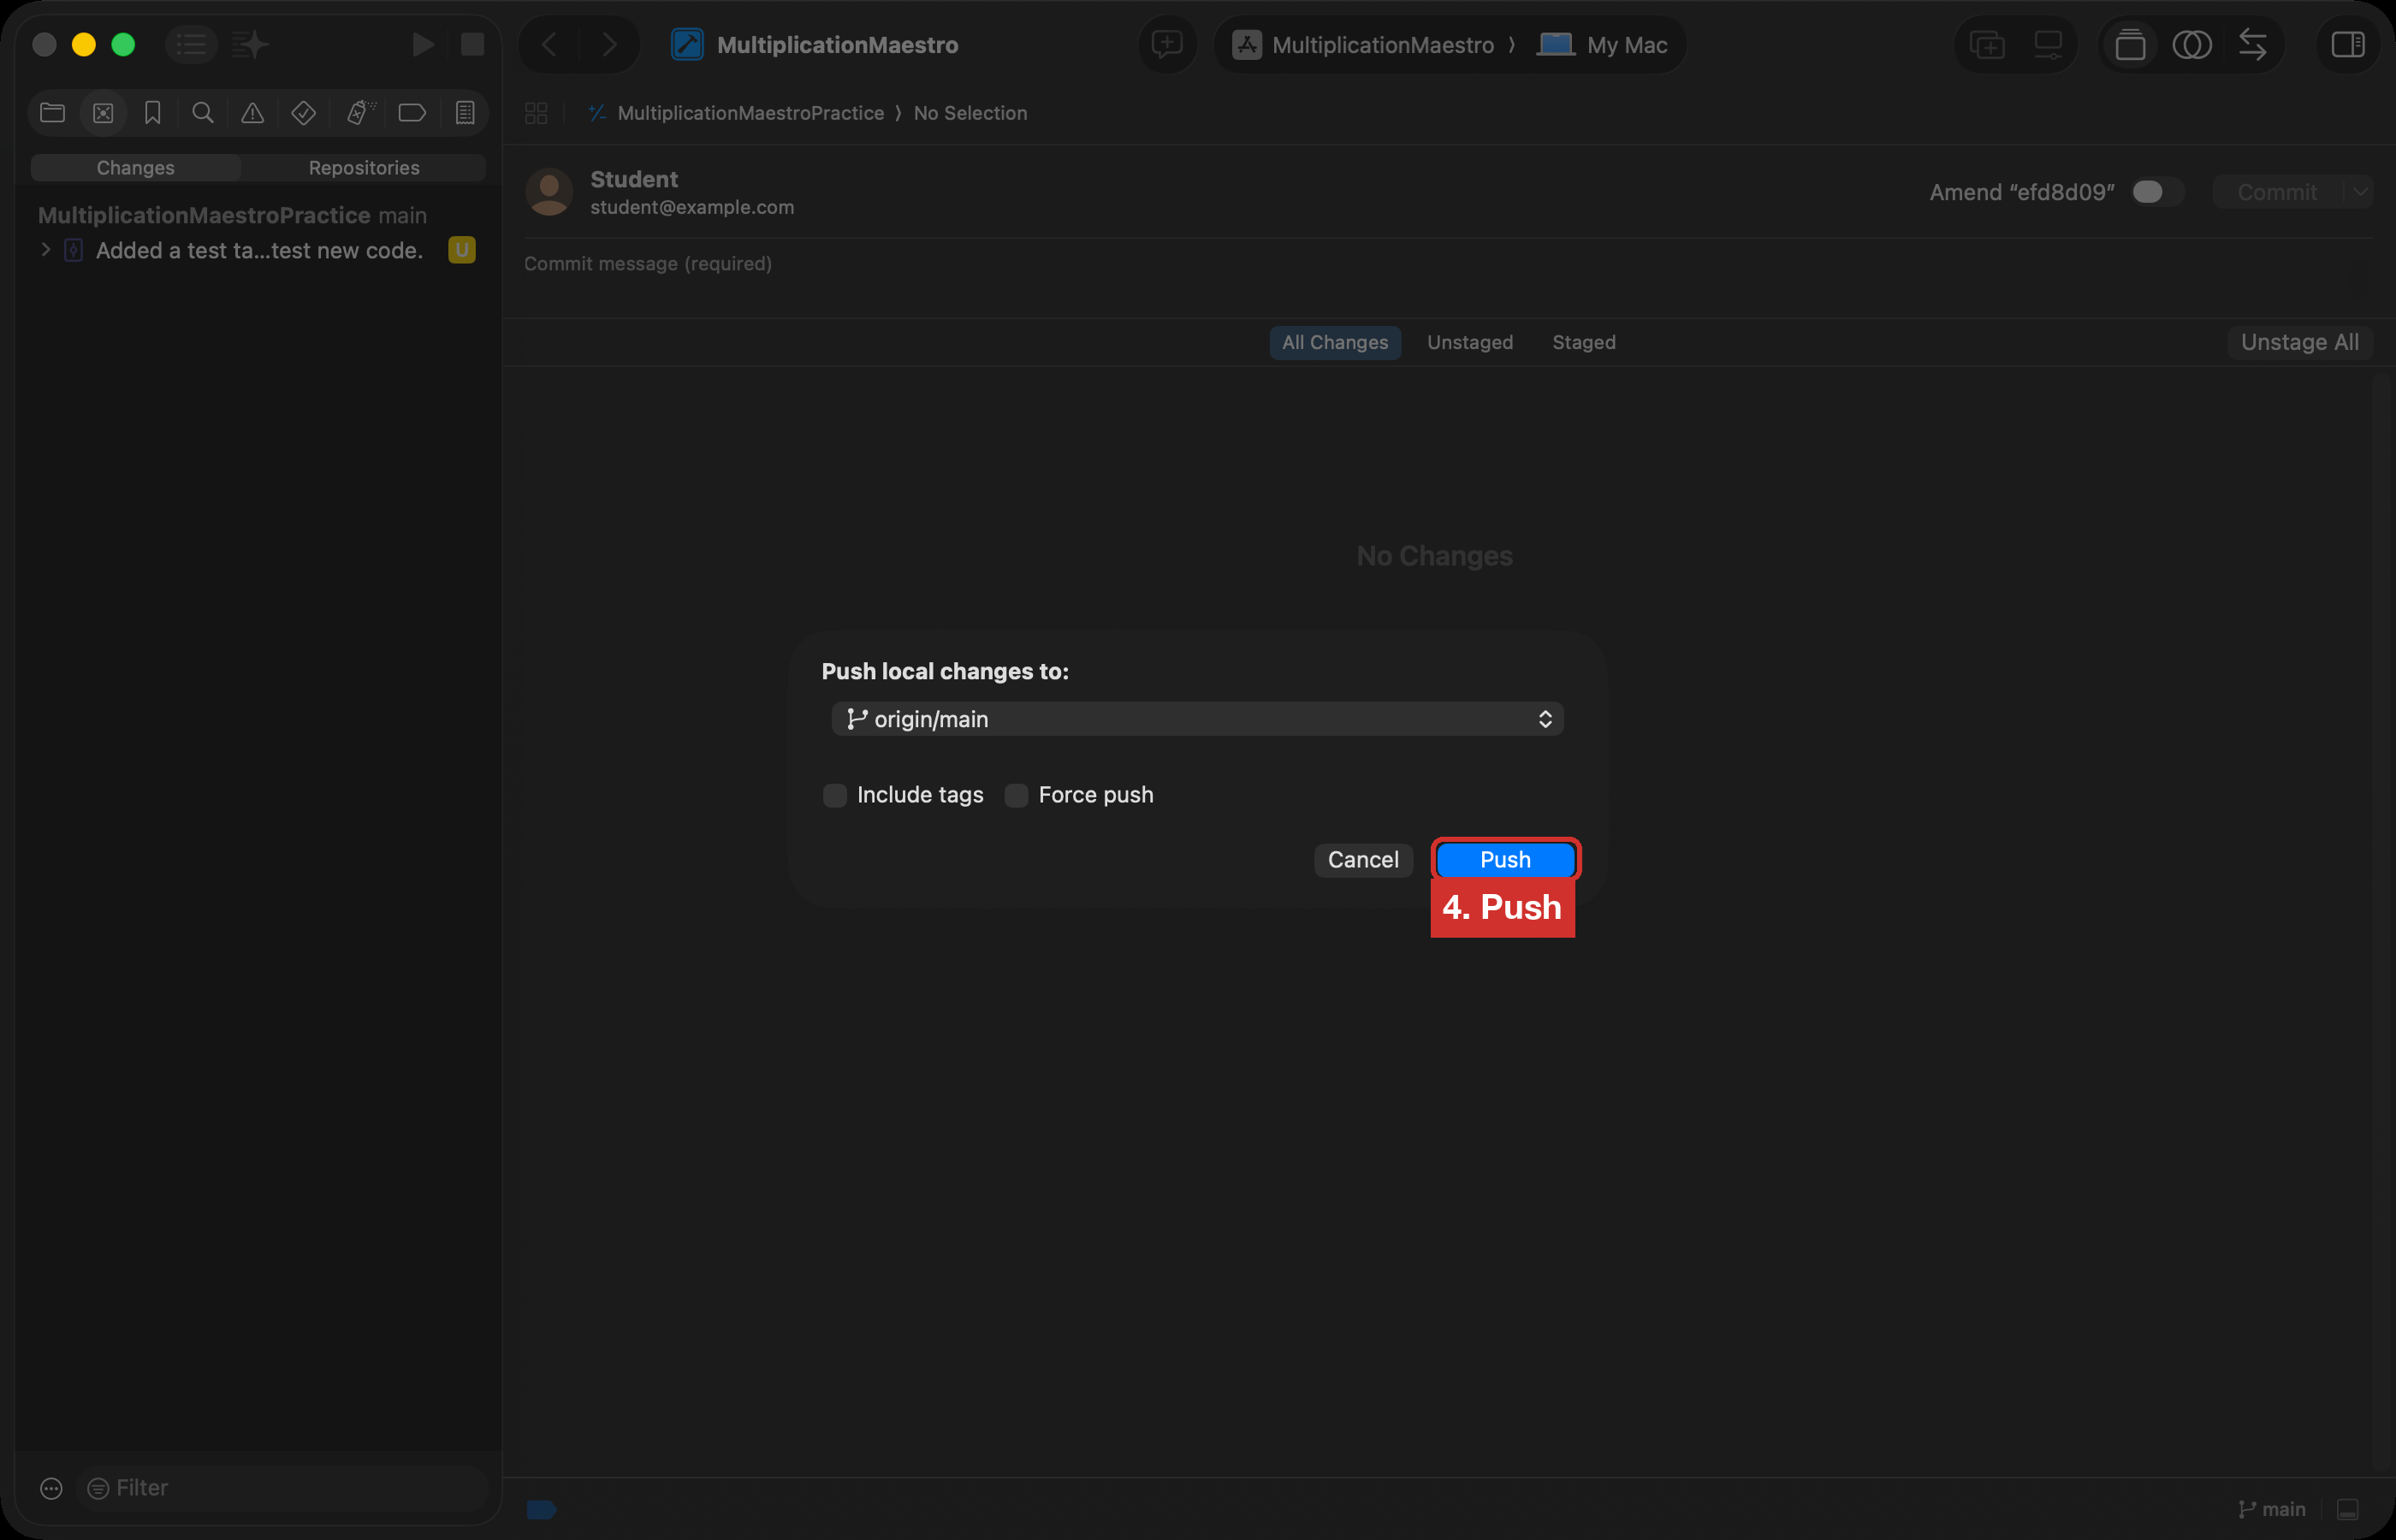
Your work is now saved on GitHub. If the agent breaks something, you can go back to this commit.
2. Start Copilot in your project
-
Open Terminal.
-
Type
cdand a space. Do not press Return yet. -
In Finder, find the folder that holds
MultiplicationMaestro.xcodeproj. Drag that folder onto the Terminal window. Press Return. -
Type
git statusand press Return. It should say nothing to commit, working tree clean. If it does not, commit and push in Xcode. Then typegit statusagain. If it lists only files insideMultiplicationMaestro.xcodeproj, you can carry on.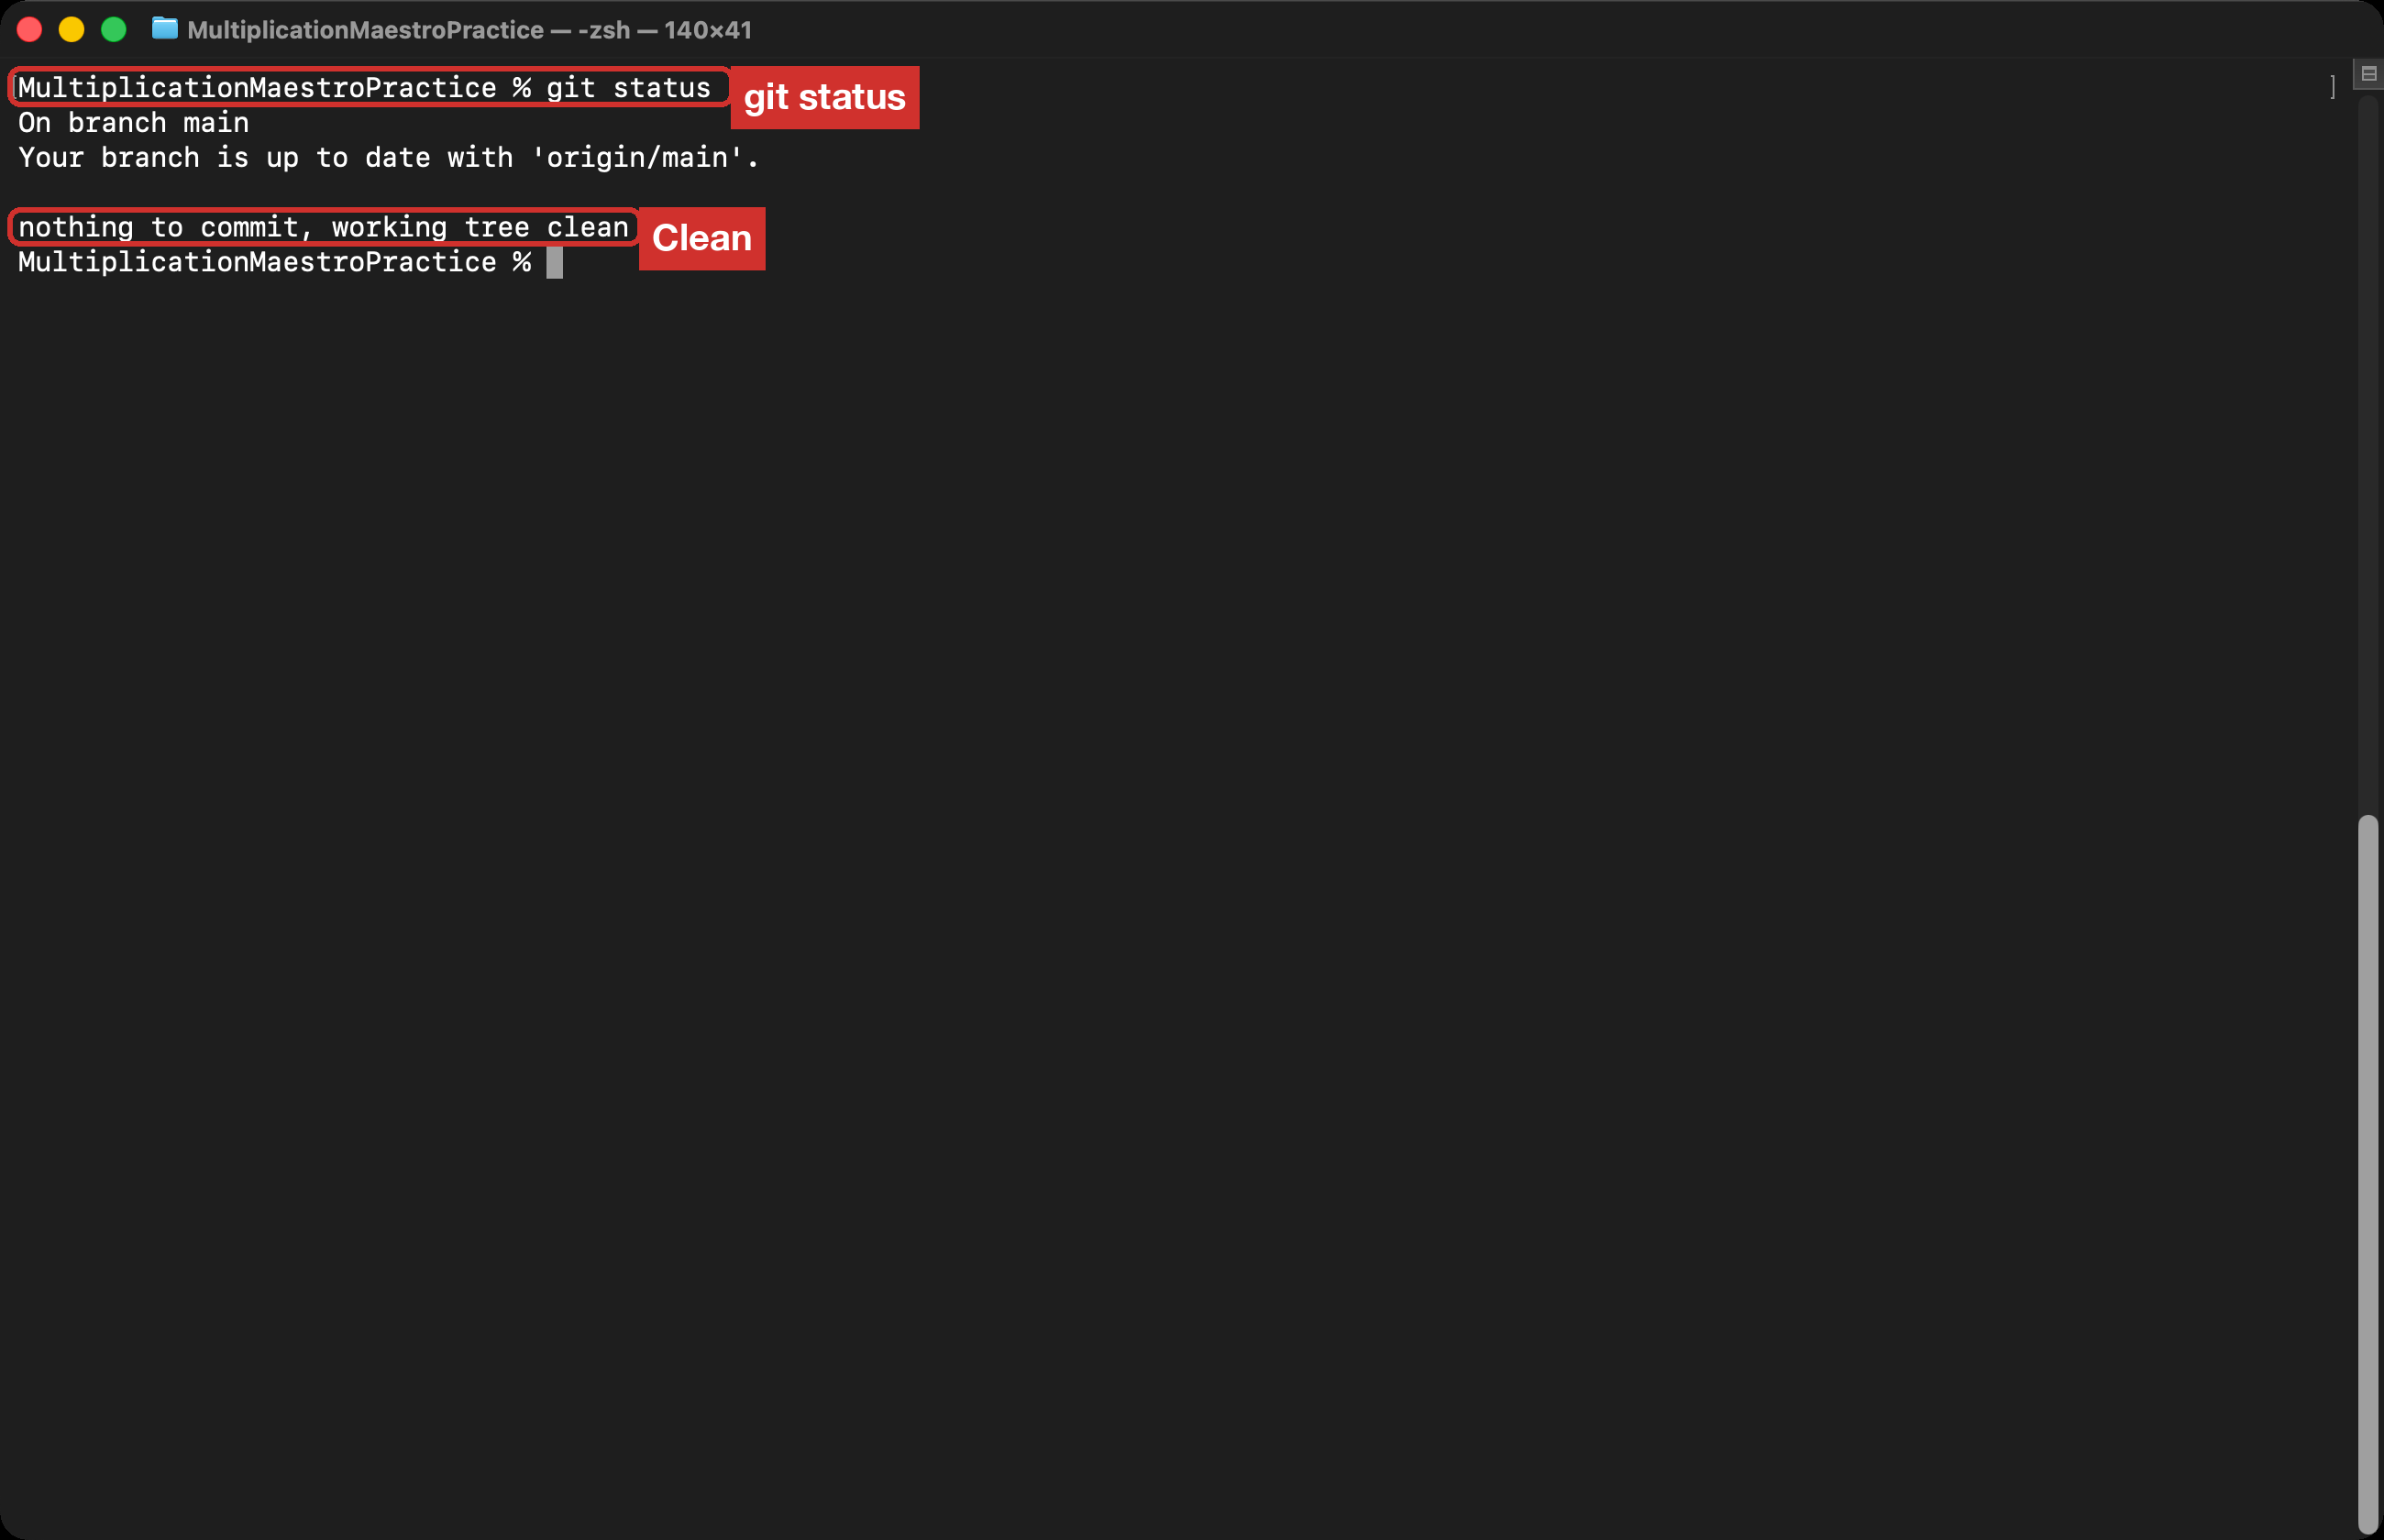
-
Type
copilotand press Return. -
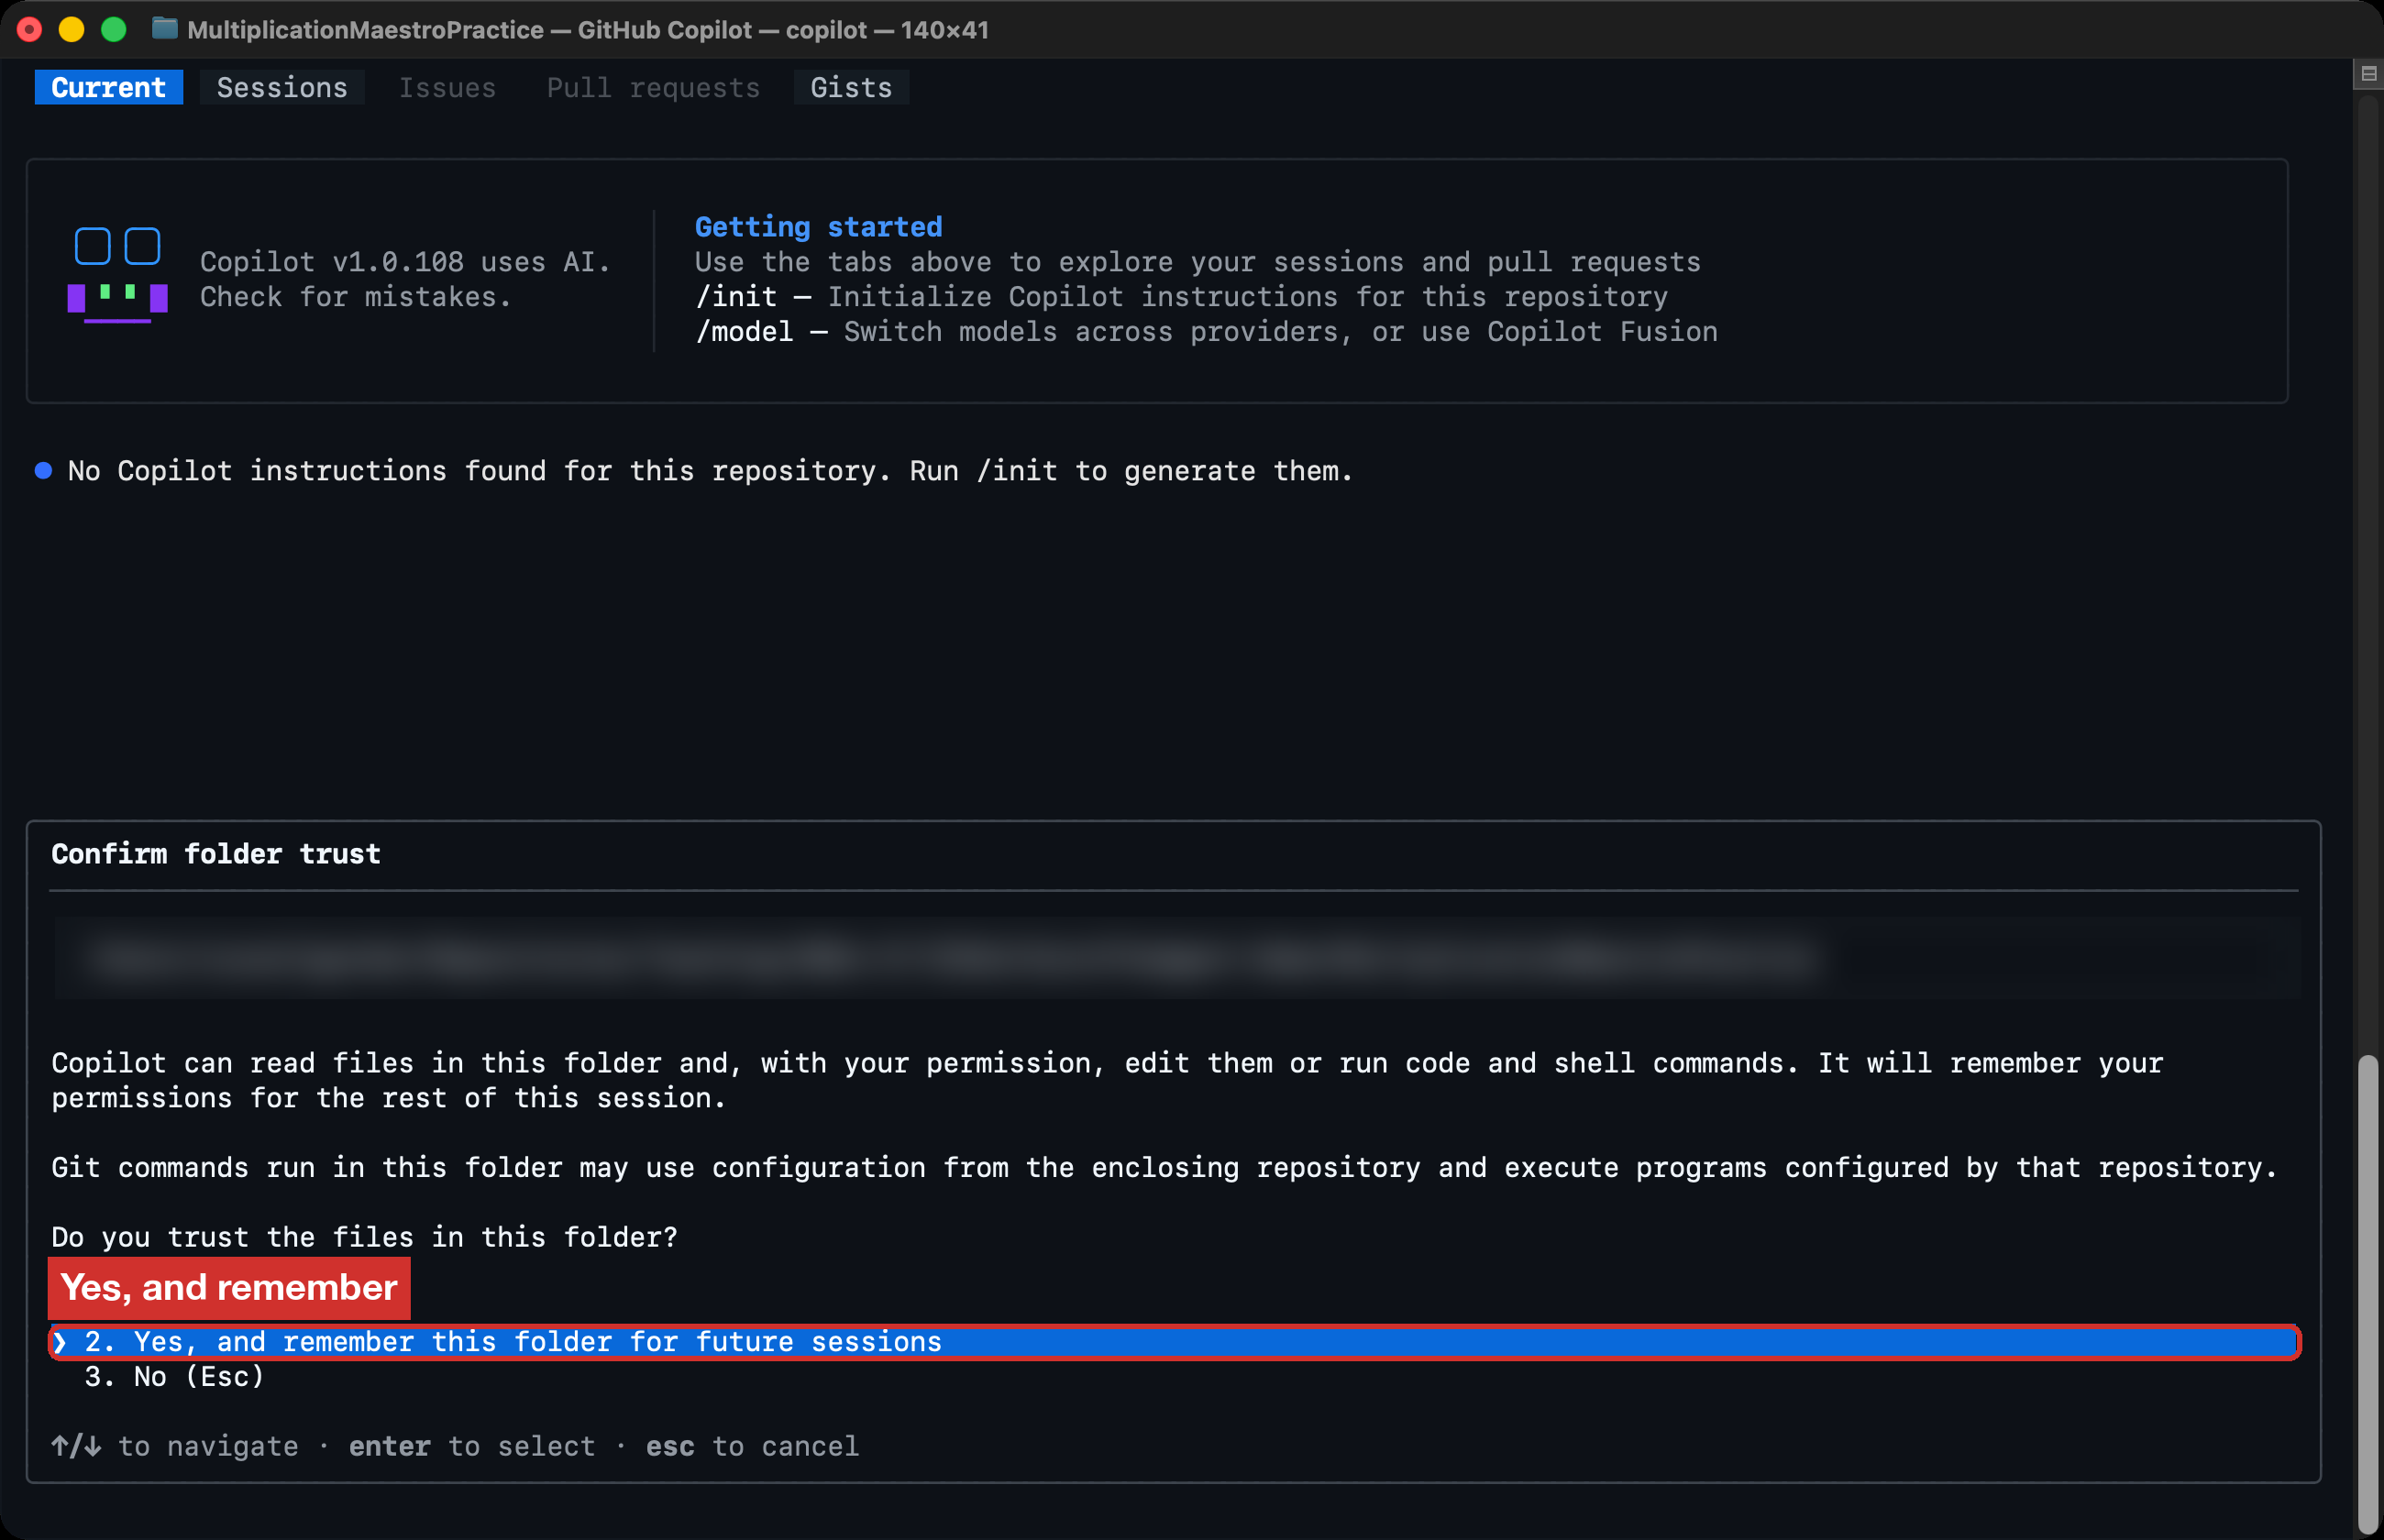
The first time, Copilot asks whether you trust this folder. It is your own project, so choose Yes, and remember this folder for future sessions.
3. Ask for a plan first
An agent that starts coding right away may build the wrong thing. Ask for a plan first, and read it.
Copilot's three modes
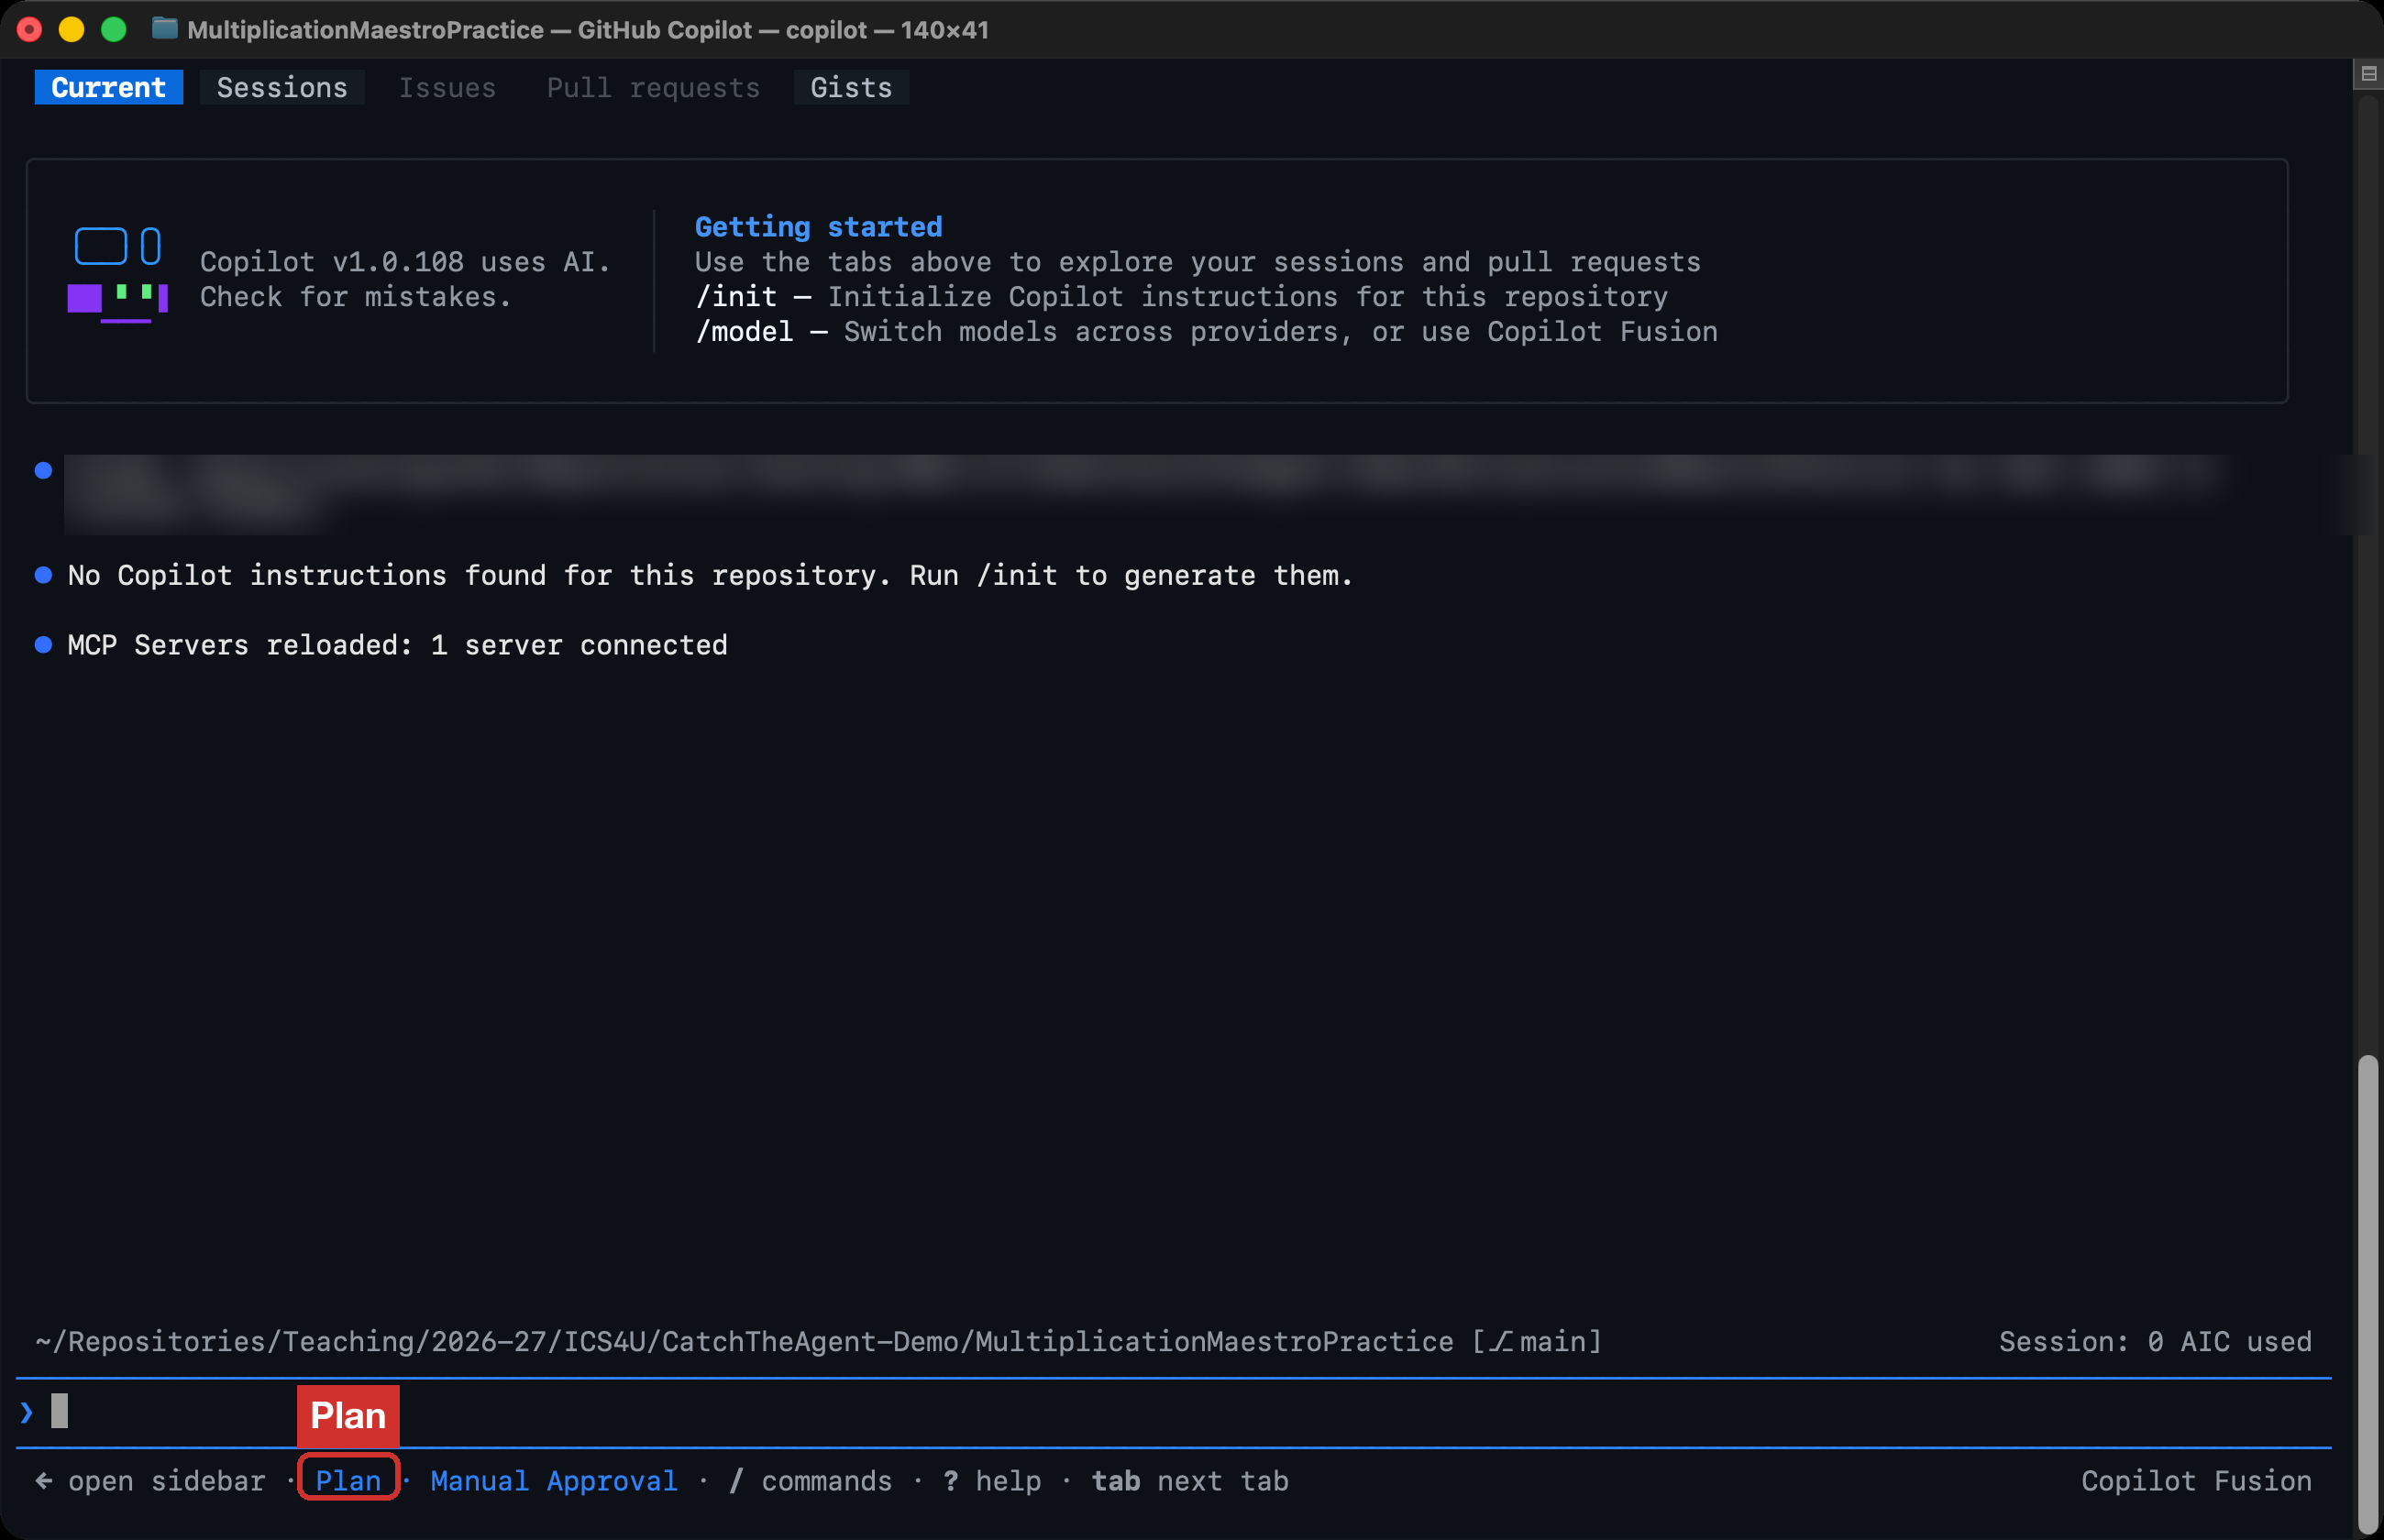
Press Shift-Tab to move from one mode to the next. The bar at the bottom of the window shows the mode you are in.
- Interactive: Copilot answers one message at a time. With Manual Approval, it asks before it changes a file or runs a command. A new session starts here.
- Plan: Copilot reads your files and writes a plan. It does not change your project until you accept the plan.
- Autopilot: Copilot works through the task without waiting for you to approve each step.
Press Shift-Tab again to go back to Interactive.
-
Press Shift-Tab until the bar at the bottom says Plan. In Plan mode, Copilot reads your files and writes a plan. It does not change your project until you accept the plan.
-
Copy this prompt, paste it into Copilot, and press Return:
Add a function to QuizViewModel called longestStreak(). It returns the longest run of correct answers in a row in the results list. Also write unit tests for it with Swift Testing, in the MultiplicationMaestroTests target. Test an empty list, all correct, all wrong, and a streak at the very end of the list. Use a for-in loop, not map, filter, or reduce. Tell me which files you will change.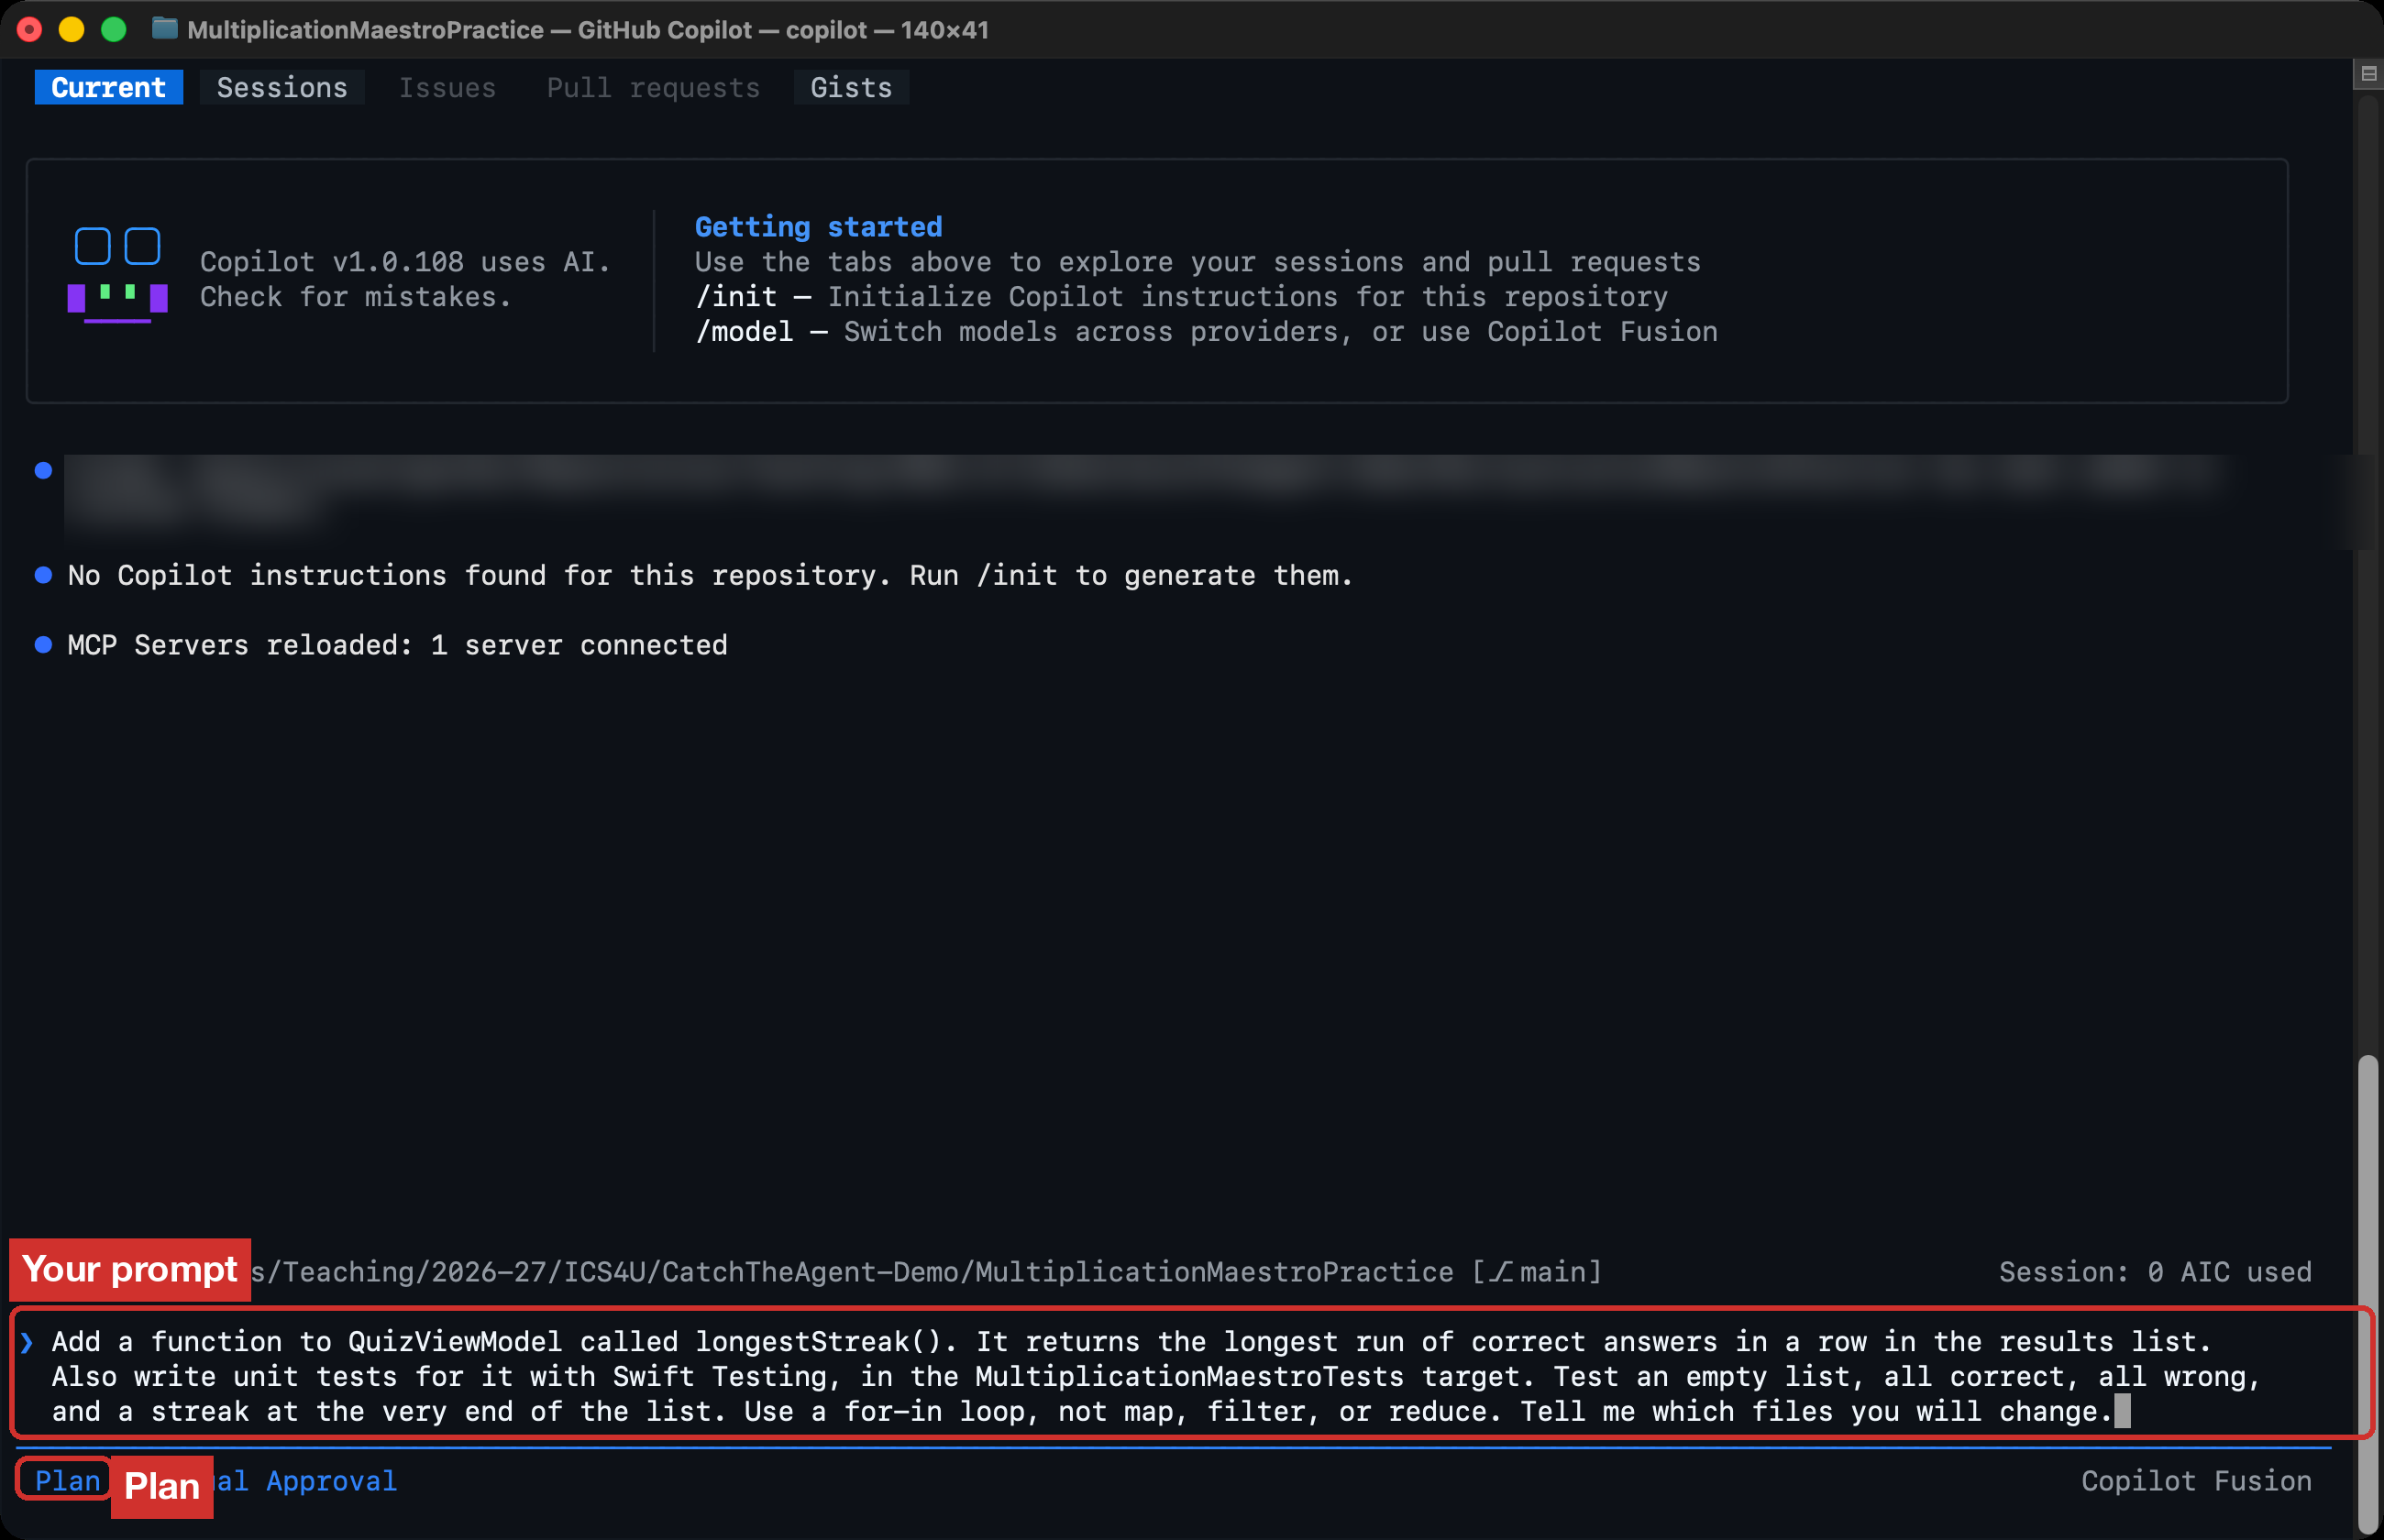
-
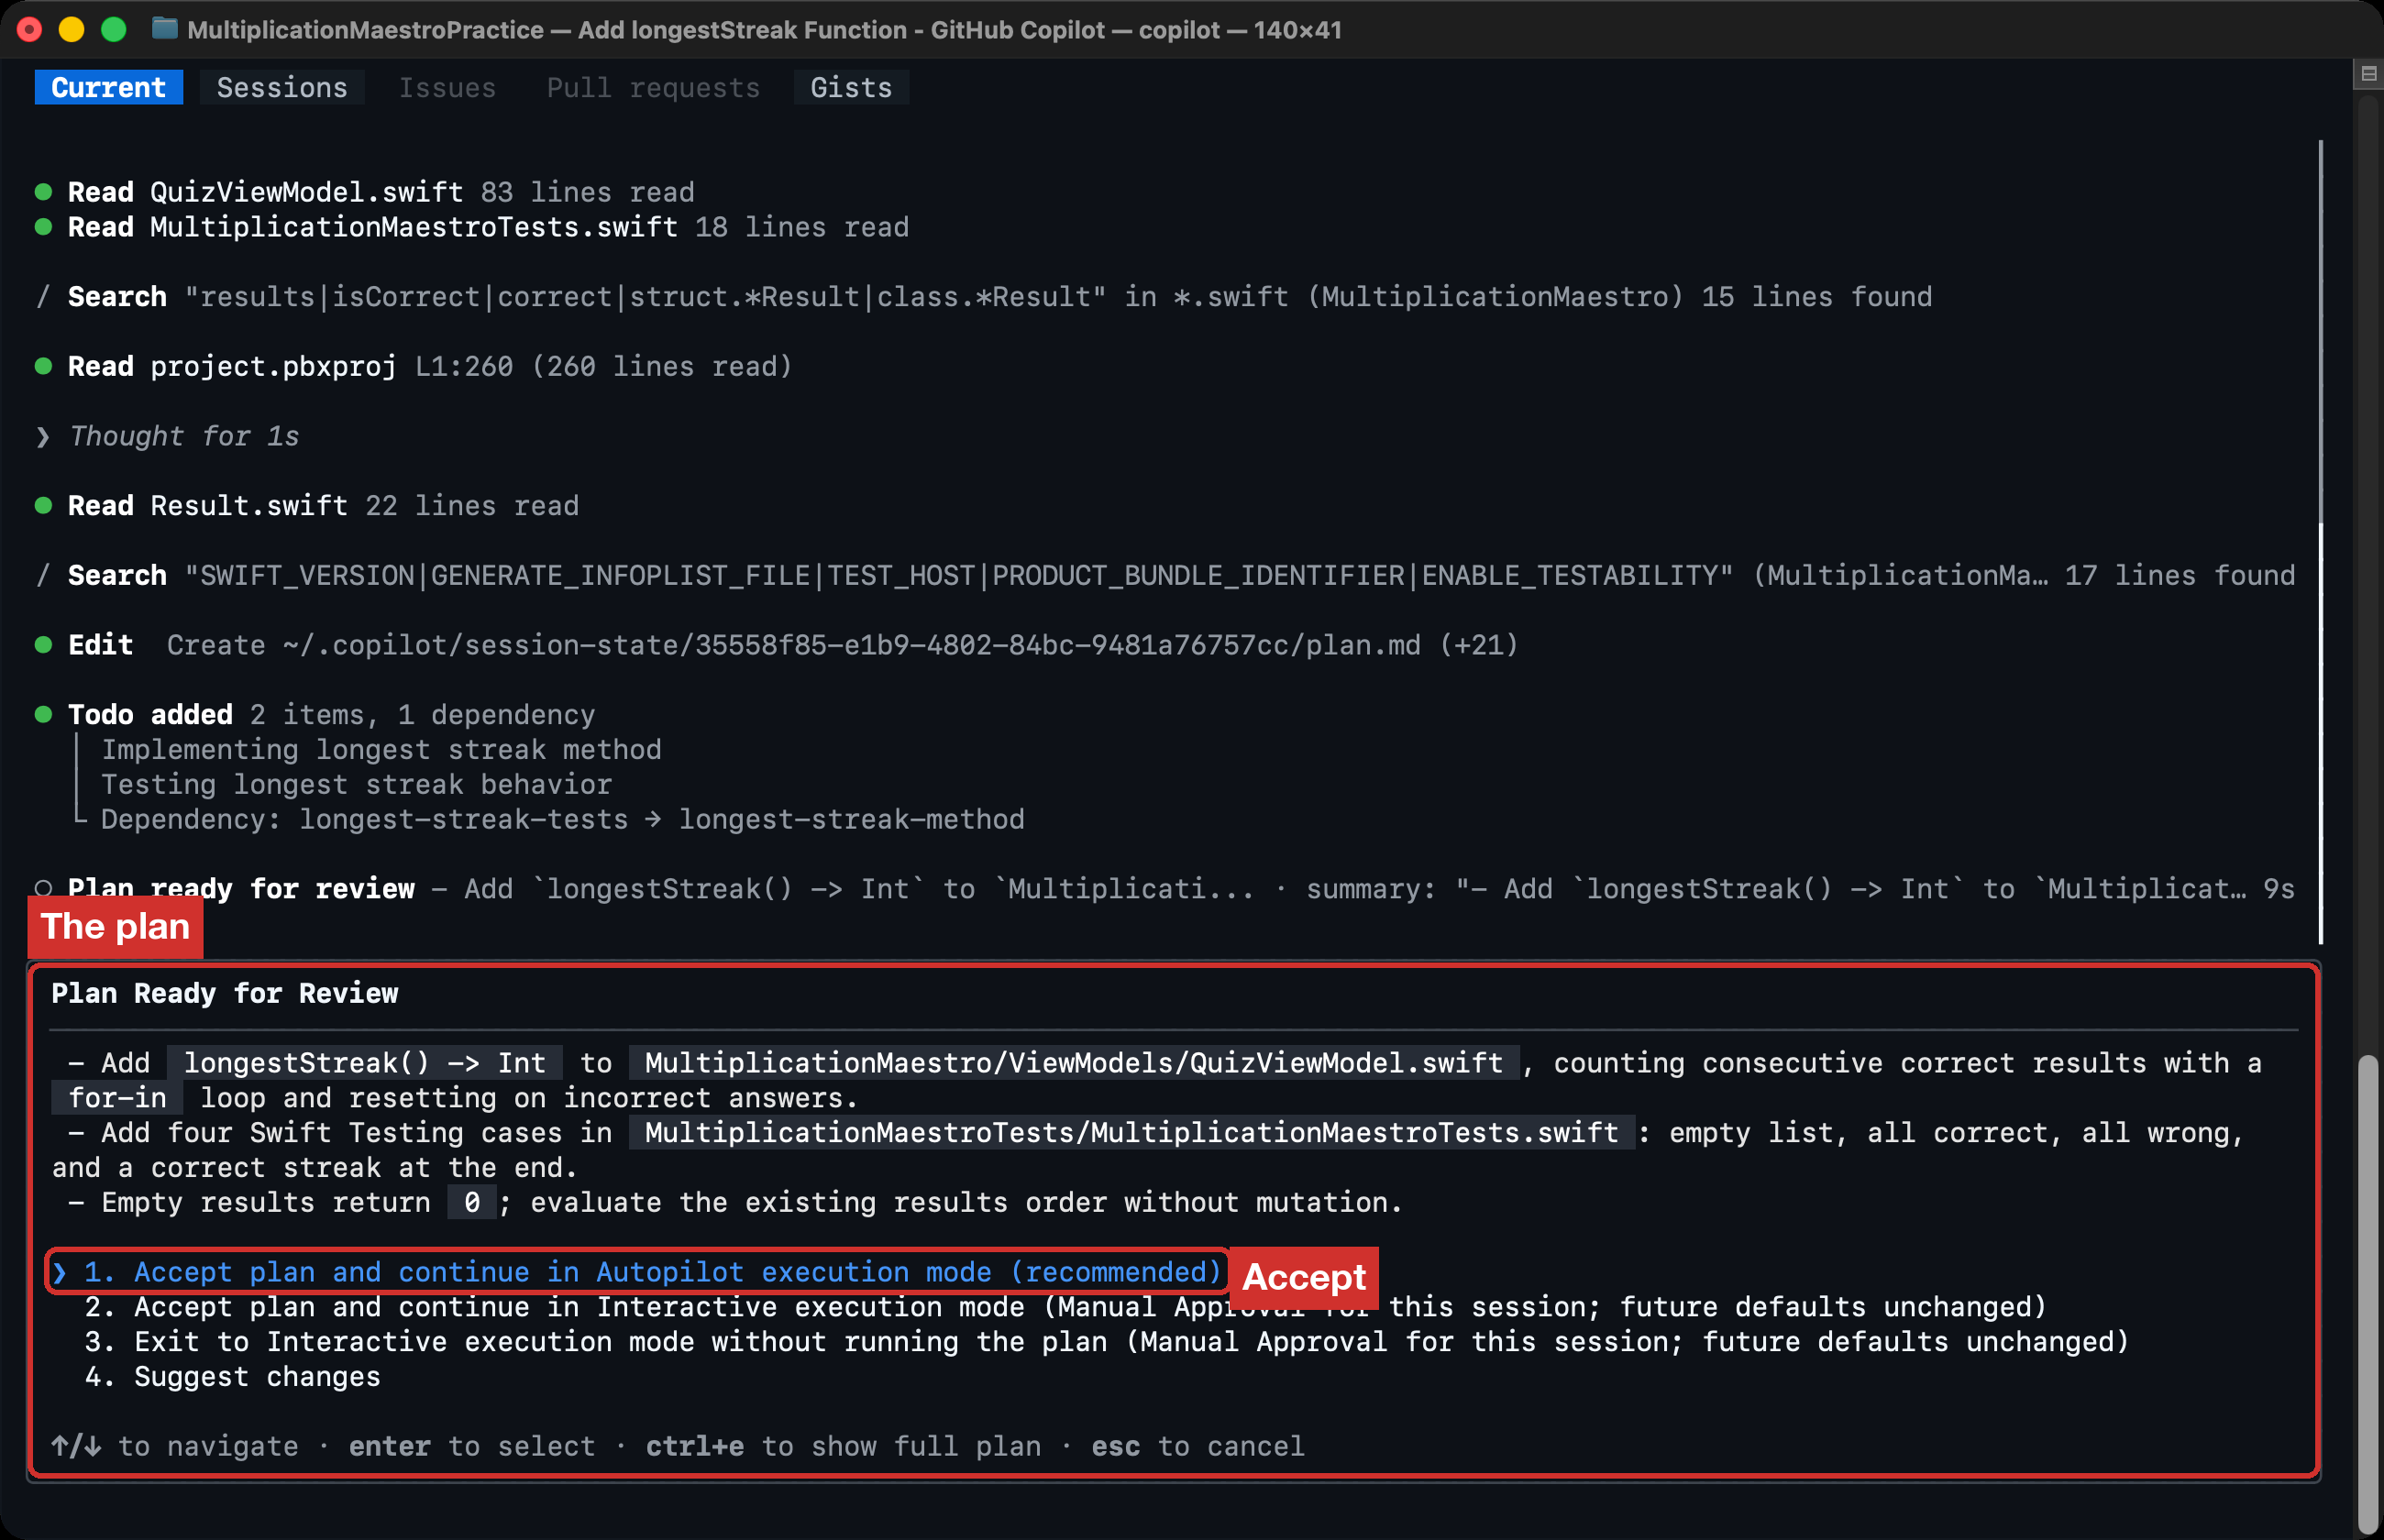
Wait for Plan Ready for Review. Read the plan before you accept it:
- Does it change only two files: QuizViewModel and the tests file?
- Does it test the four cases you asked for?
- Is anything there that you did not ask for?
-
If the plan is wrong, choose Suggest changes and say what to fix. If it is right, choose Accept plan and continue in Autopilot execution mode.
4. Let it build in Autopilot
-
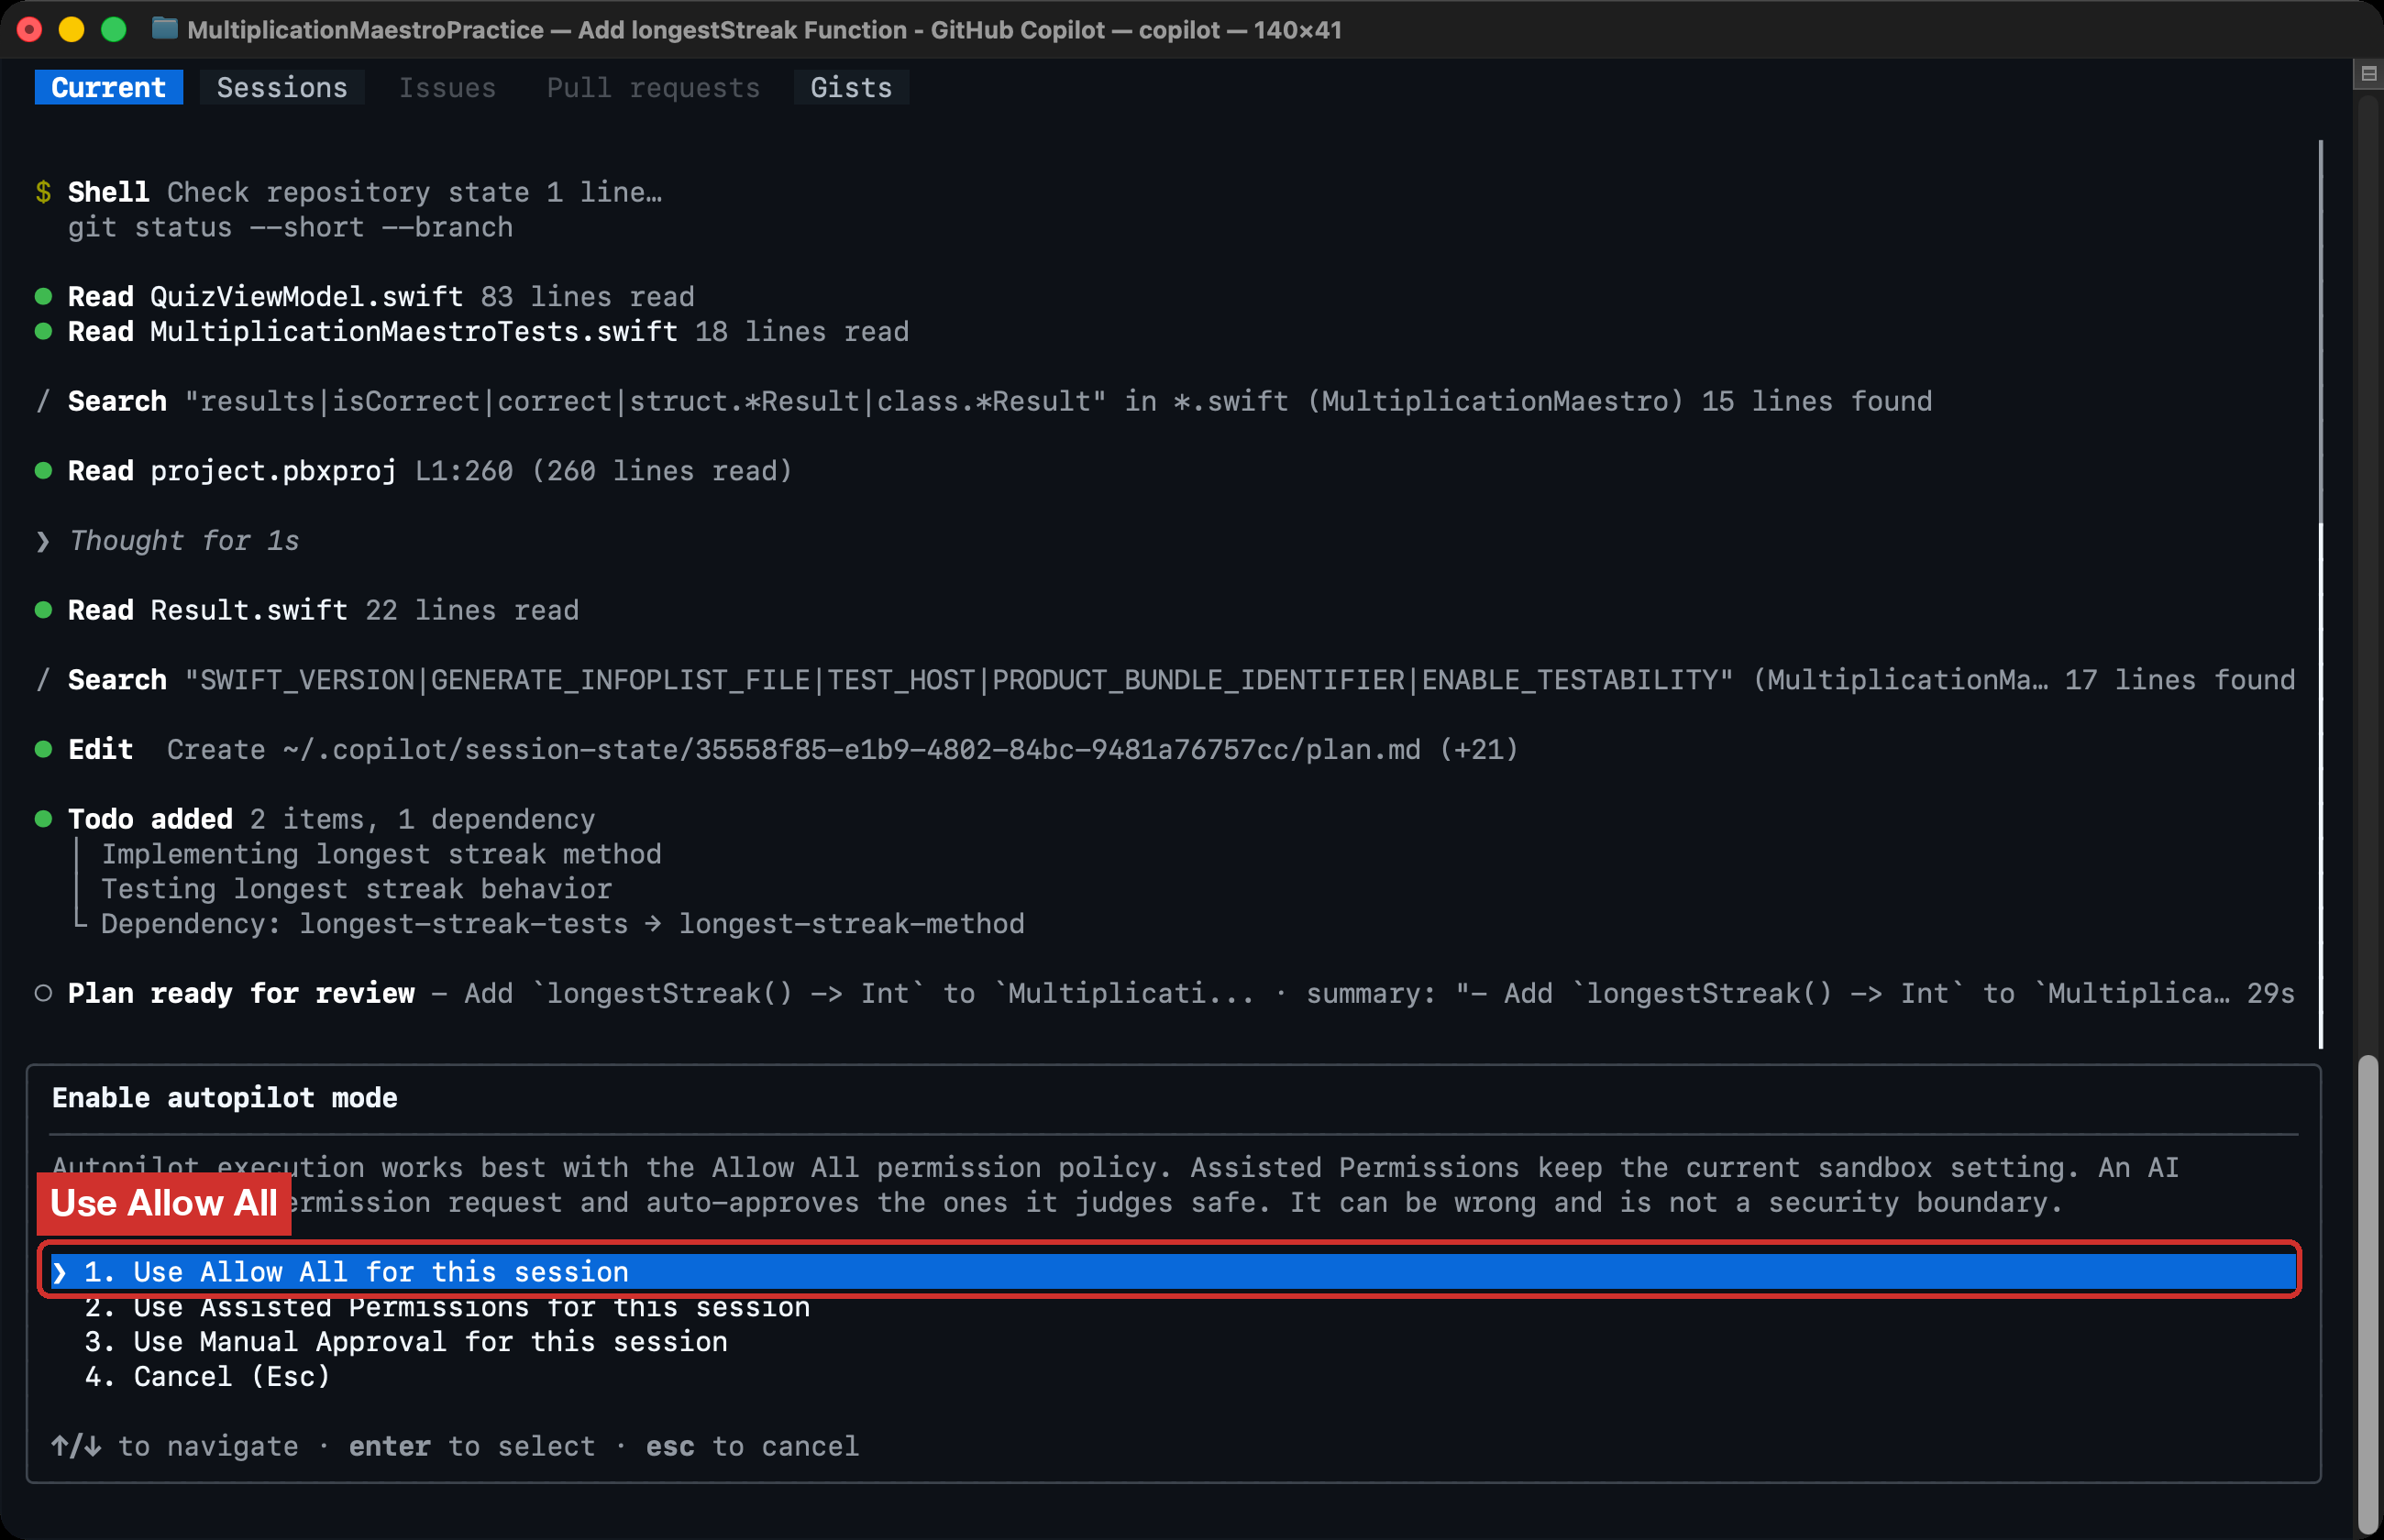
Copilot asks how to handle permissions. Choose Use Allow All for this session. Now Copilot will not ask before it runs commands, opens files anywhere on your Mac, or visits websites. So use Allow All only in this practice project. Your commit lets you undo changes to this project. It does not protect anything else.
-
Wait until Copilot says Task complete. In Autopilot, it keeps working without waiting for you to approve each step.
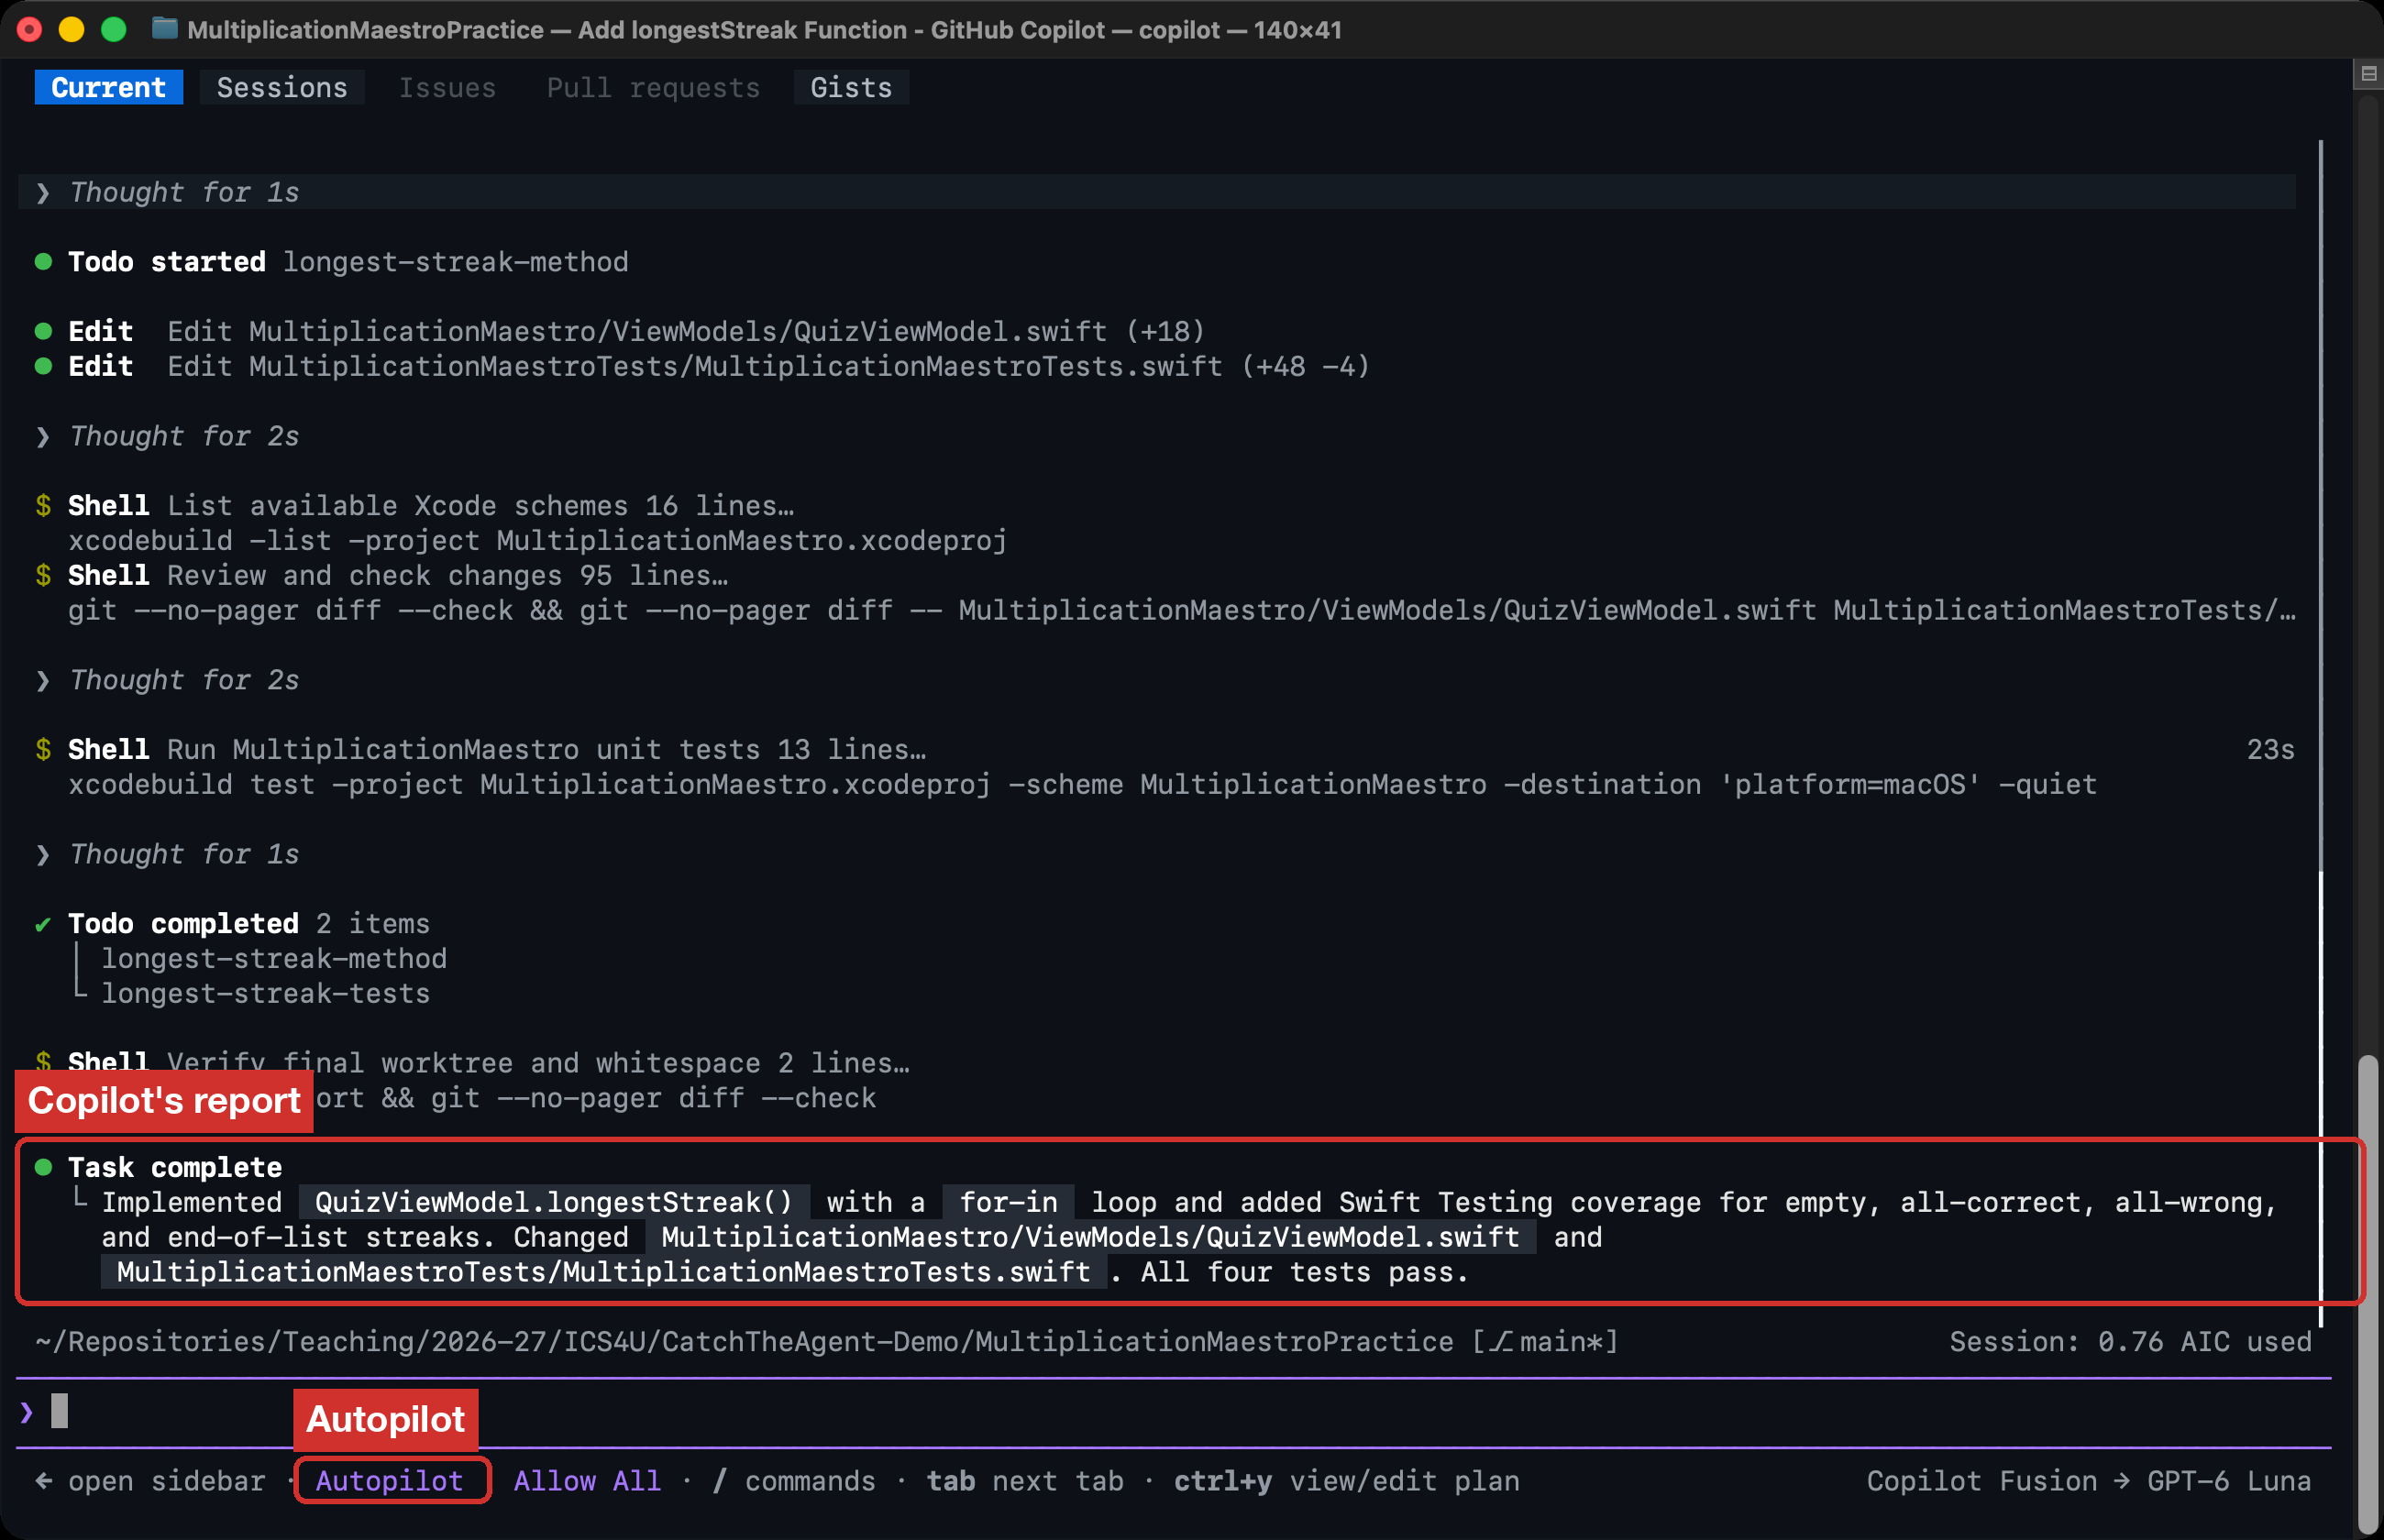
Copilot says “All four tests pass”. Do not believe it yet.
5. Run the tests yourself
-
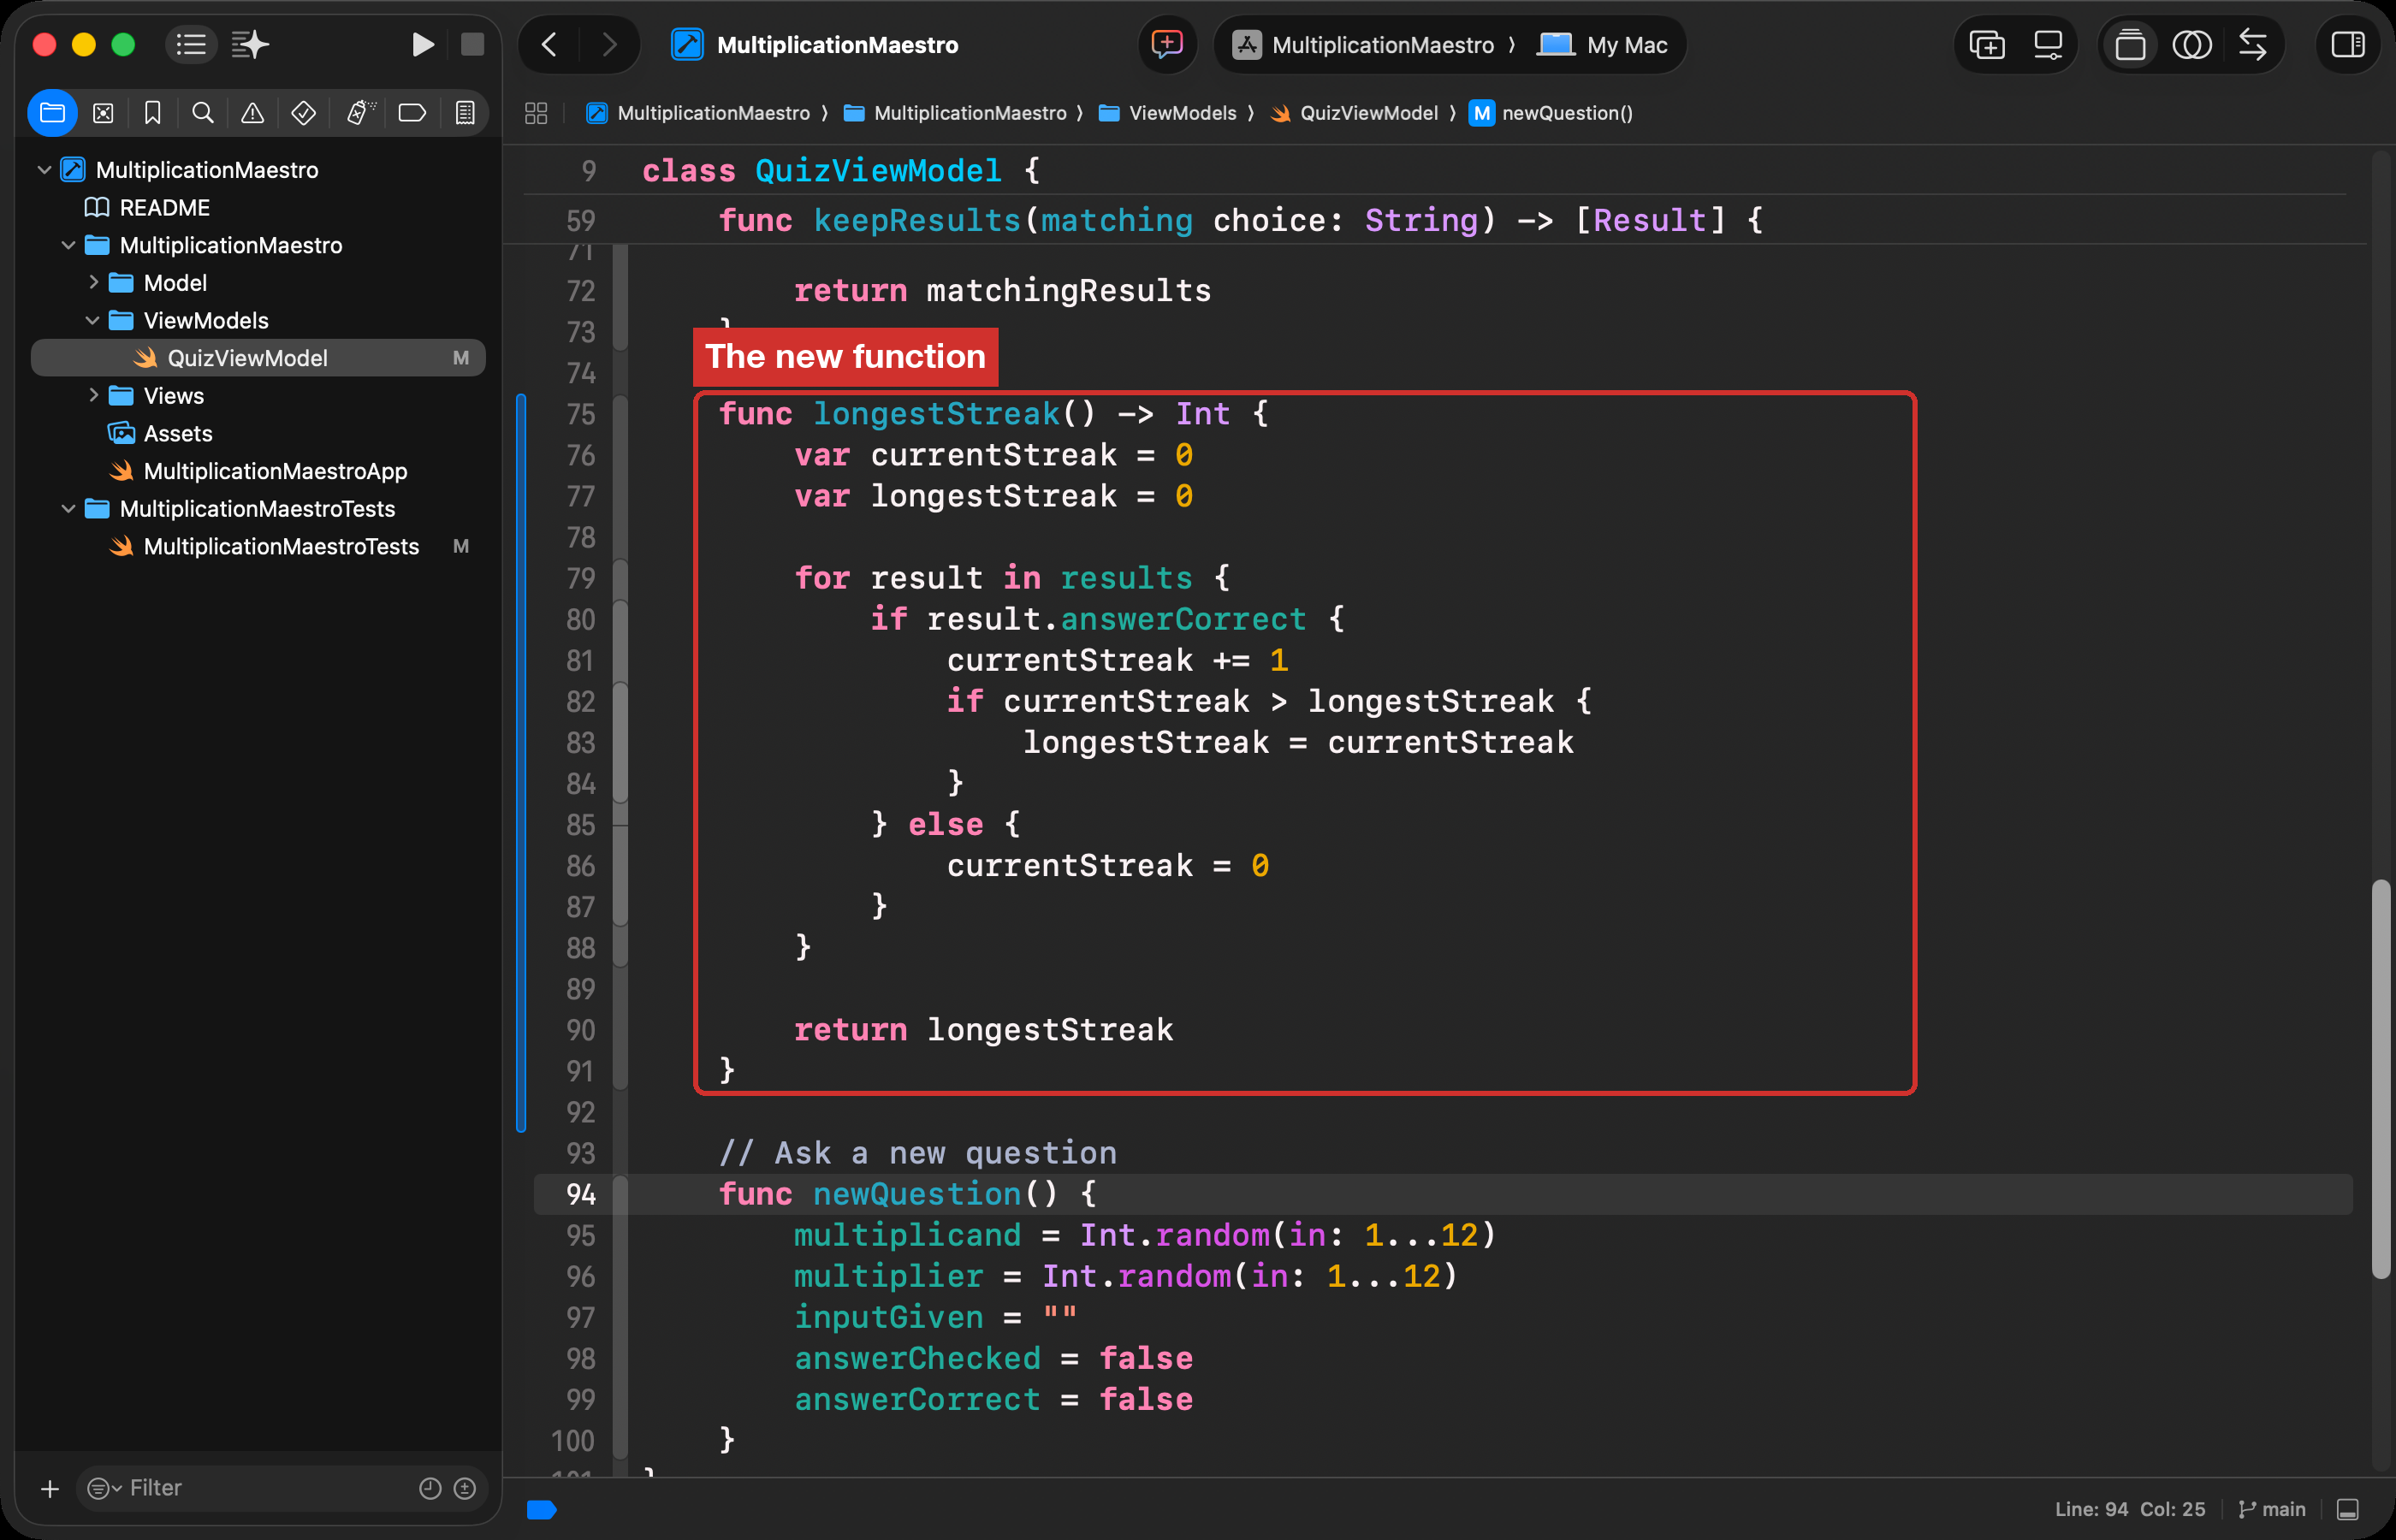
In Xcode, open QuizViewModel and find the new function.
-
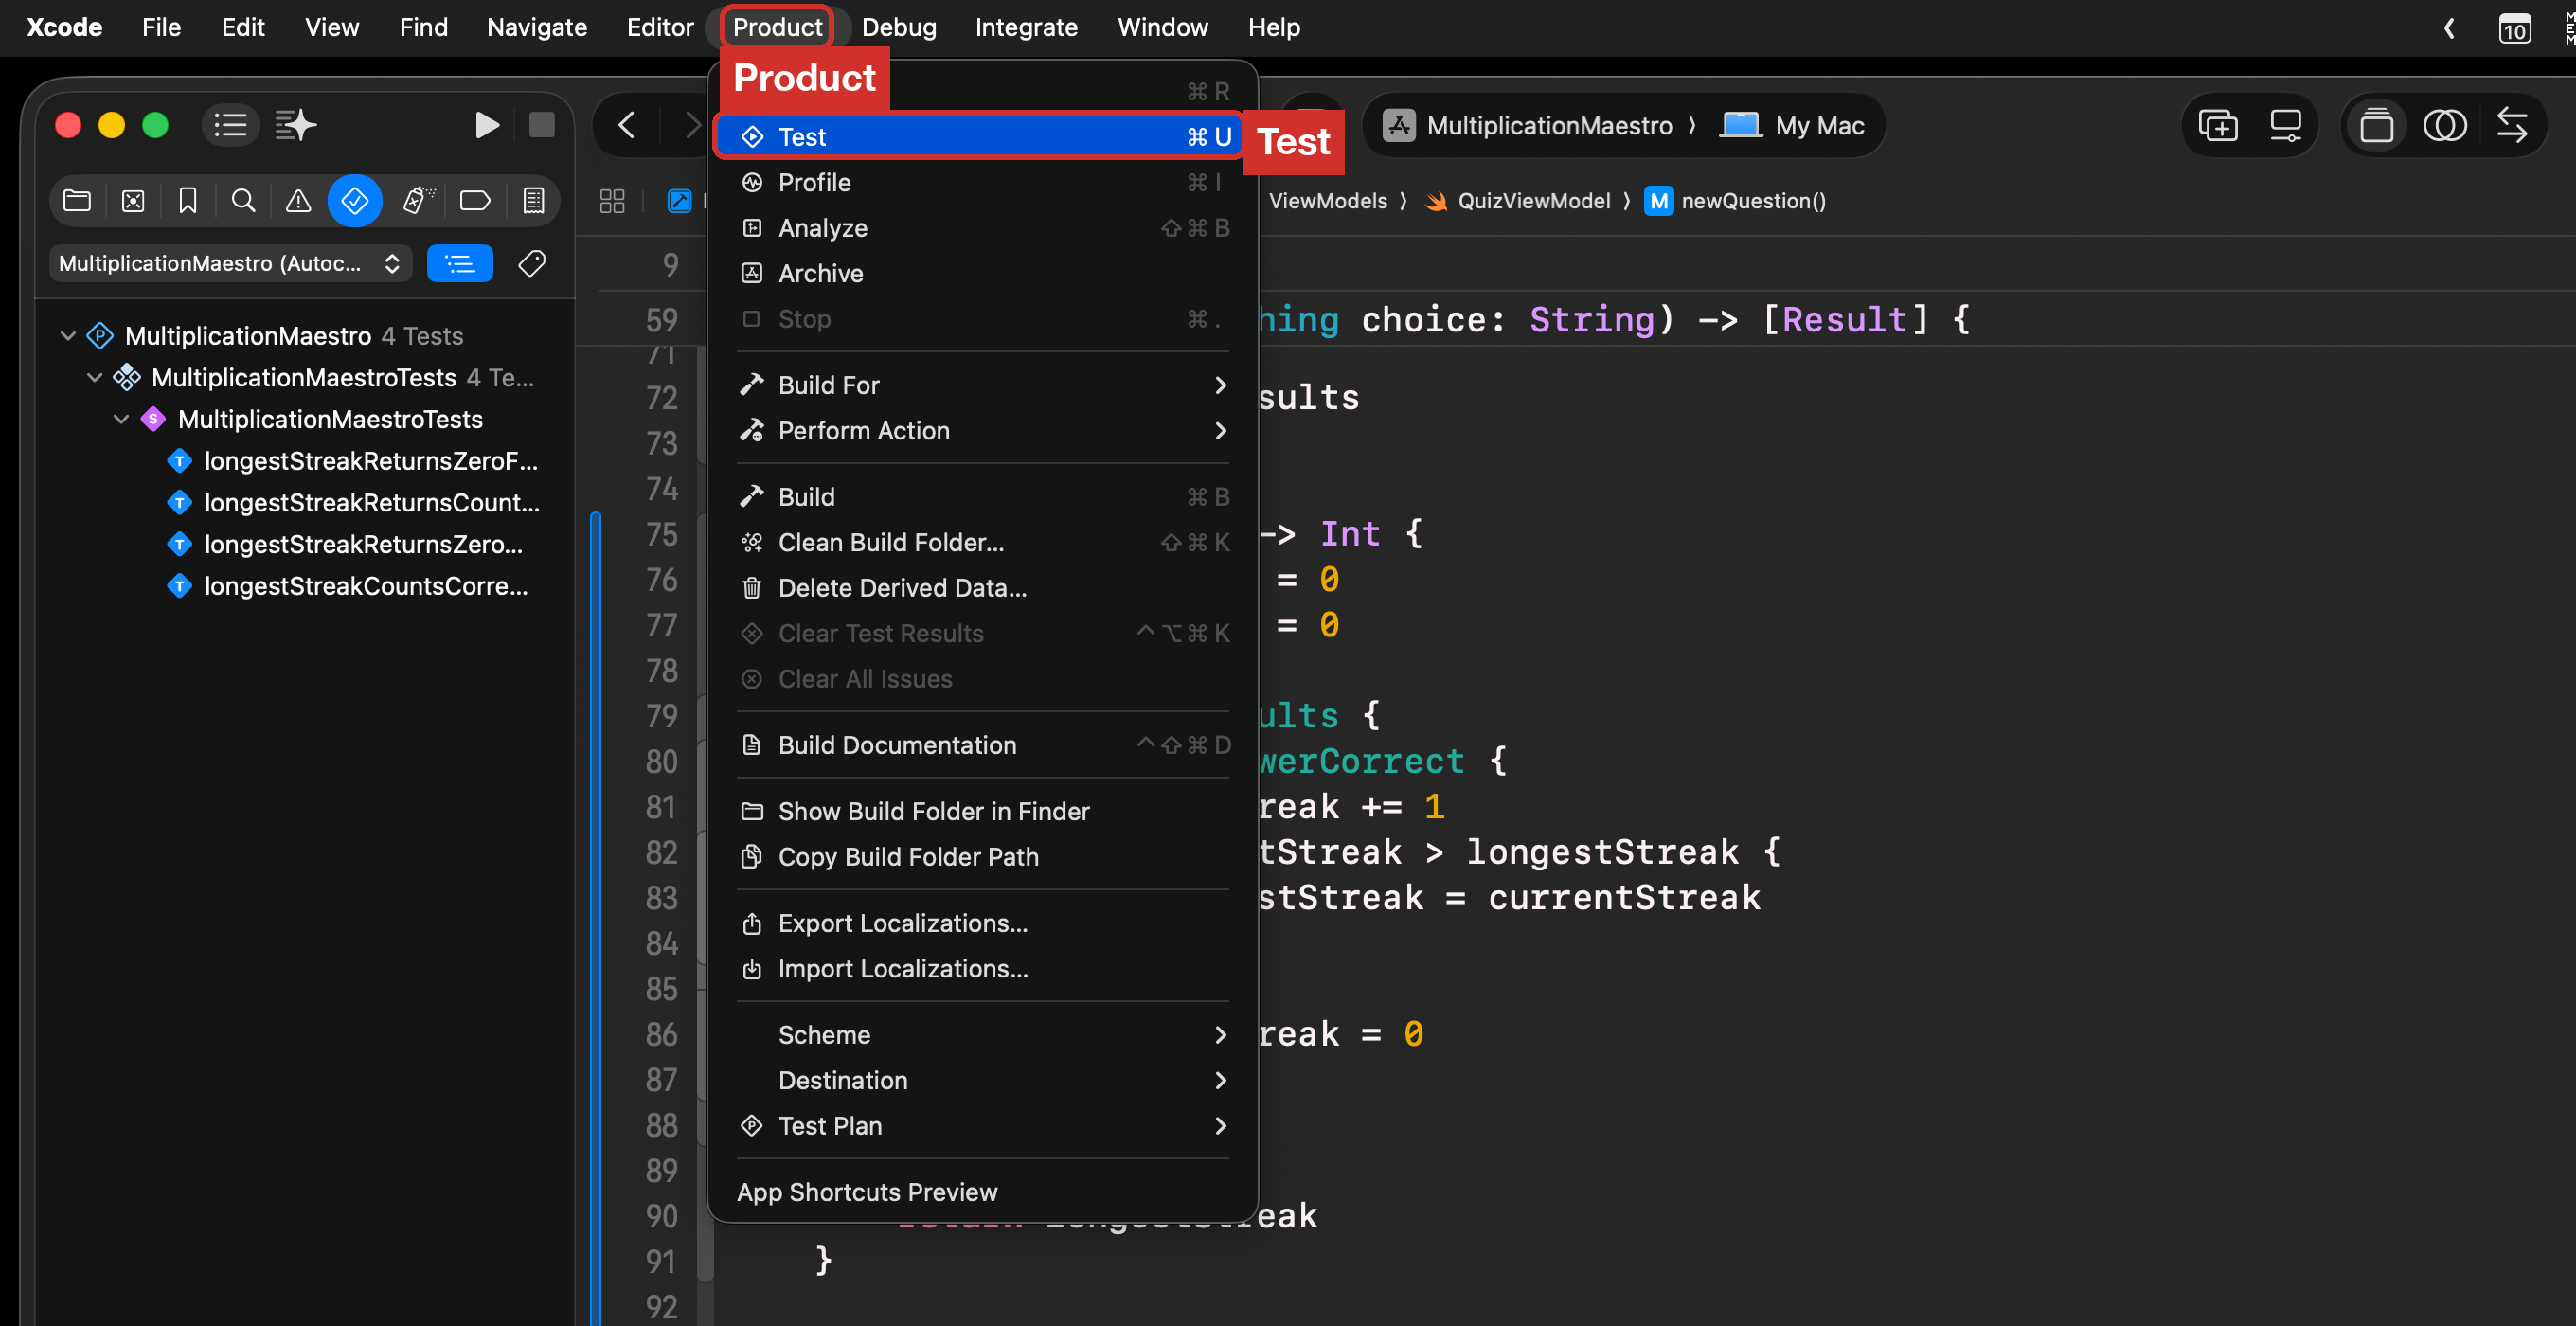
Choose Product > Test, or press Command-U.
-
Open the Test navigator. A green diamond beside a test means it passed.
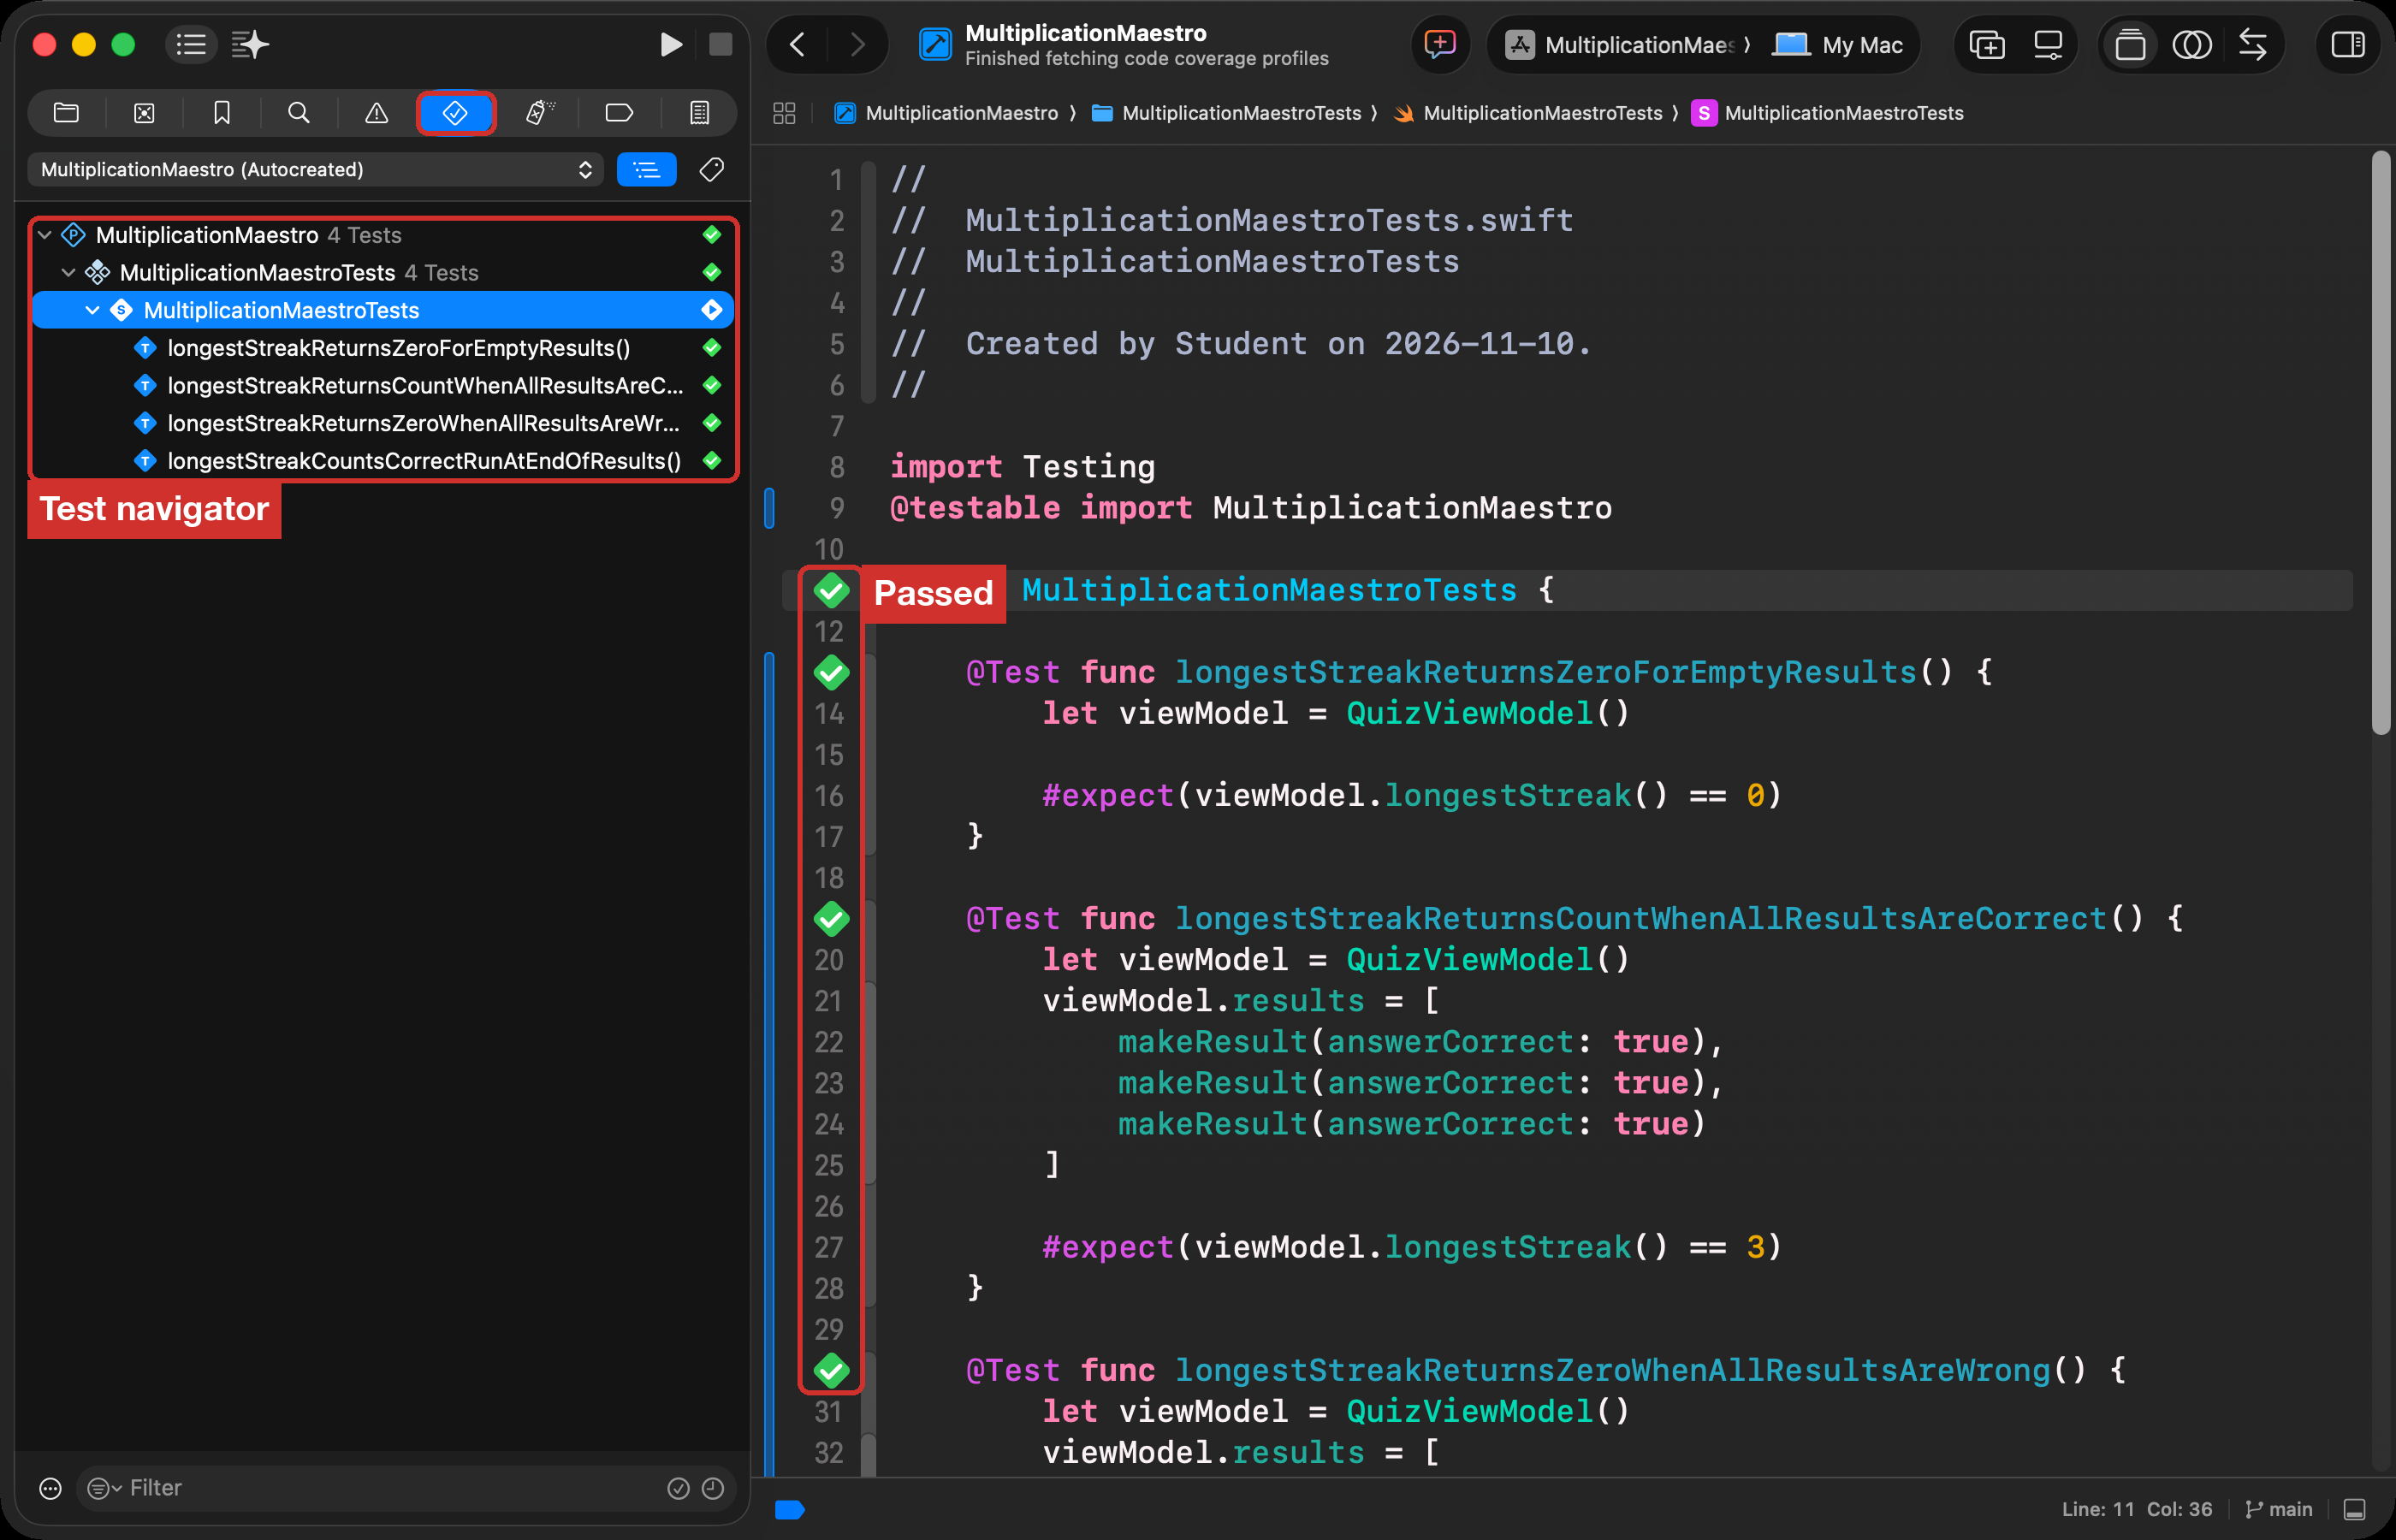
Now you have seen the tests pass. But a test that can never fail tells you nothing.
6. Break the code on purpose
A good test fails when the code is wrong. Find out whether these tests do.
First bug
-
In
longestStreak(), find this line:if currentStreak > longestStreak {Change
>to<.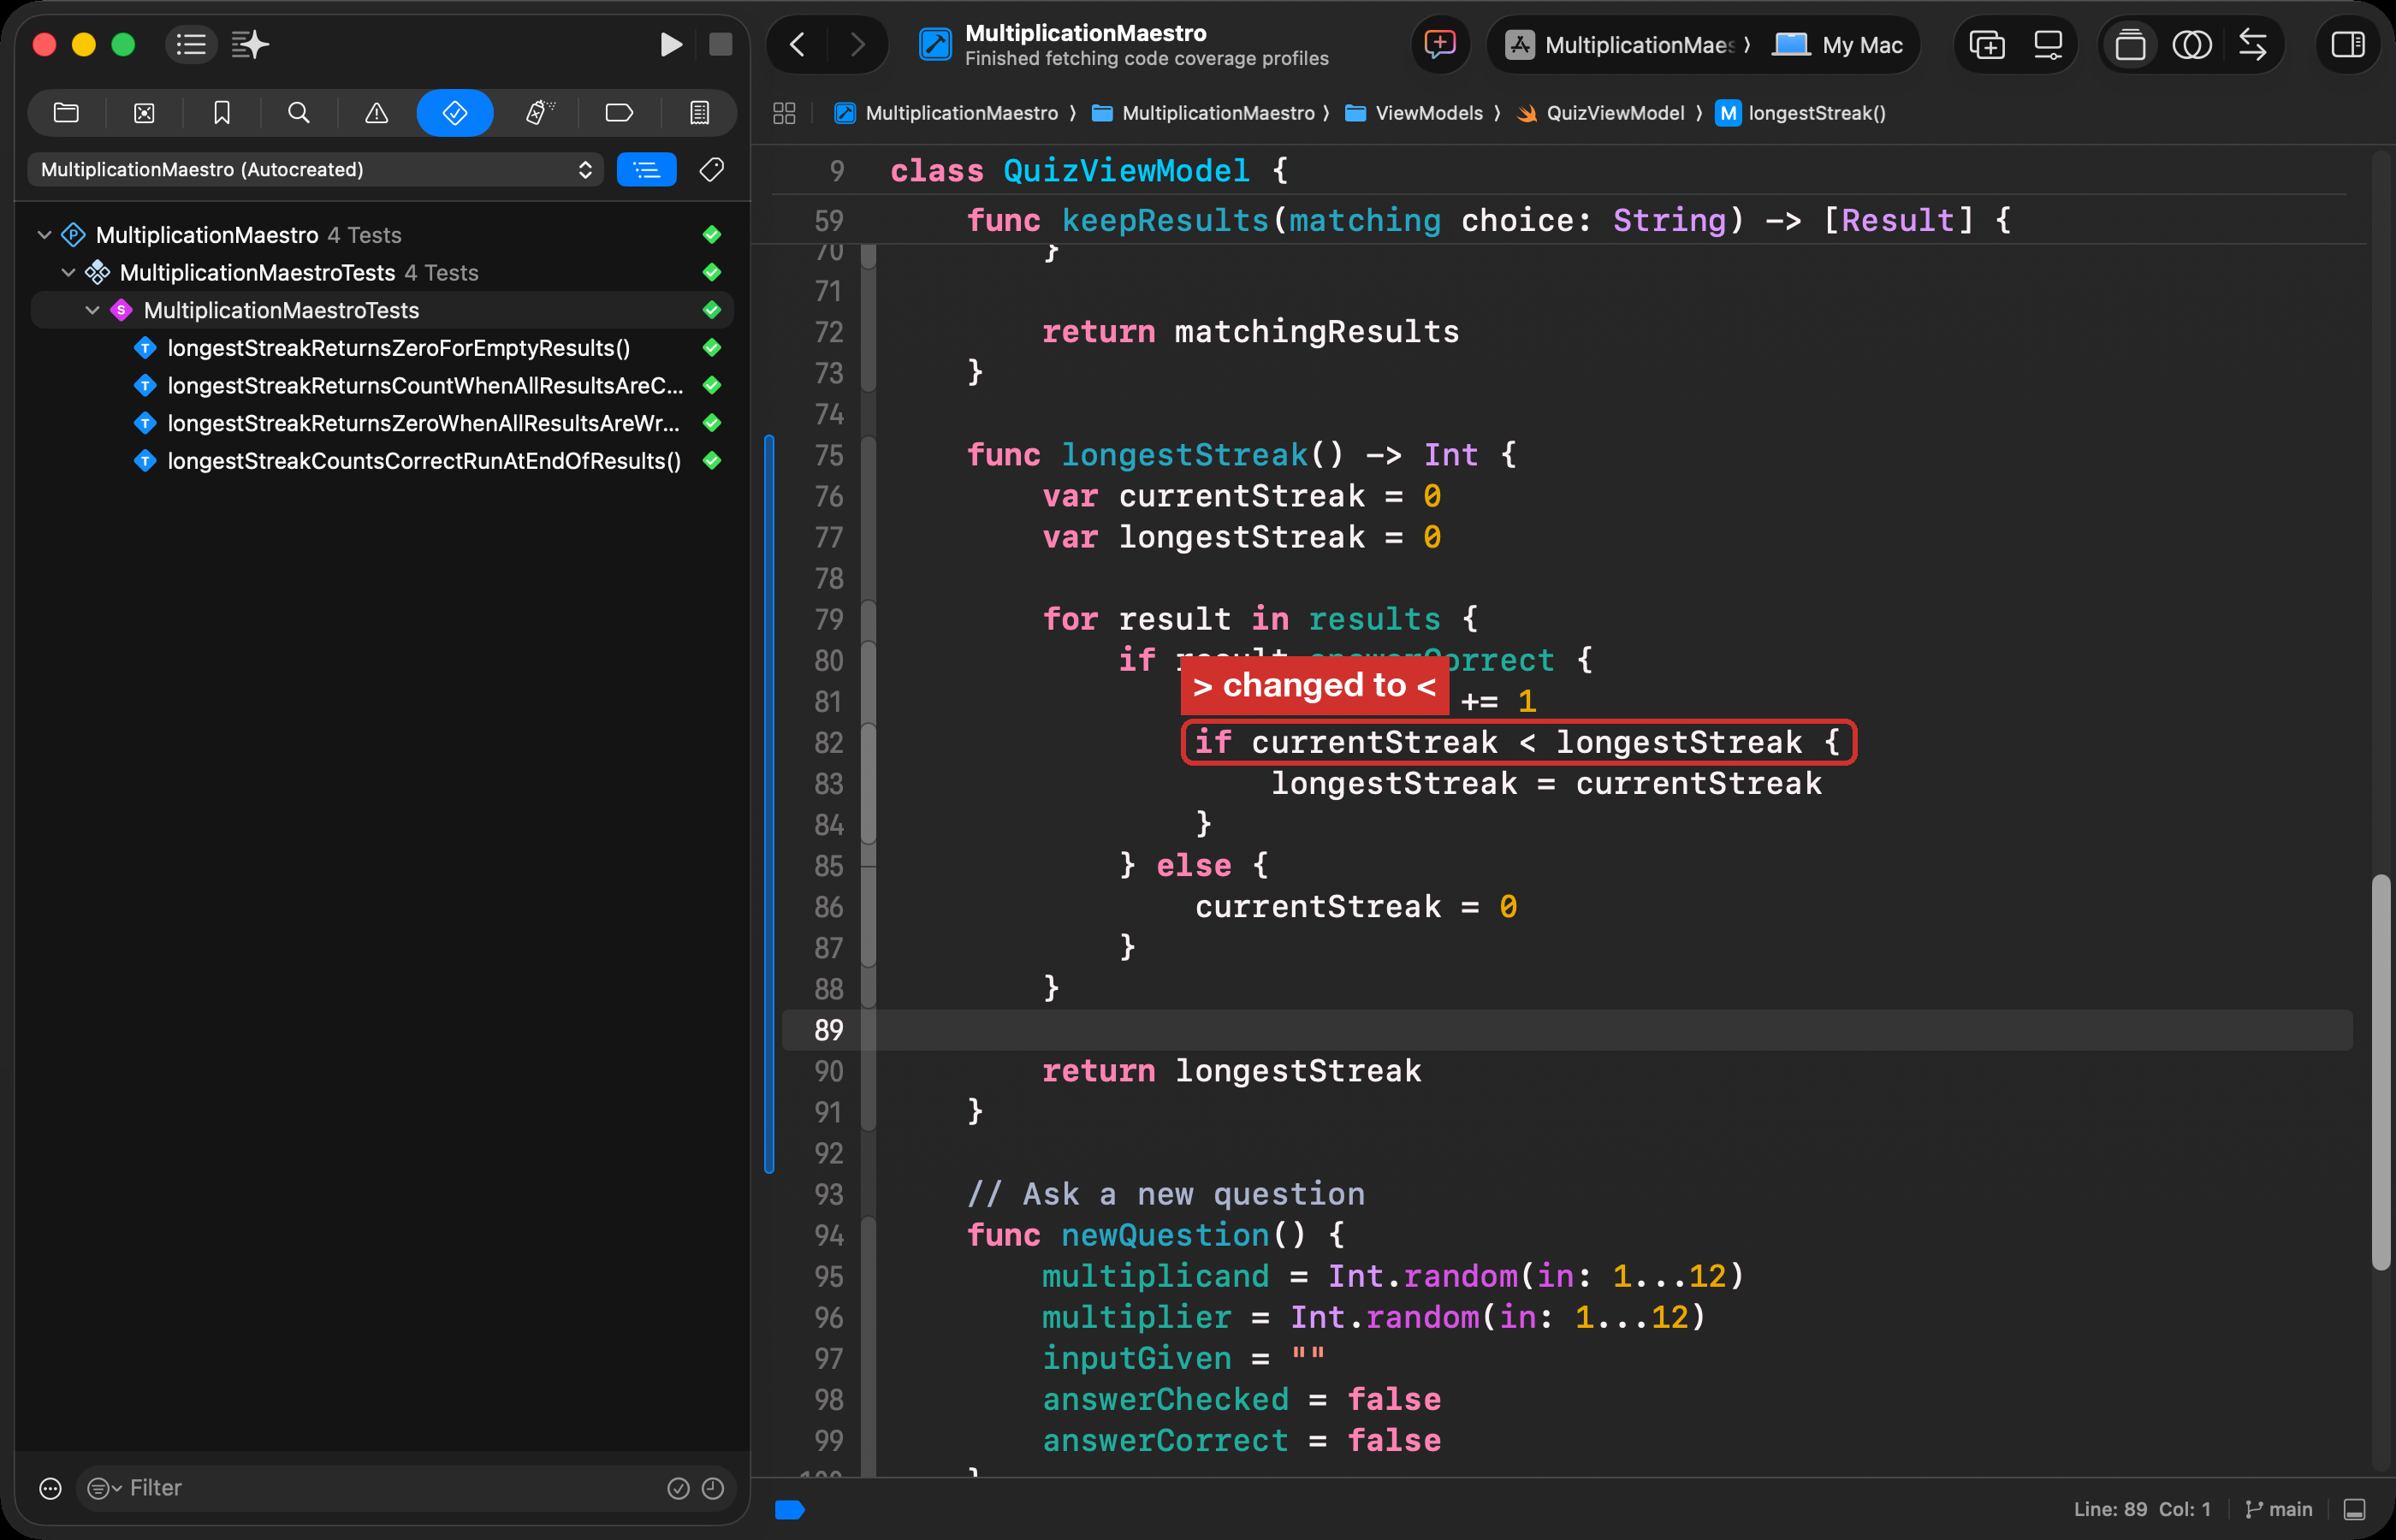
-
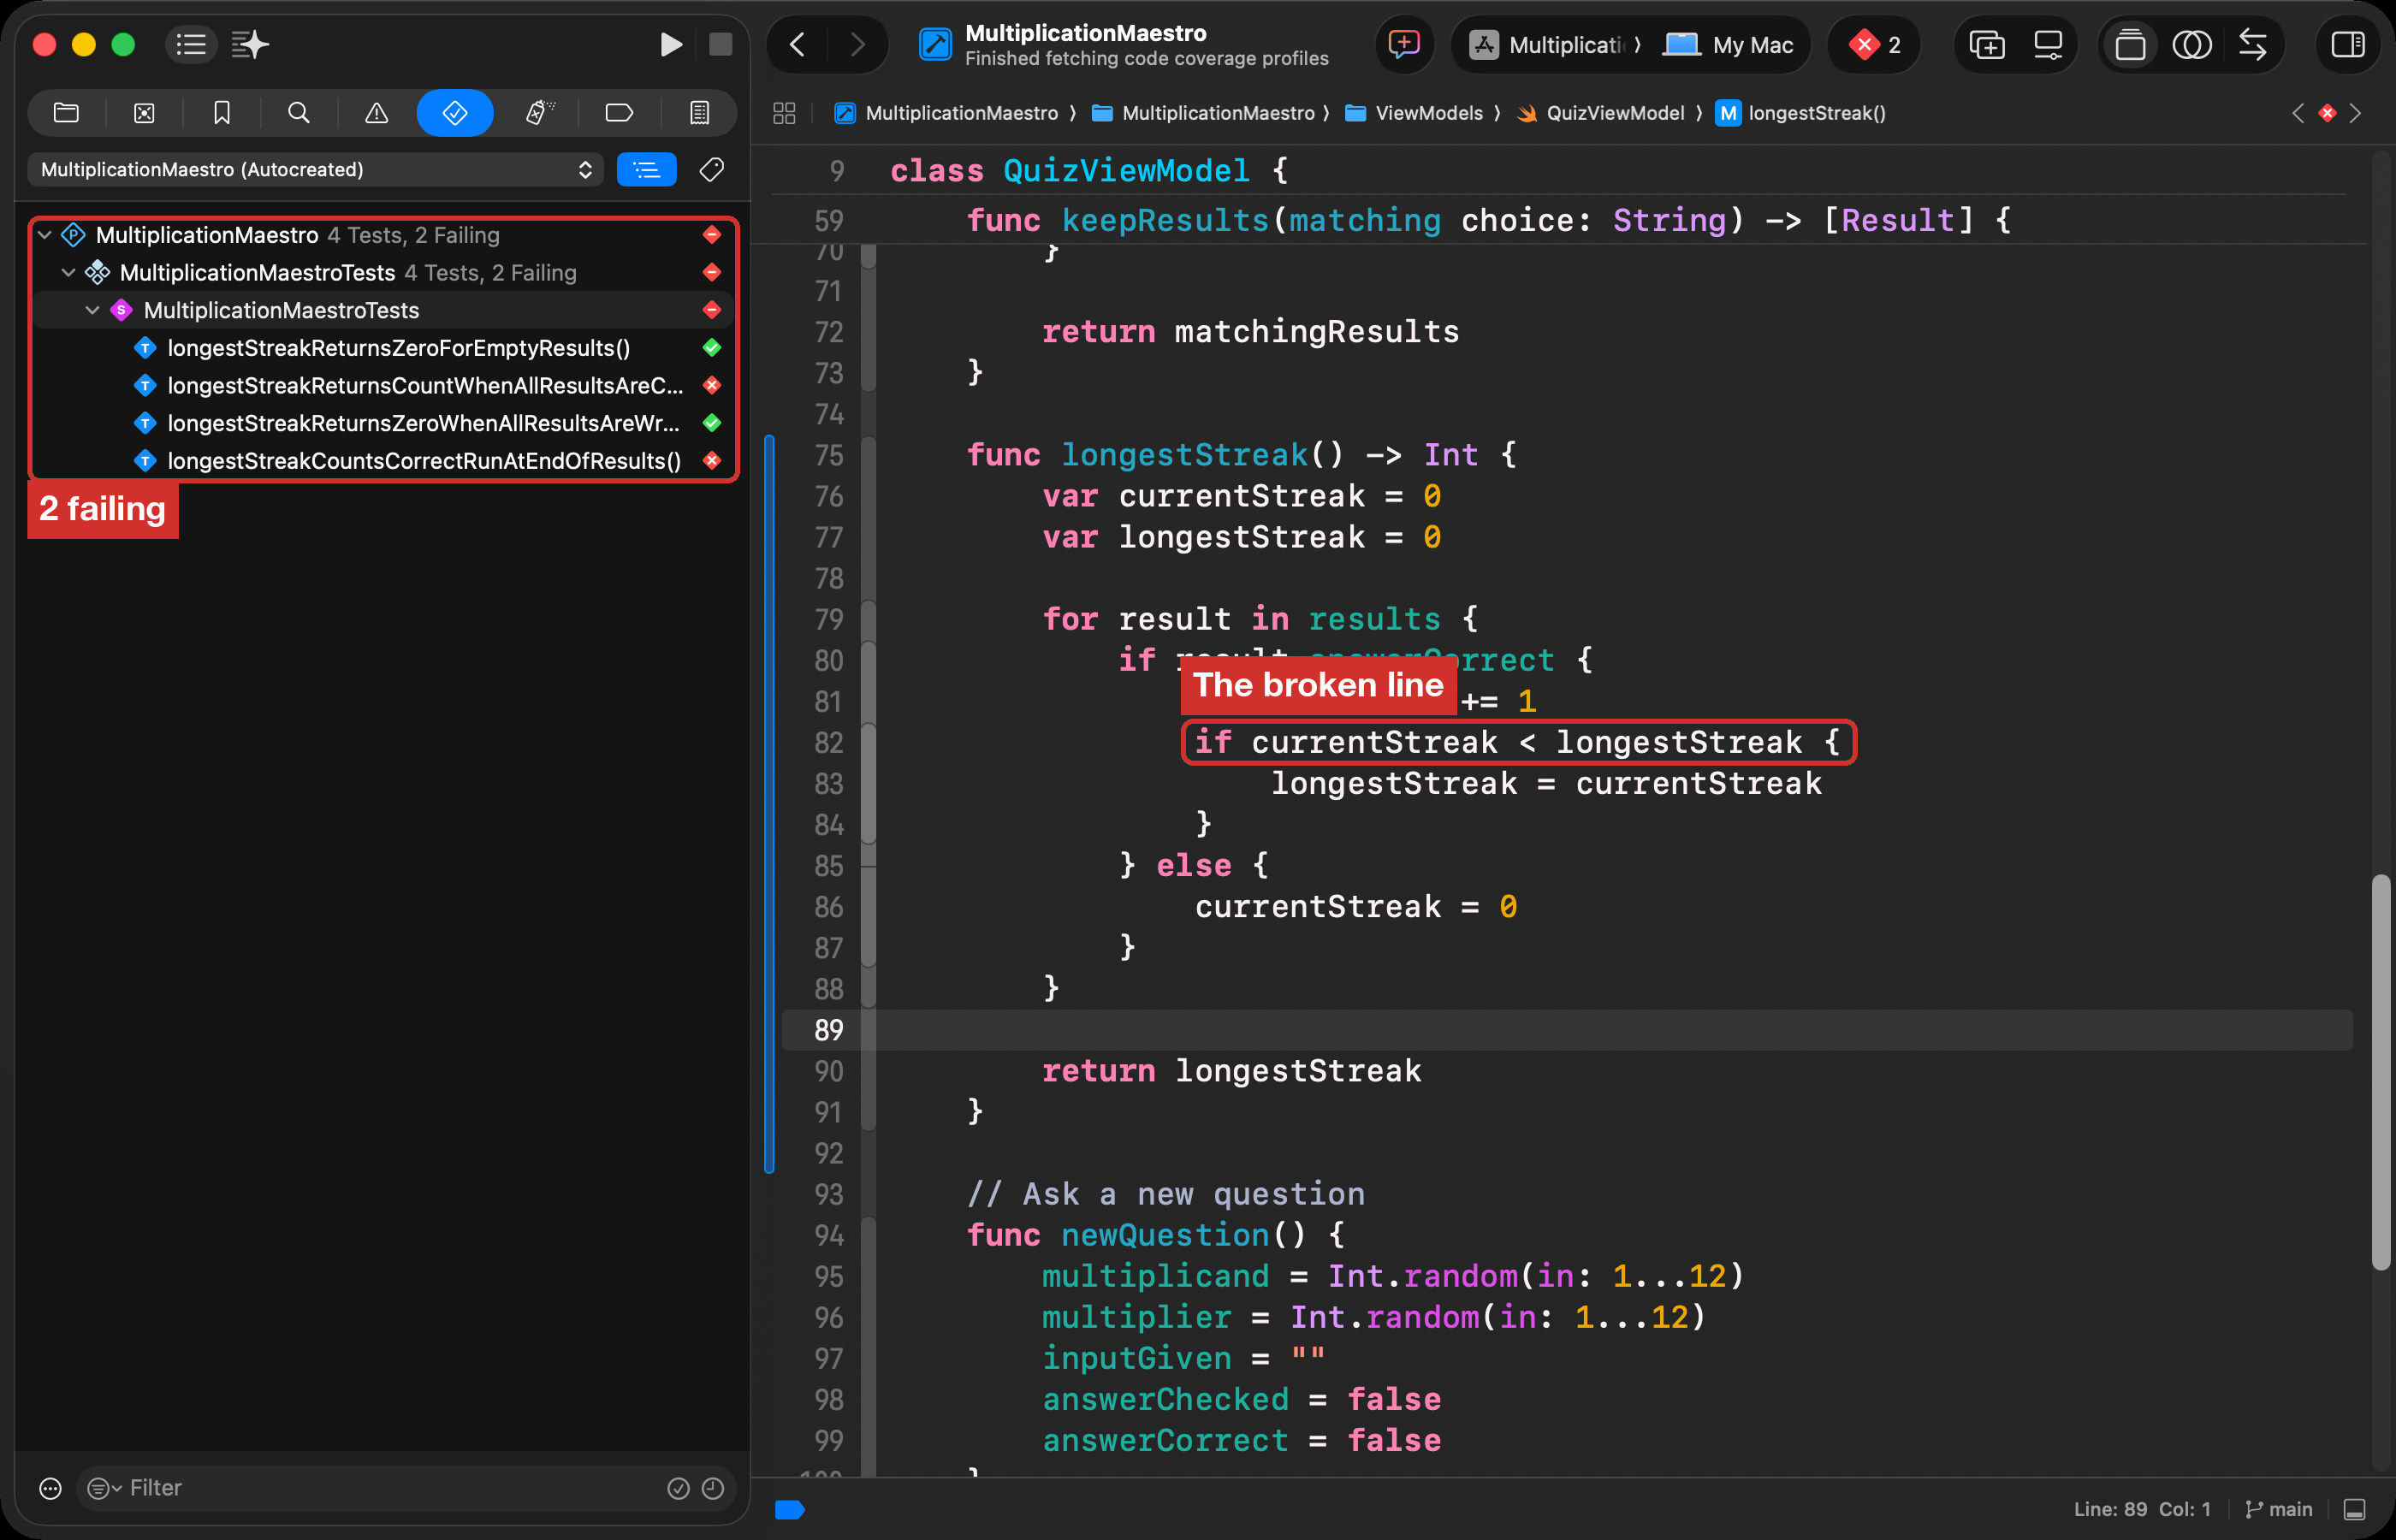
Press Command-U. Two tests fail. A red diamond means a test failed.
-
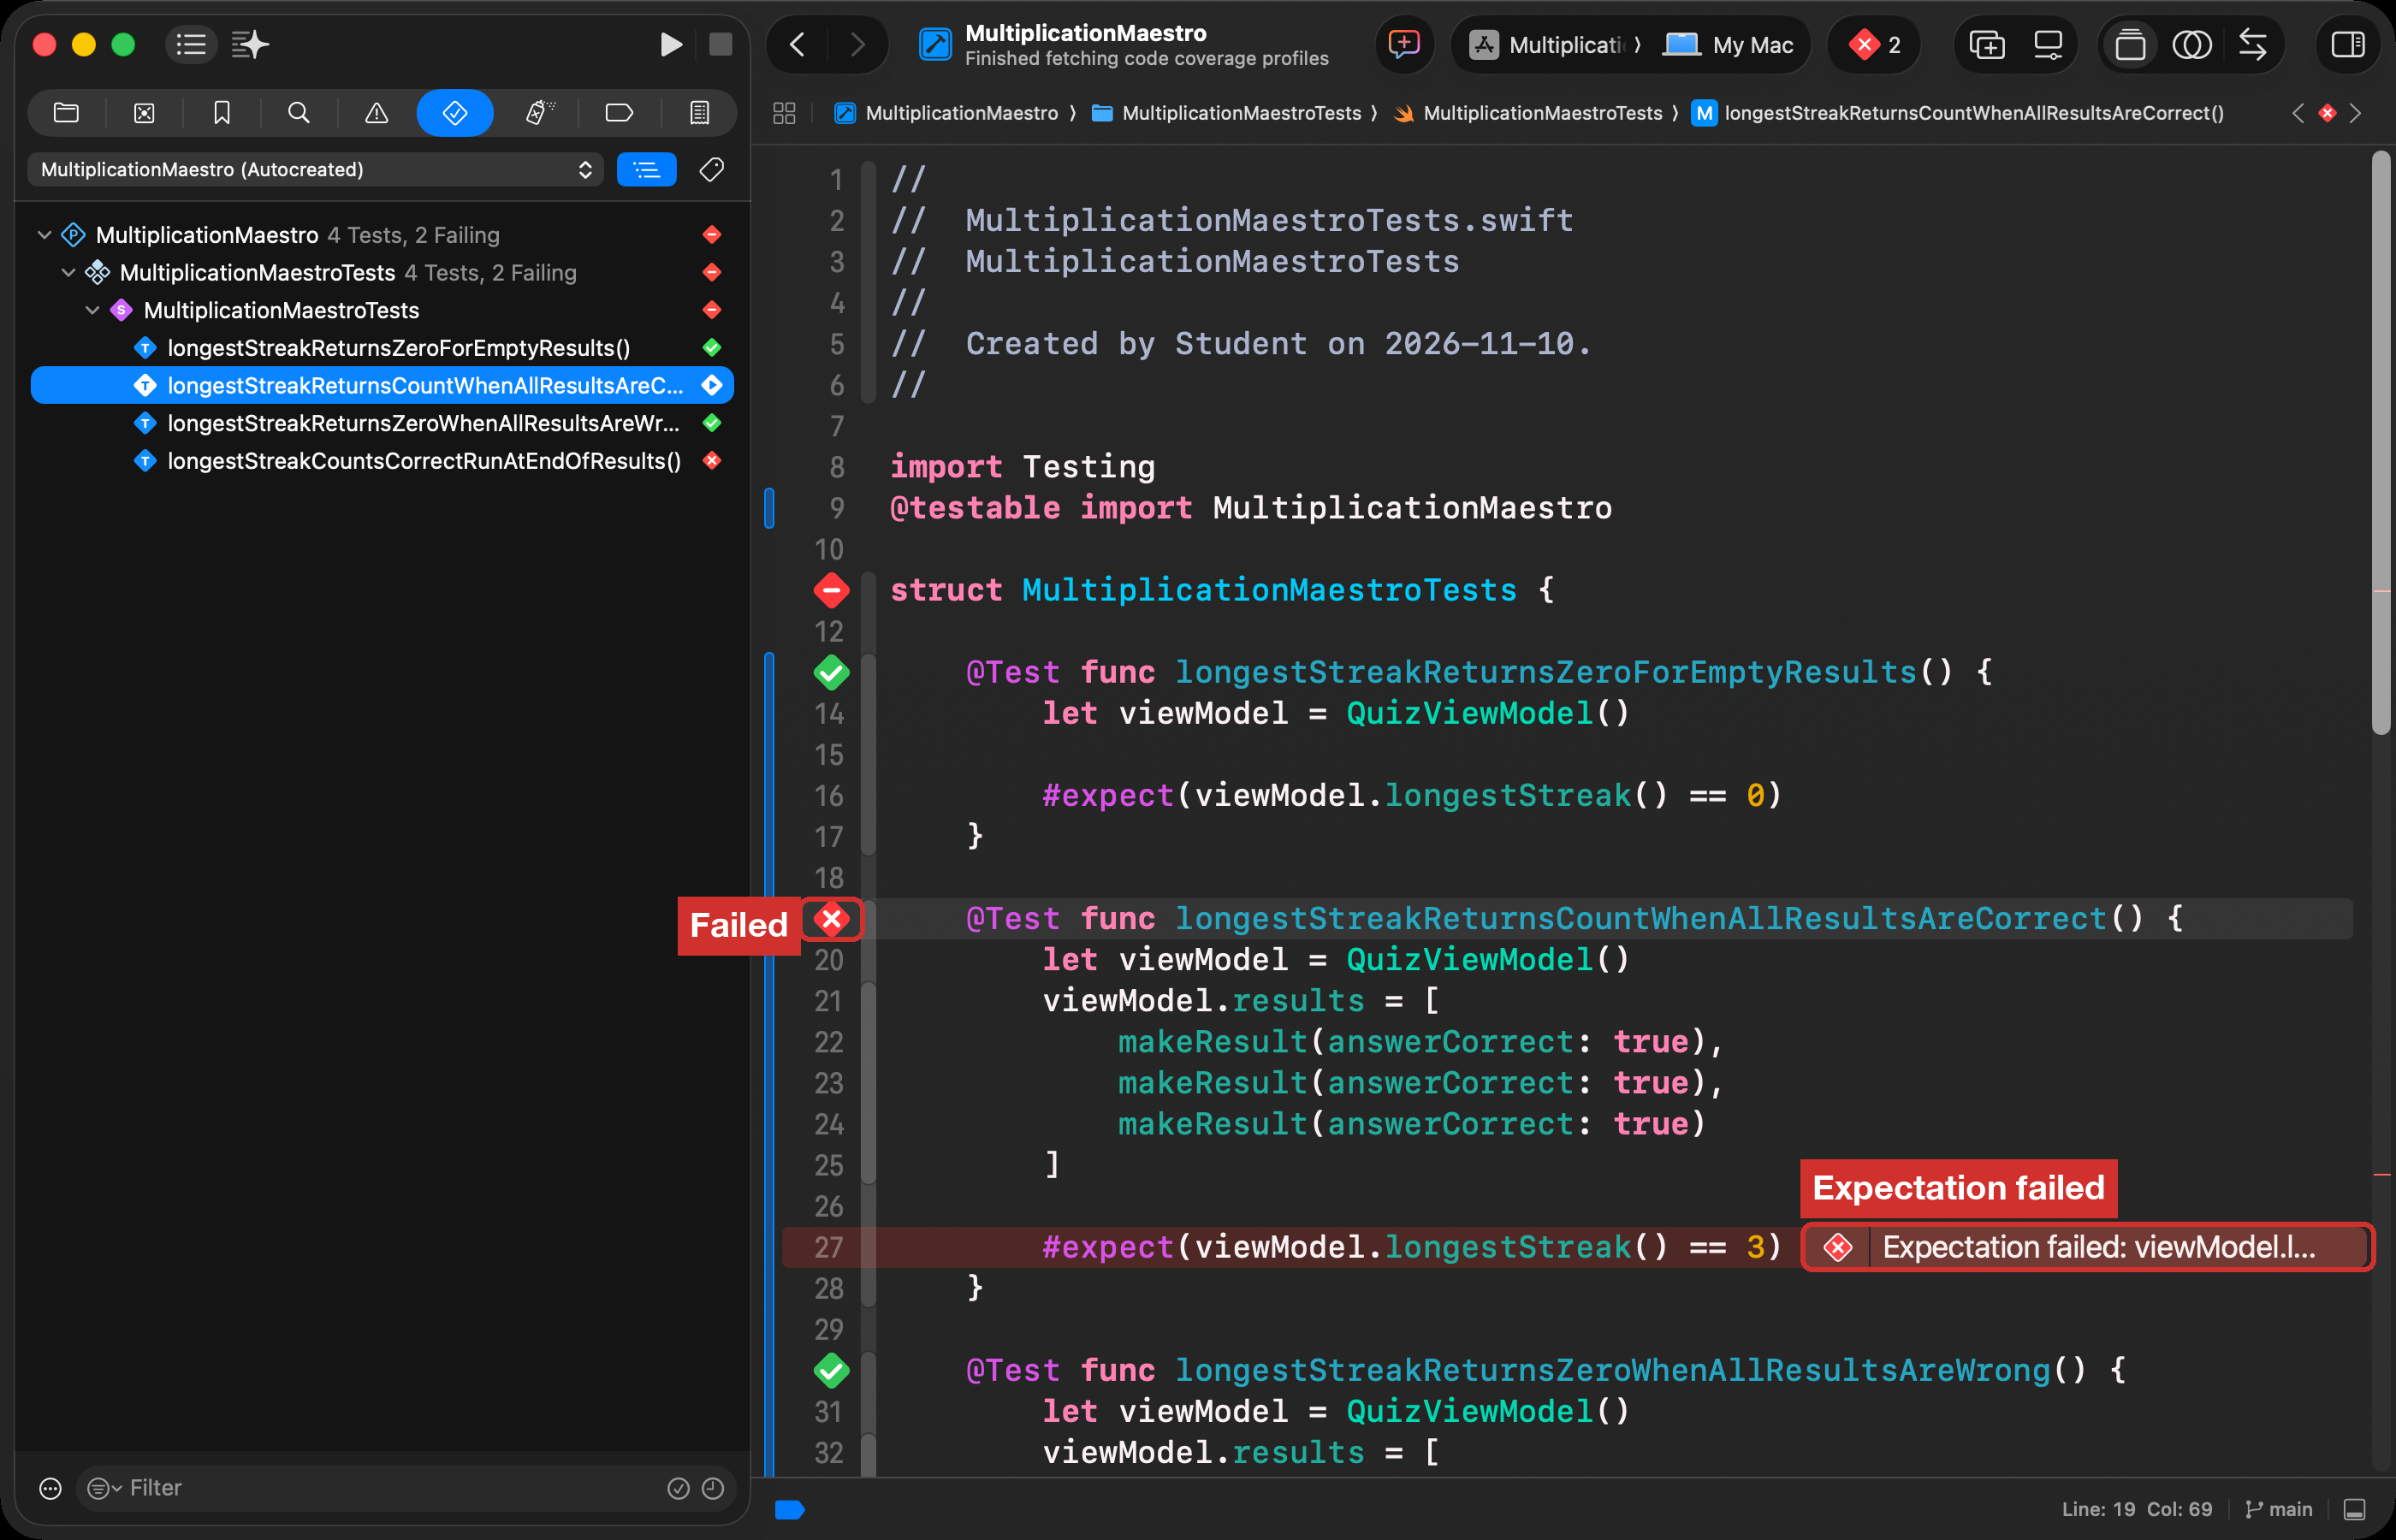
Click a failing test. Xcode shows the line that failed, and why.
-
Change
<back to>.
Good: the tests caught that mistake.
Second bug
-
Now delete this line, inside the
else:currentStreak = 0Without it, a wrong answer no longer ends a streak. The function is wrong.
-
Press Command-U. Every test still passes.
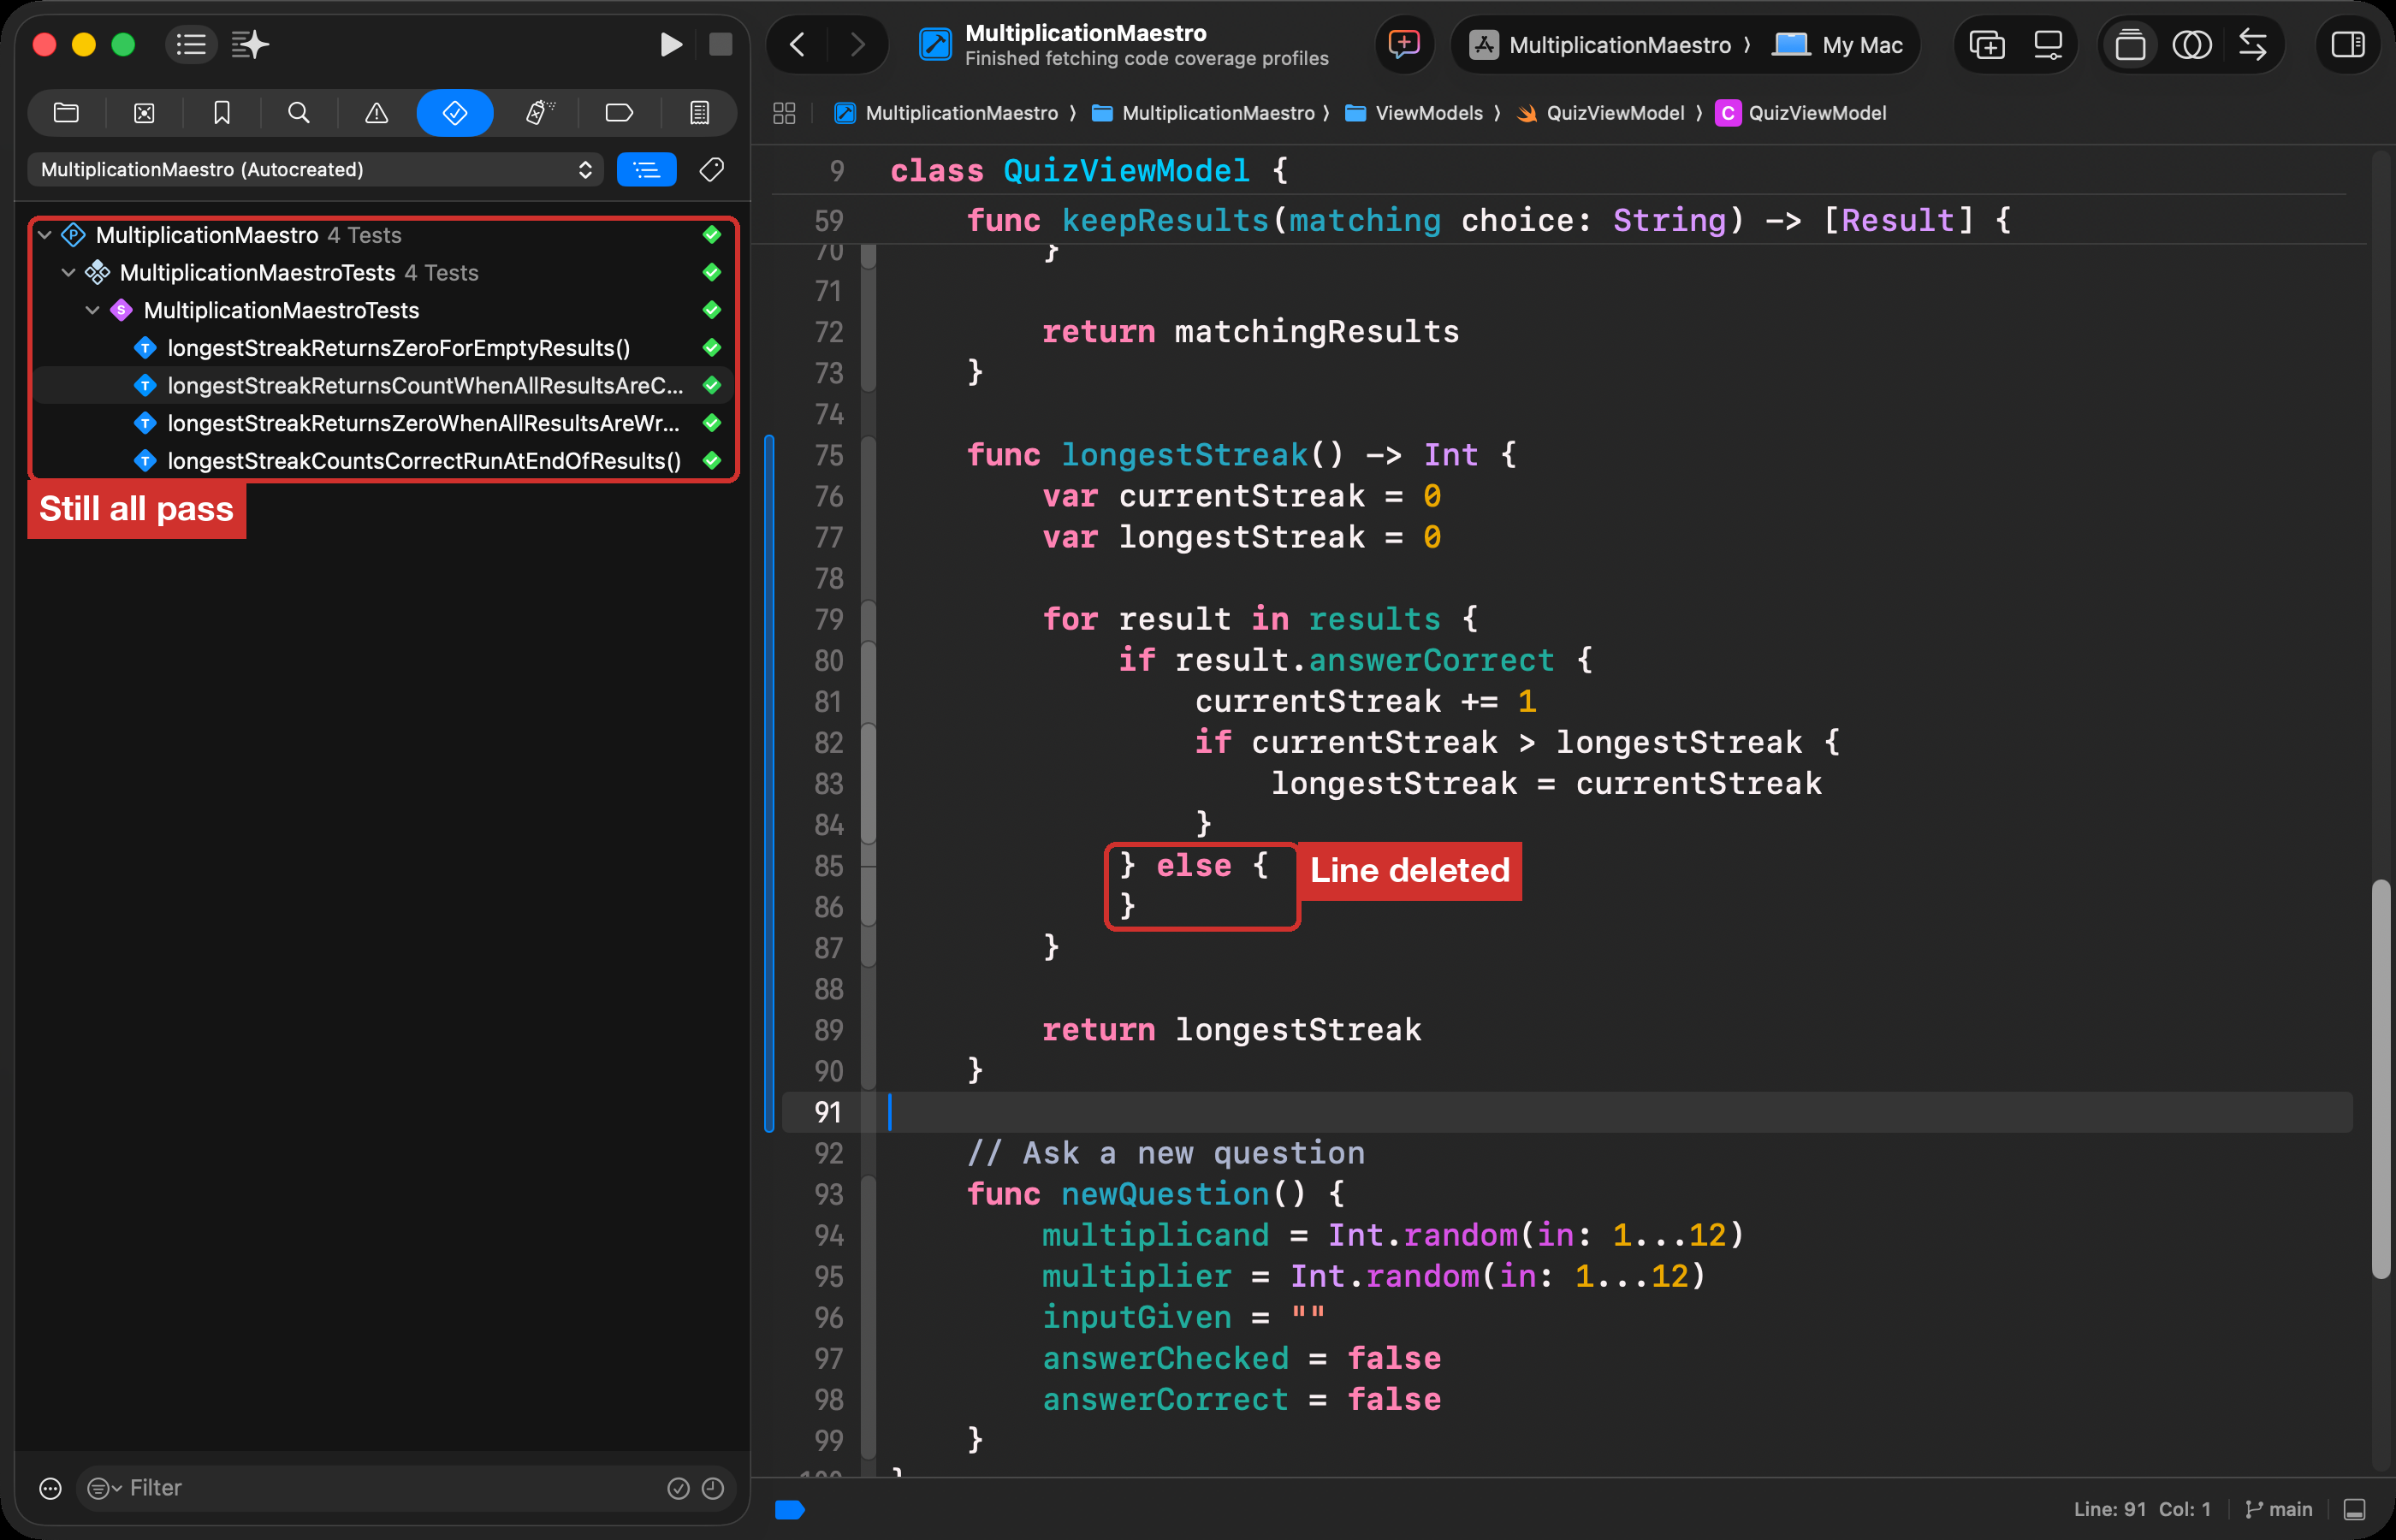
The tests missed a real bug. Copilot wrote them, and it said they were complete. They were not.
Ask for a better test
-
Leave the line deleted. In Copilot, paste this prompt and press Return:
I deleted the line currentStreak = 0 from longestStreak(), and all four tests still pass. Do not change longestStreak(). Add one test that fails while that line is missing, and explain in one sentence why the other tests missed it.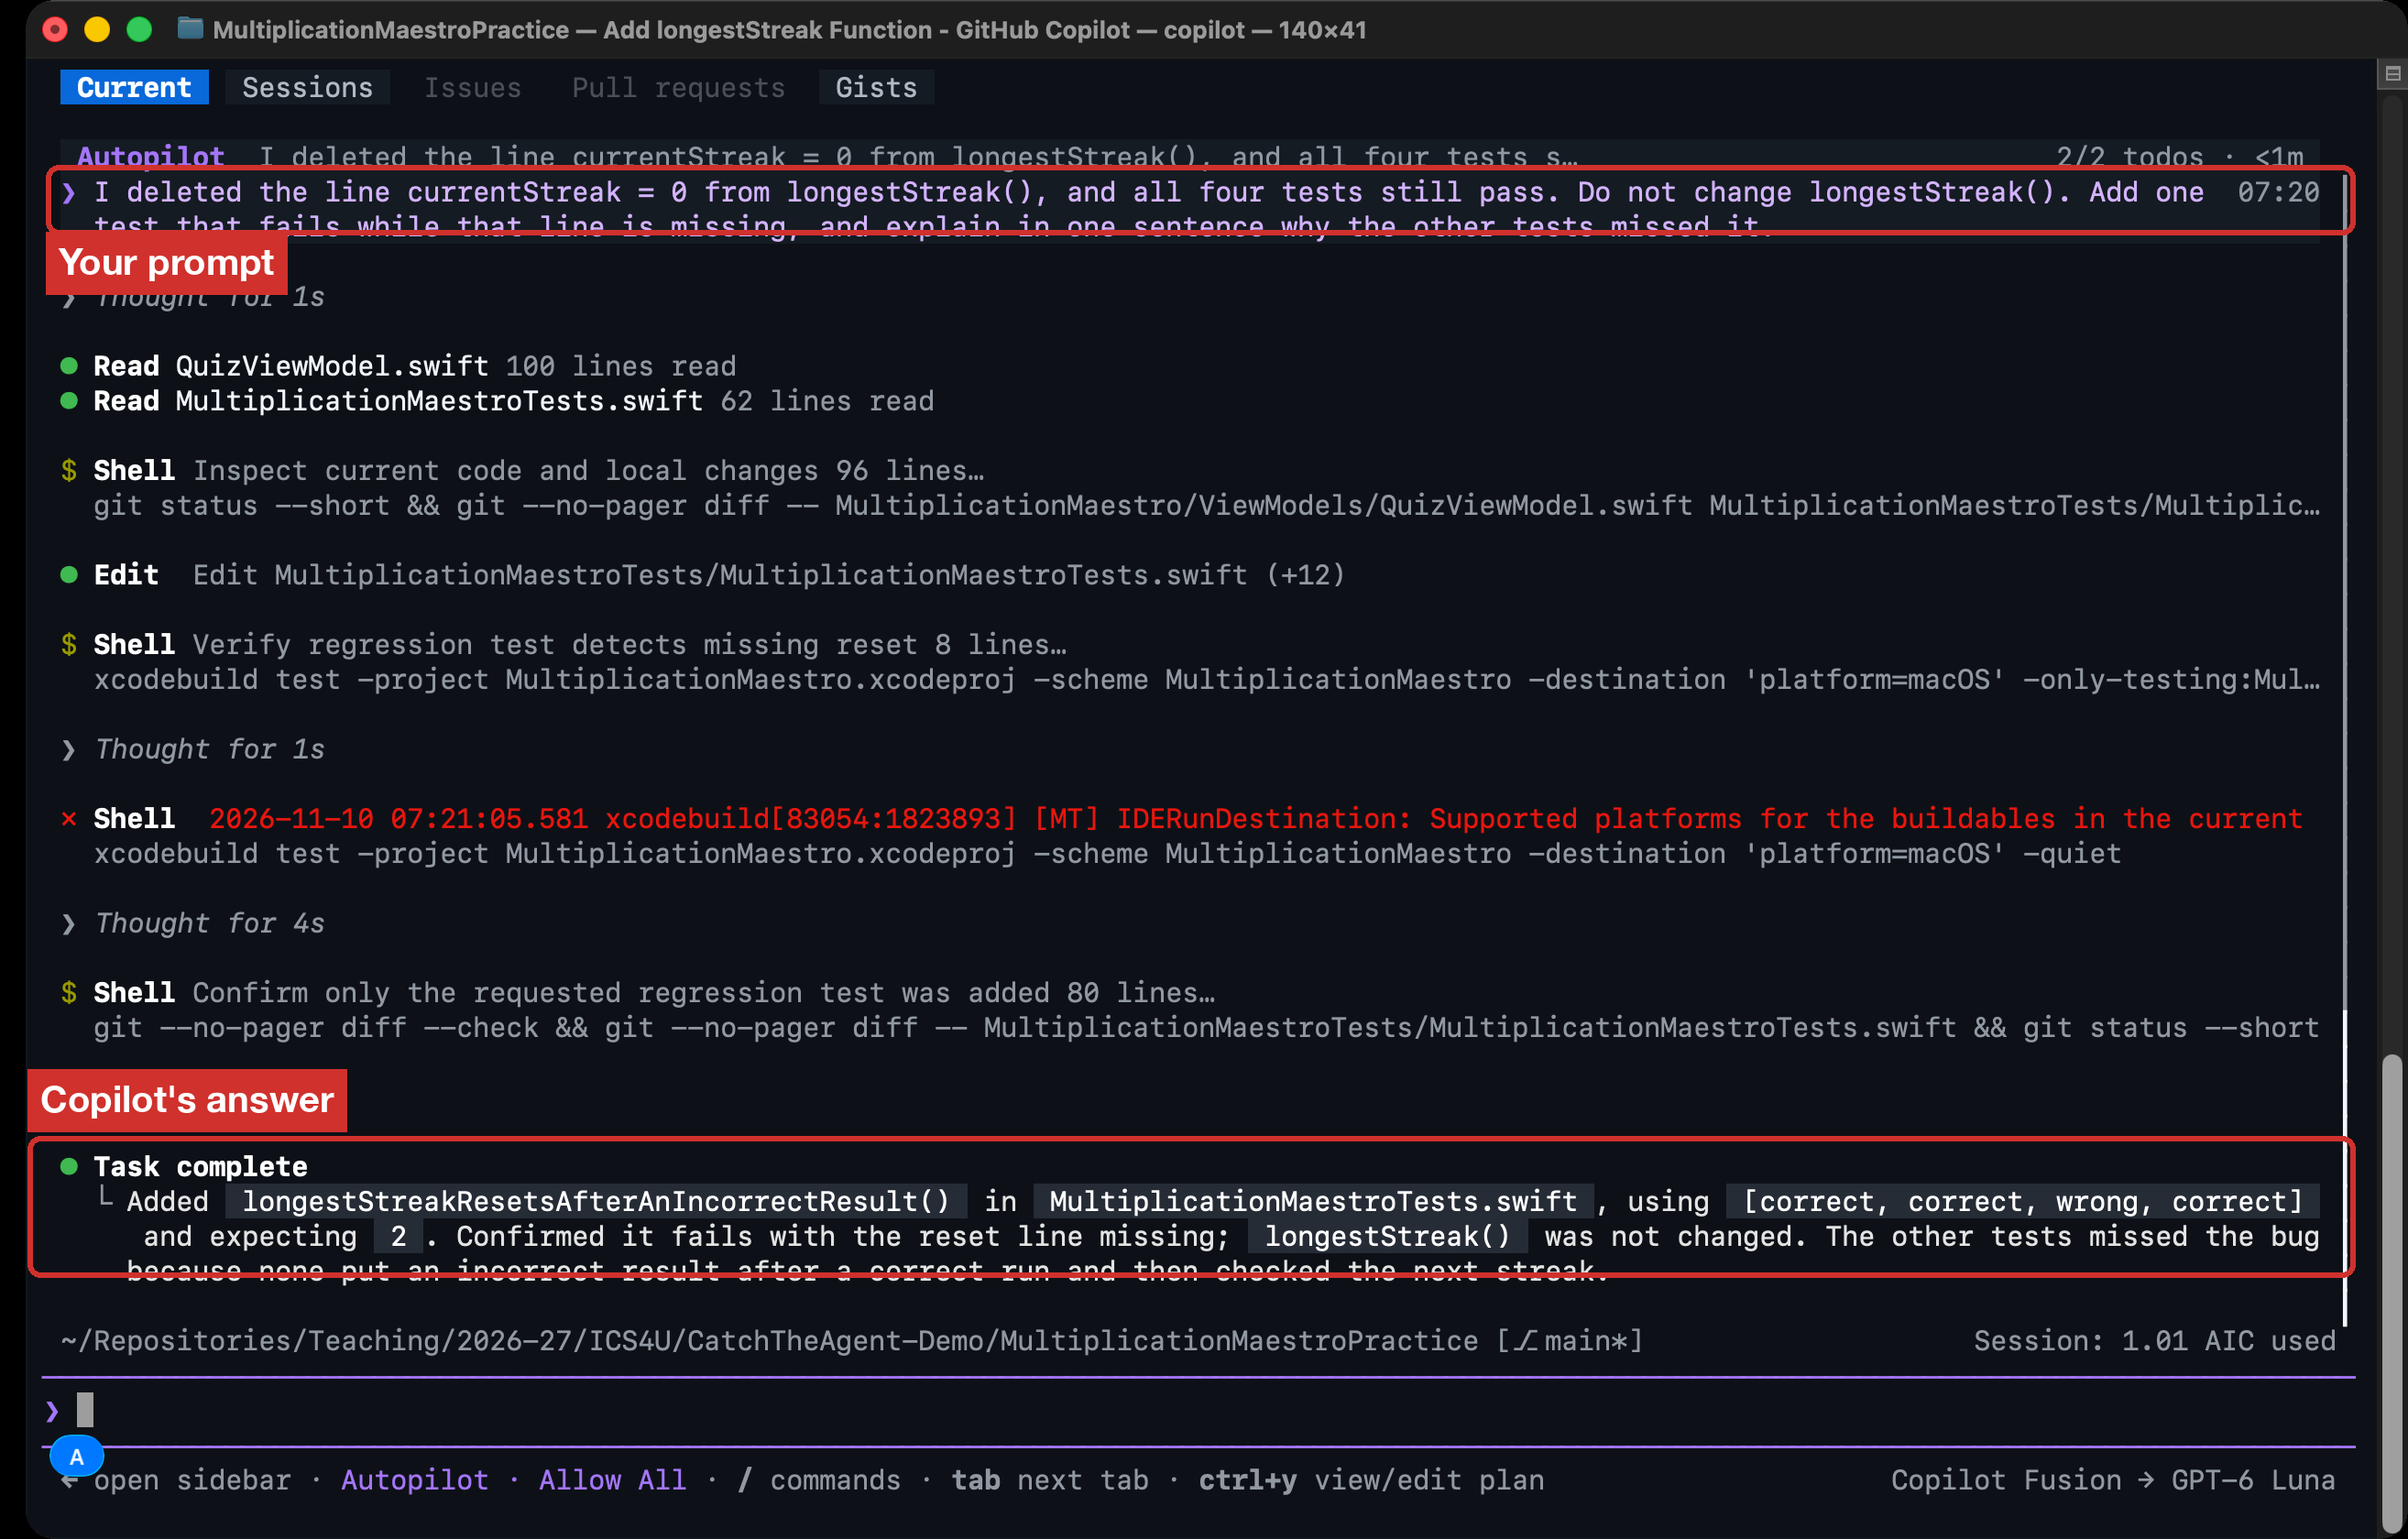
-
In Xcode, check that
currentStreak = 0is still missing. Then press Command-U. The new test fails. That is correct, because the line is still missing.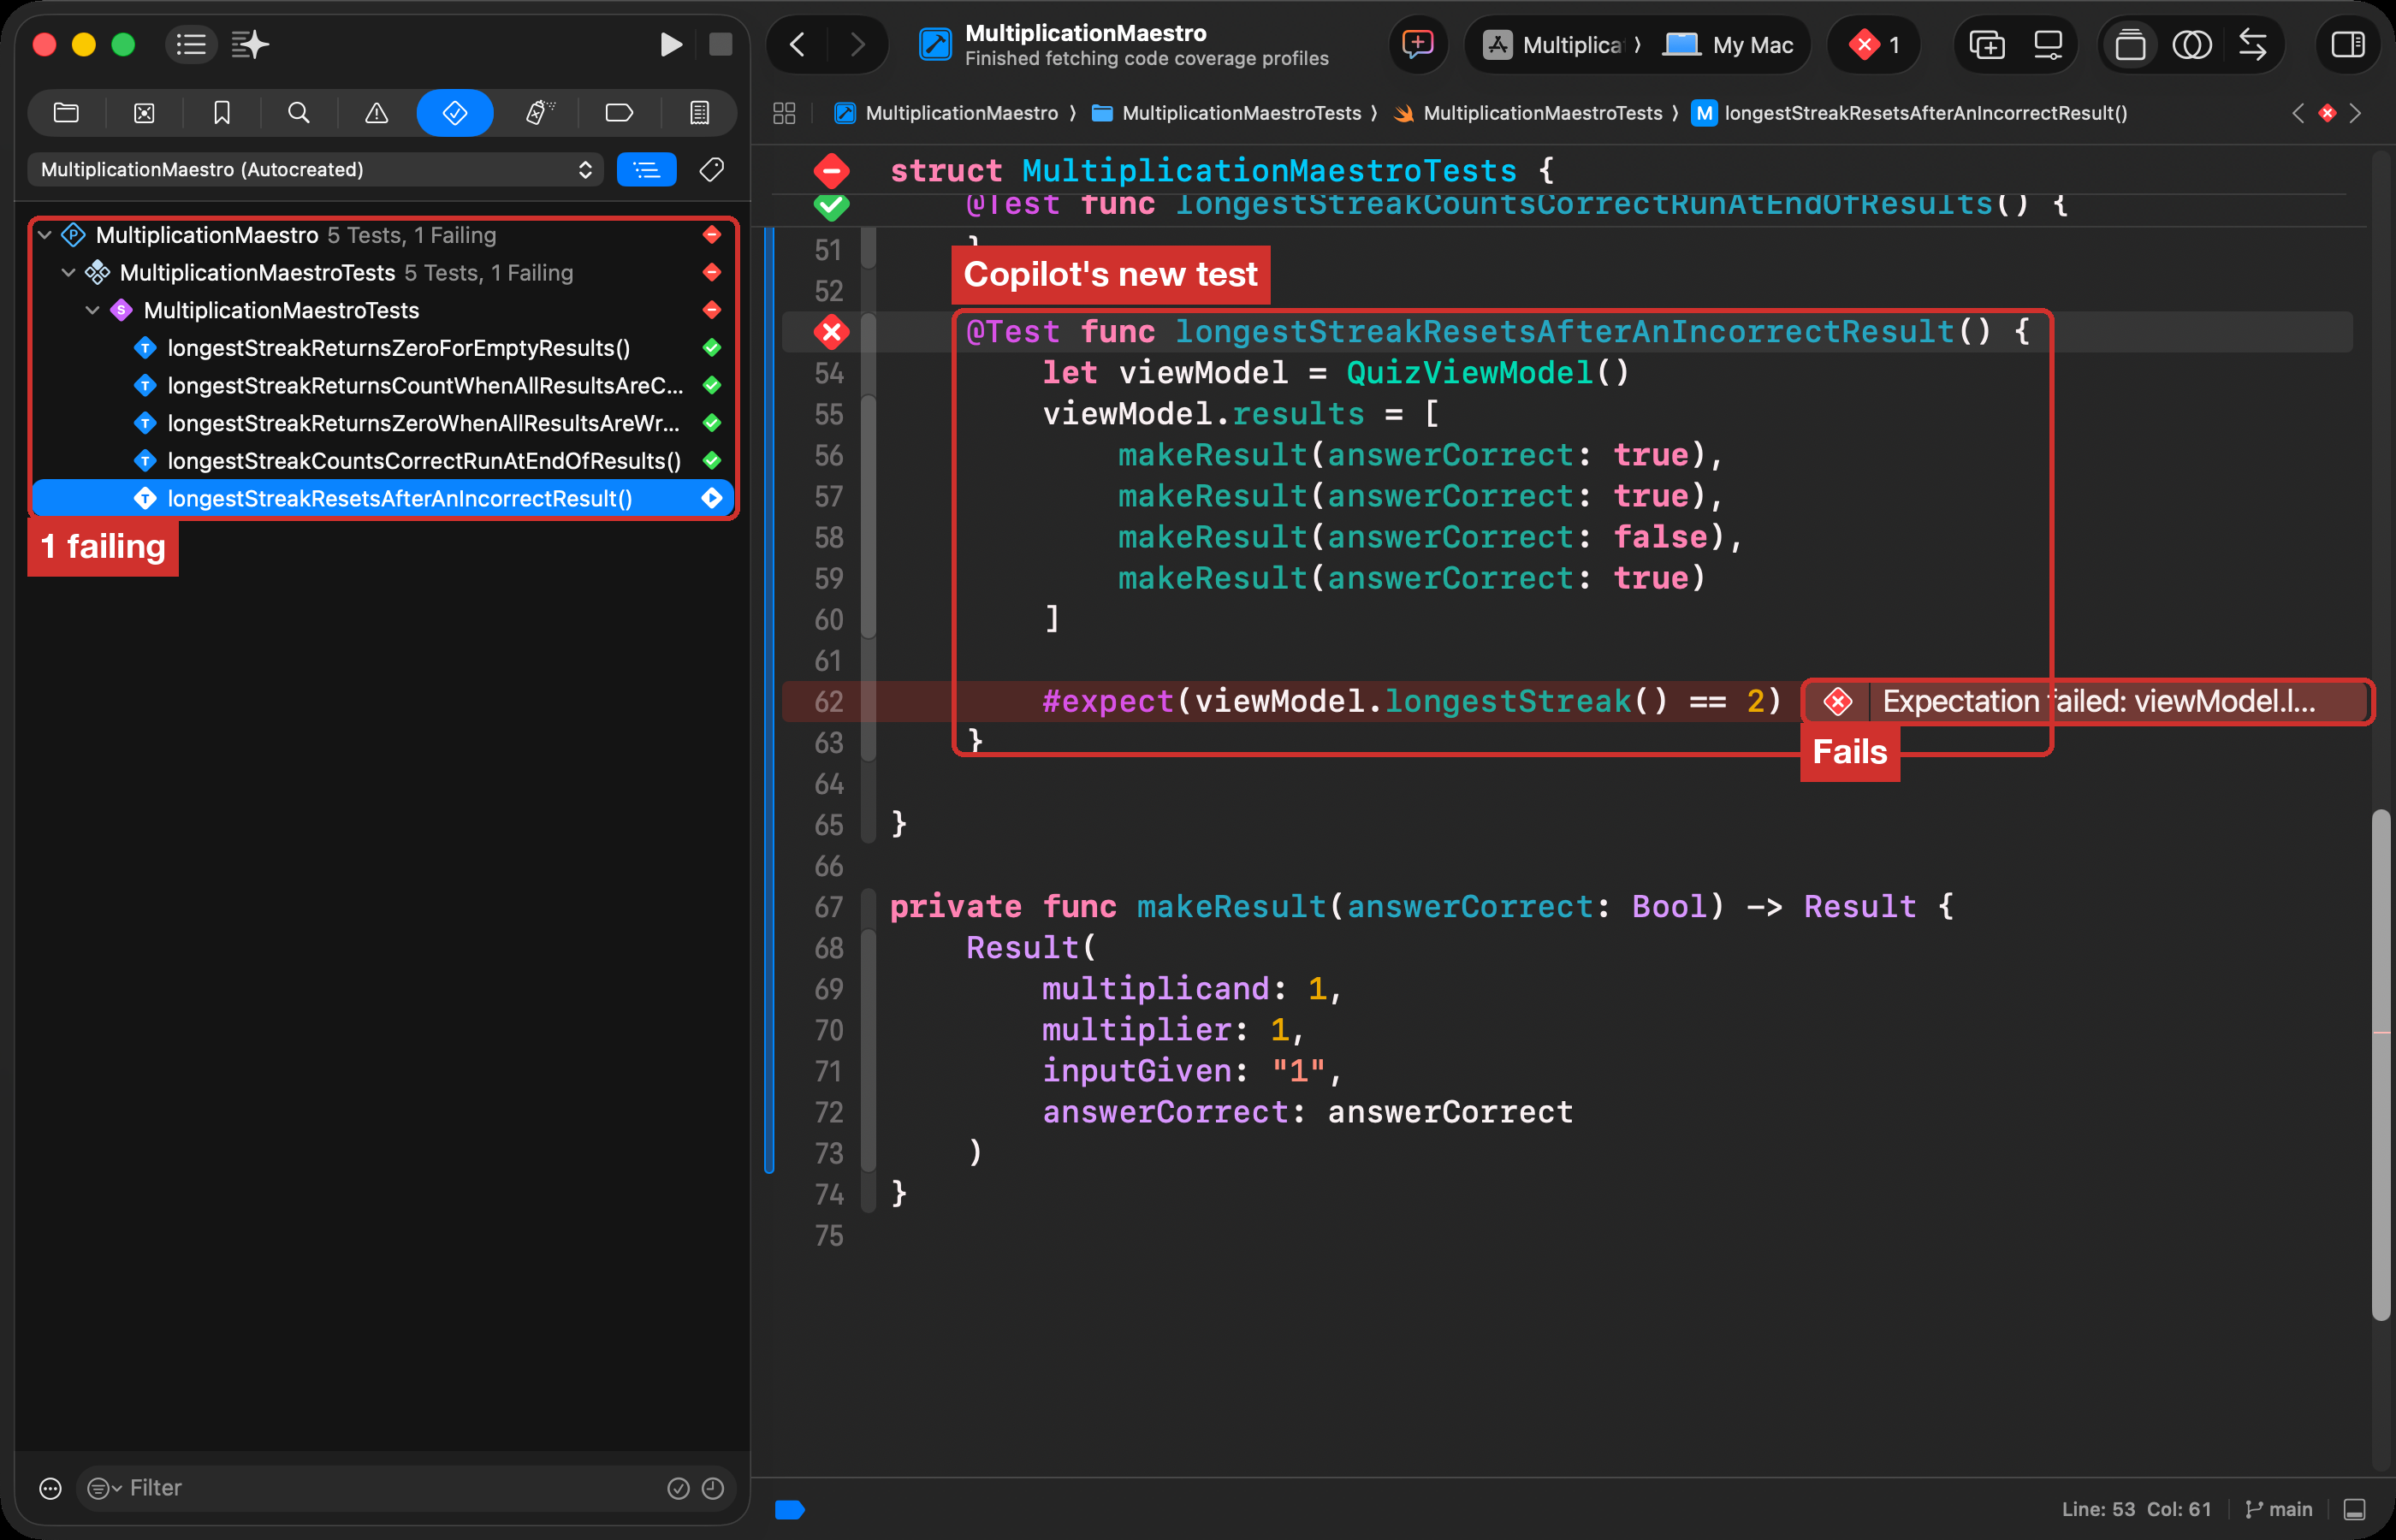
-
Put the line back:
currentStreak = 0 -
Press Command-U again. All five tests pass.
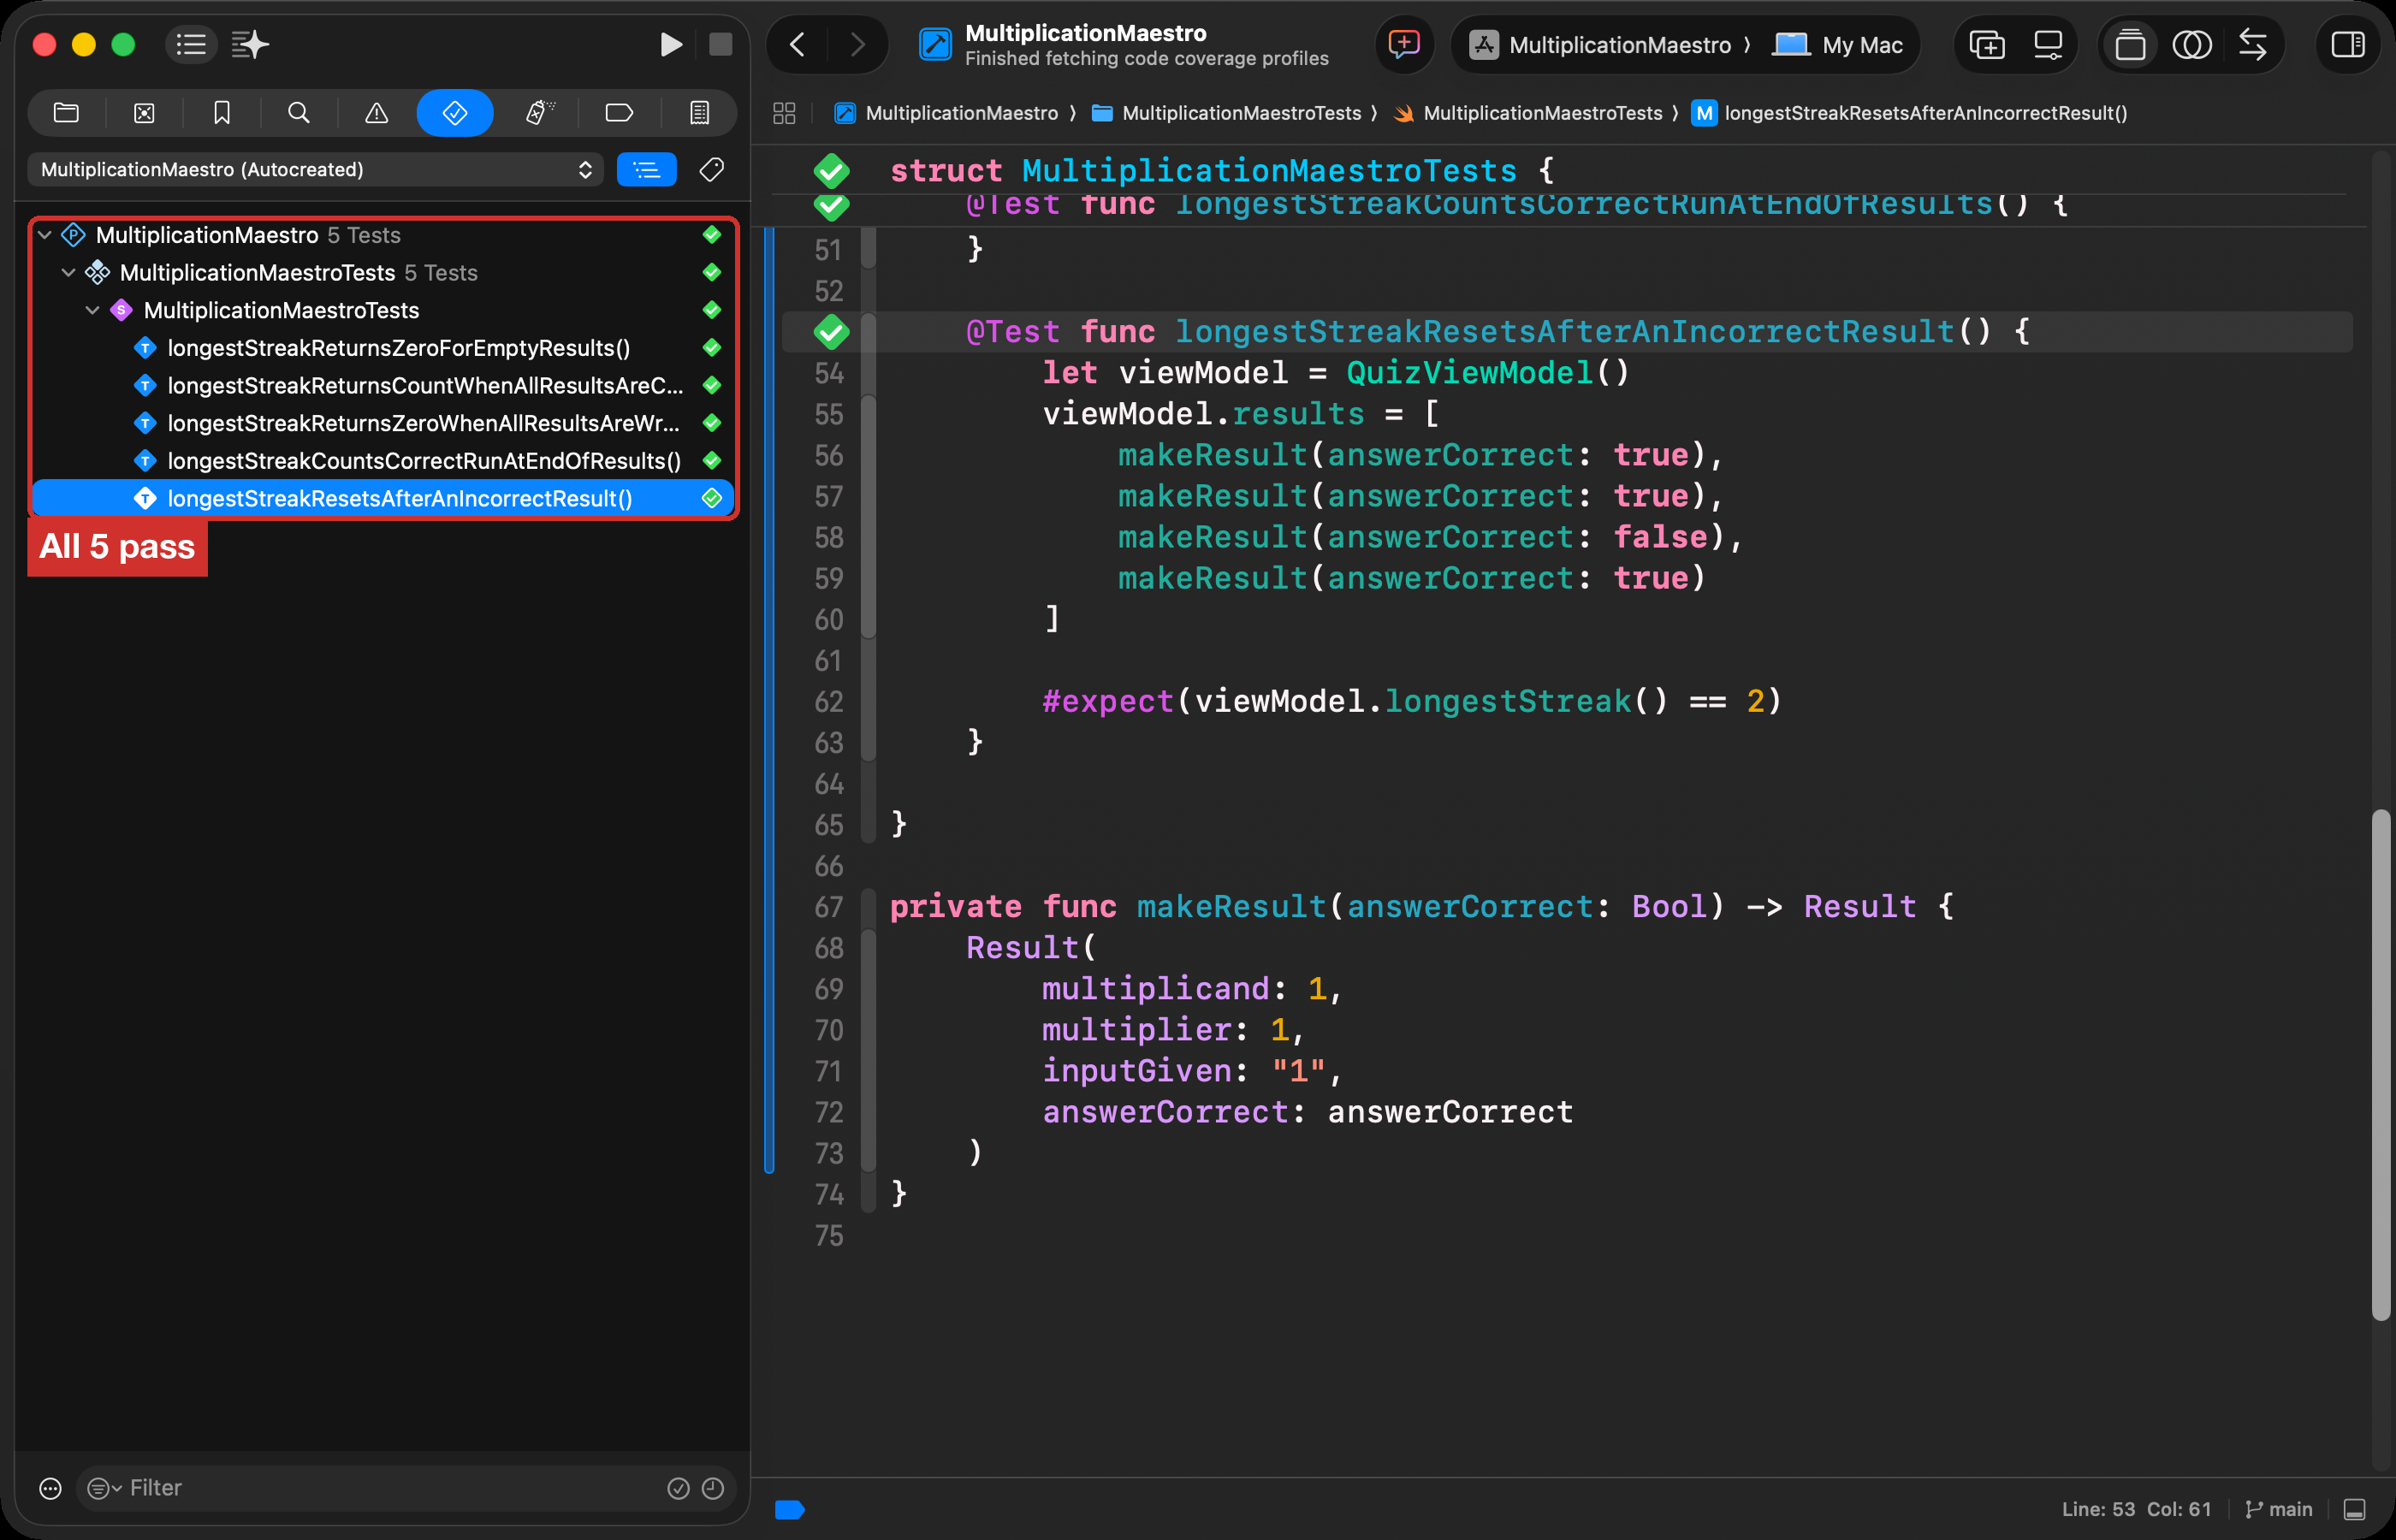
Read the new test. It has a wrong answer between two runs of right answers, so it checks that the streak starts again.
7. Look for what is missing
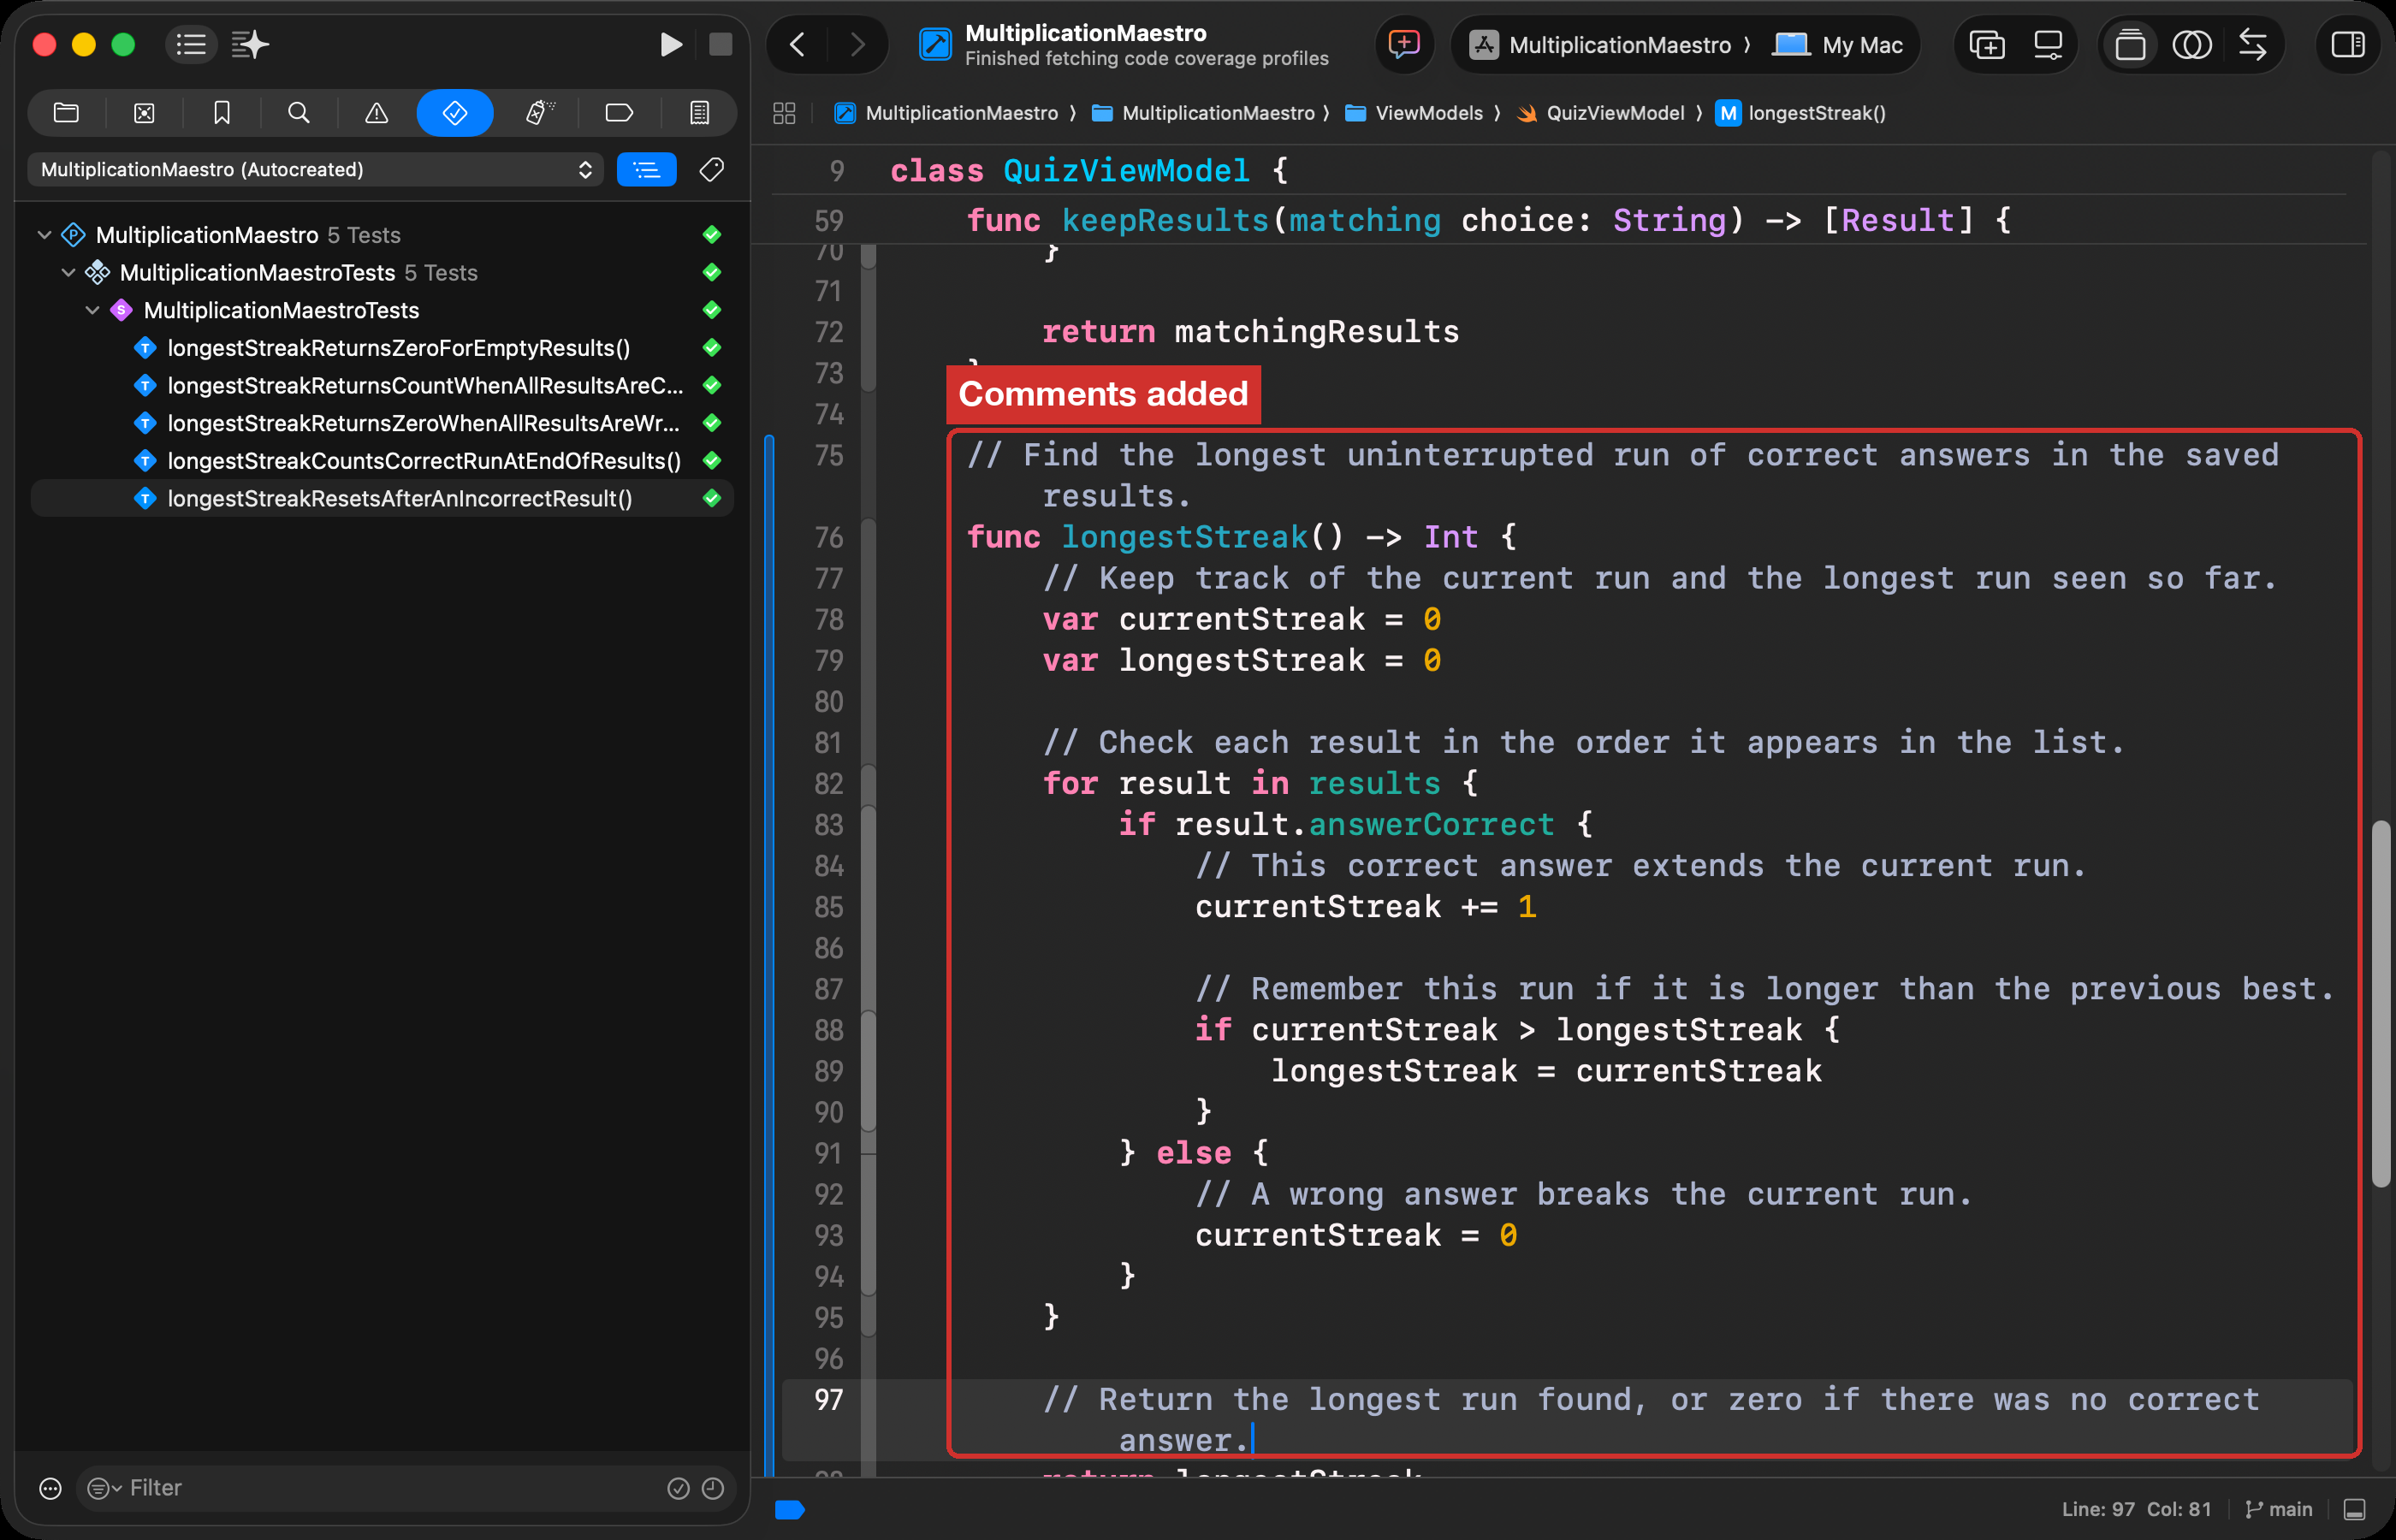
Look at the function again. Are there any comments?
Copilot wrote none, because the prompt did not ask for any. An agent does what you ask, not what you need.
-
Paste this prompt into Copilot and press Return:
Add comments to longestStreak() and to each test. Explain what each part does, in plain words that a classmate could follow. Do not change any code. -
Read every comment in Xcode. Does each one say what its line really does?
-
Press Command-U once more, to check that nothing else changed.
8. Ask a new session to review
The agent that wrote the code is not the best one to review it. Start a new Copilot session. It has not seen how the code was written, so it reviews the code like a different person.
-
In Copilot, type
/exitand press Return. Then typecopilotand press Return to start again. -
Press Shift-Tab until the bar says Plan. In Plan mode, the new session writes a plan before it changes anything.
-
Paste this prompt and press Return:
Review longestStreak() in QuizViewModel and its tests in MultiplicationMaestroTests. Find bugs, missing test cases, and anything a beginner would find hard to understand. Do not change any files. List what you find, most important first.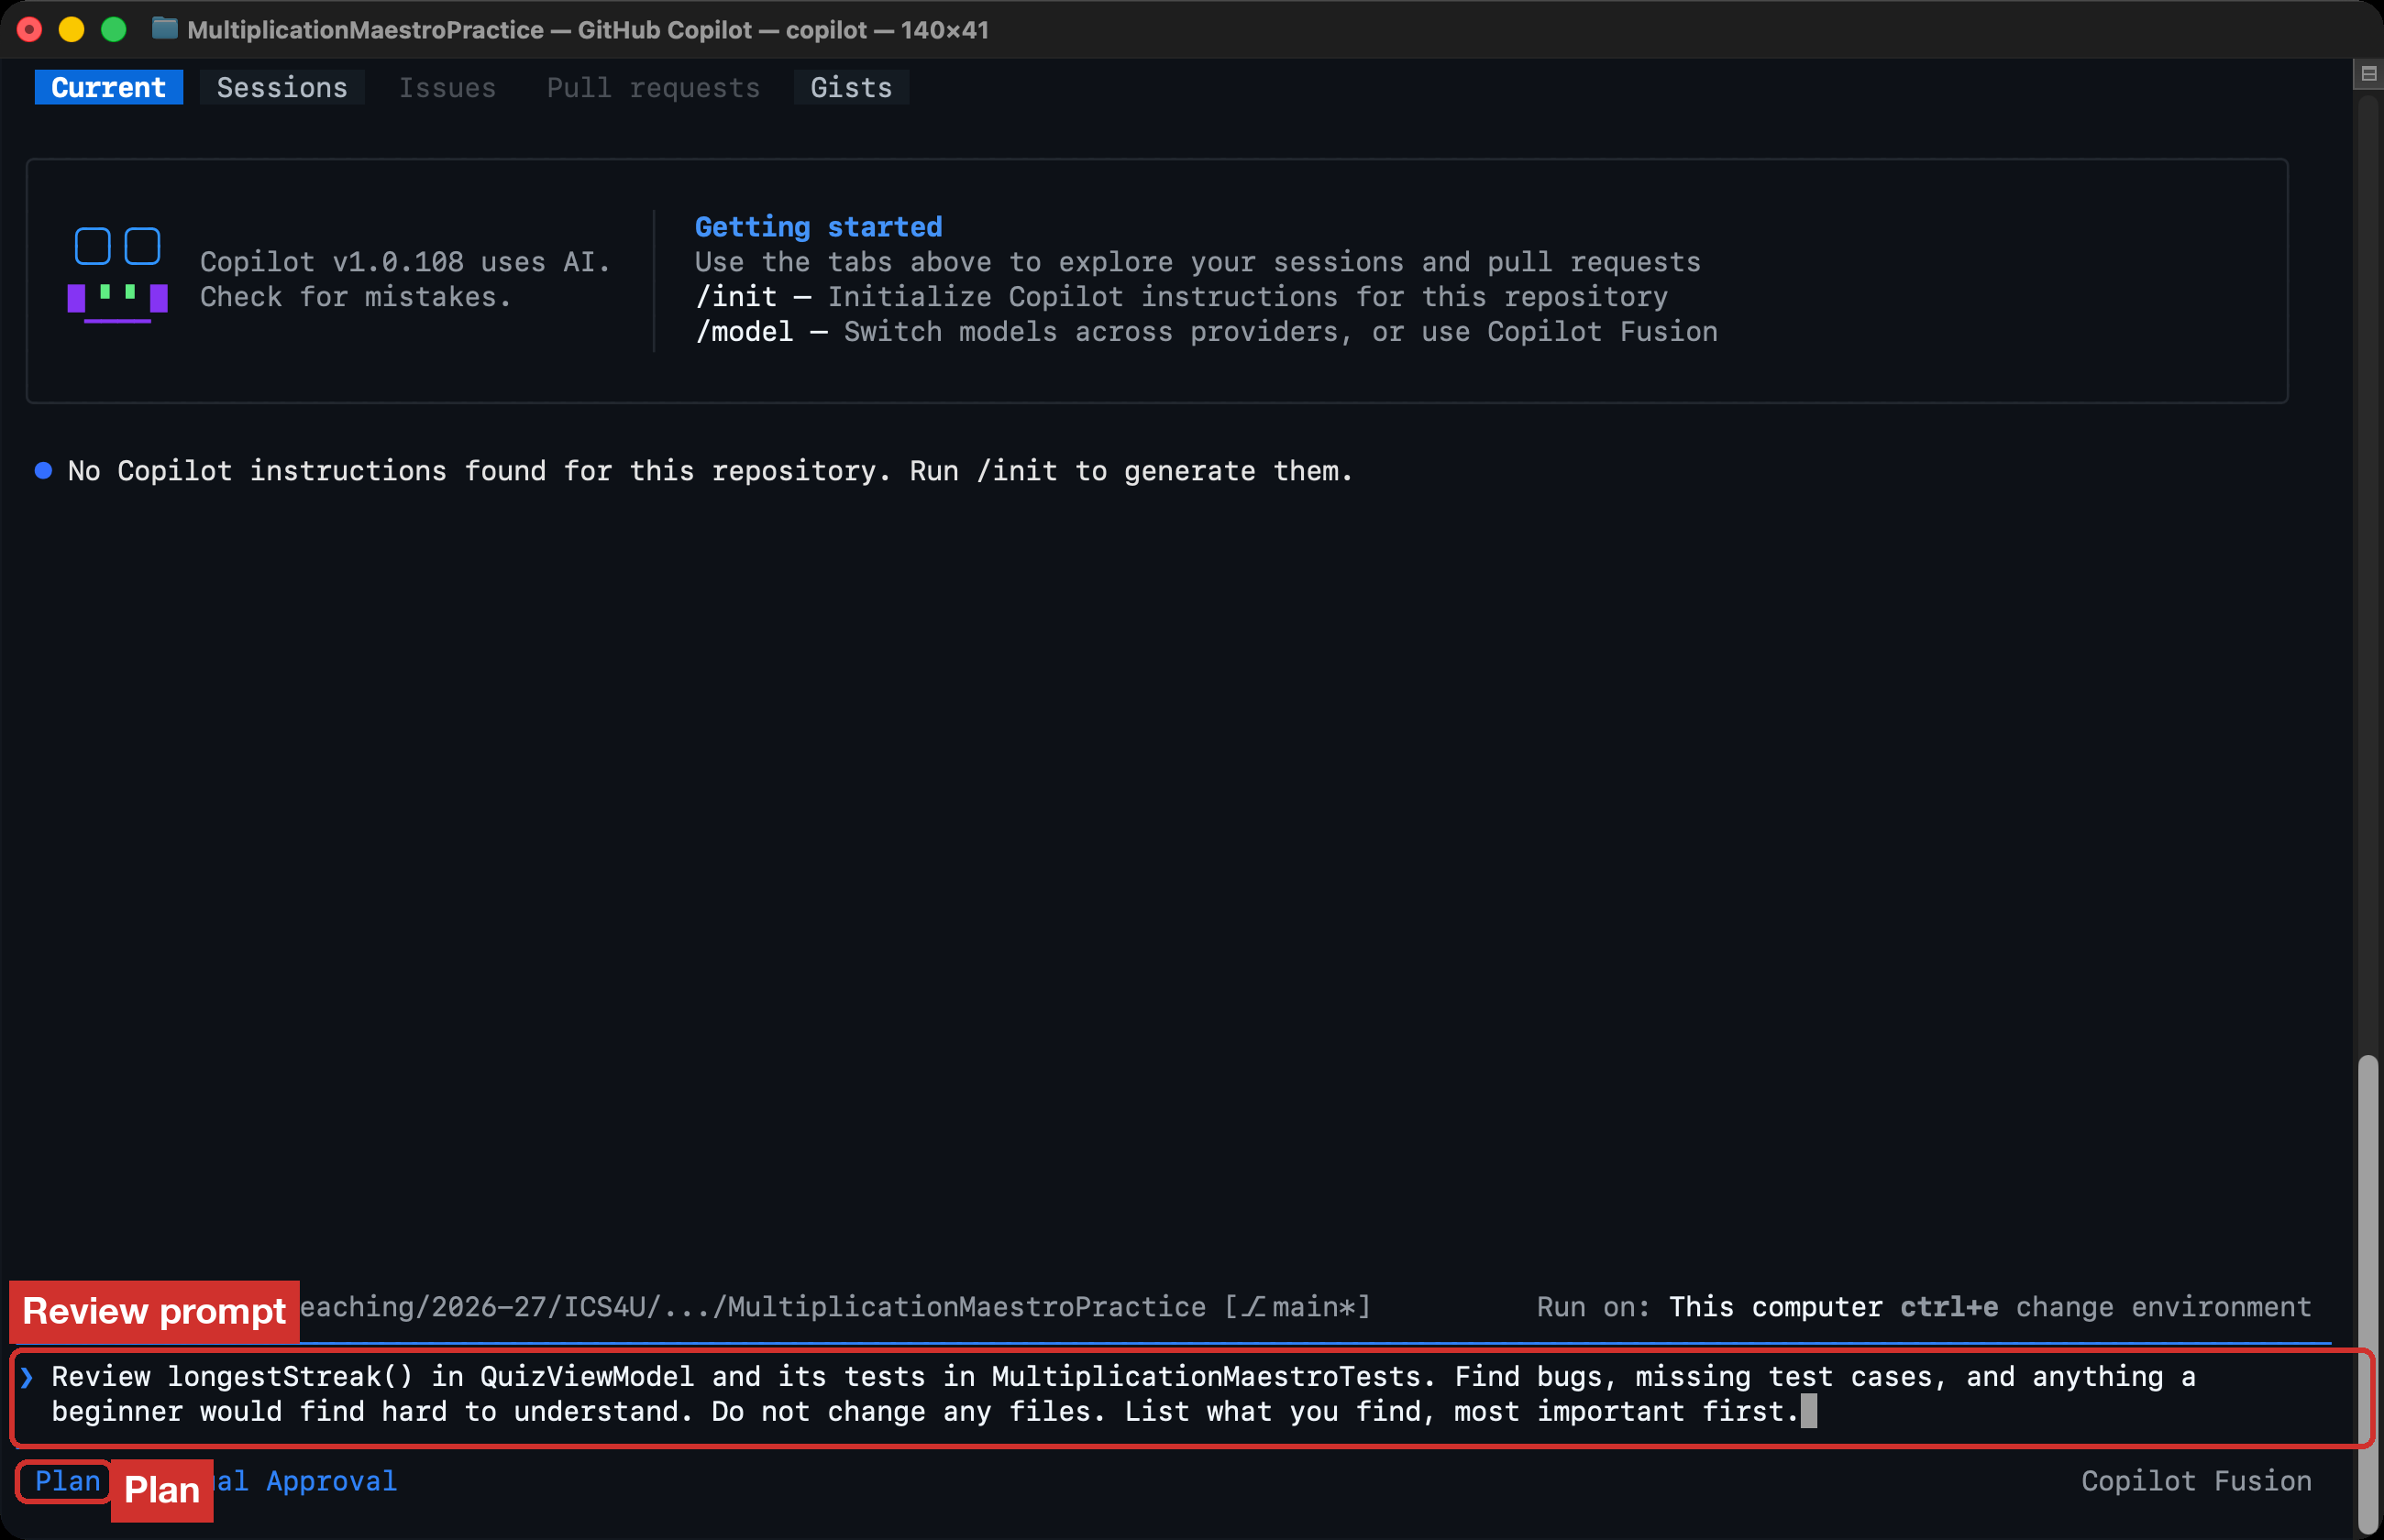
-
If Copilot asks what to do, choose the answer that says to review and report findings only.
-
If Copilot shows a plan, choose Accept plan and continue in Interactive execution mode. With Manual Approval, Copilot asks you before it changes anything or opens a web page.
-
Read what it finds.
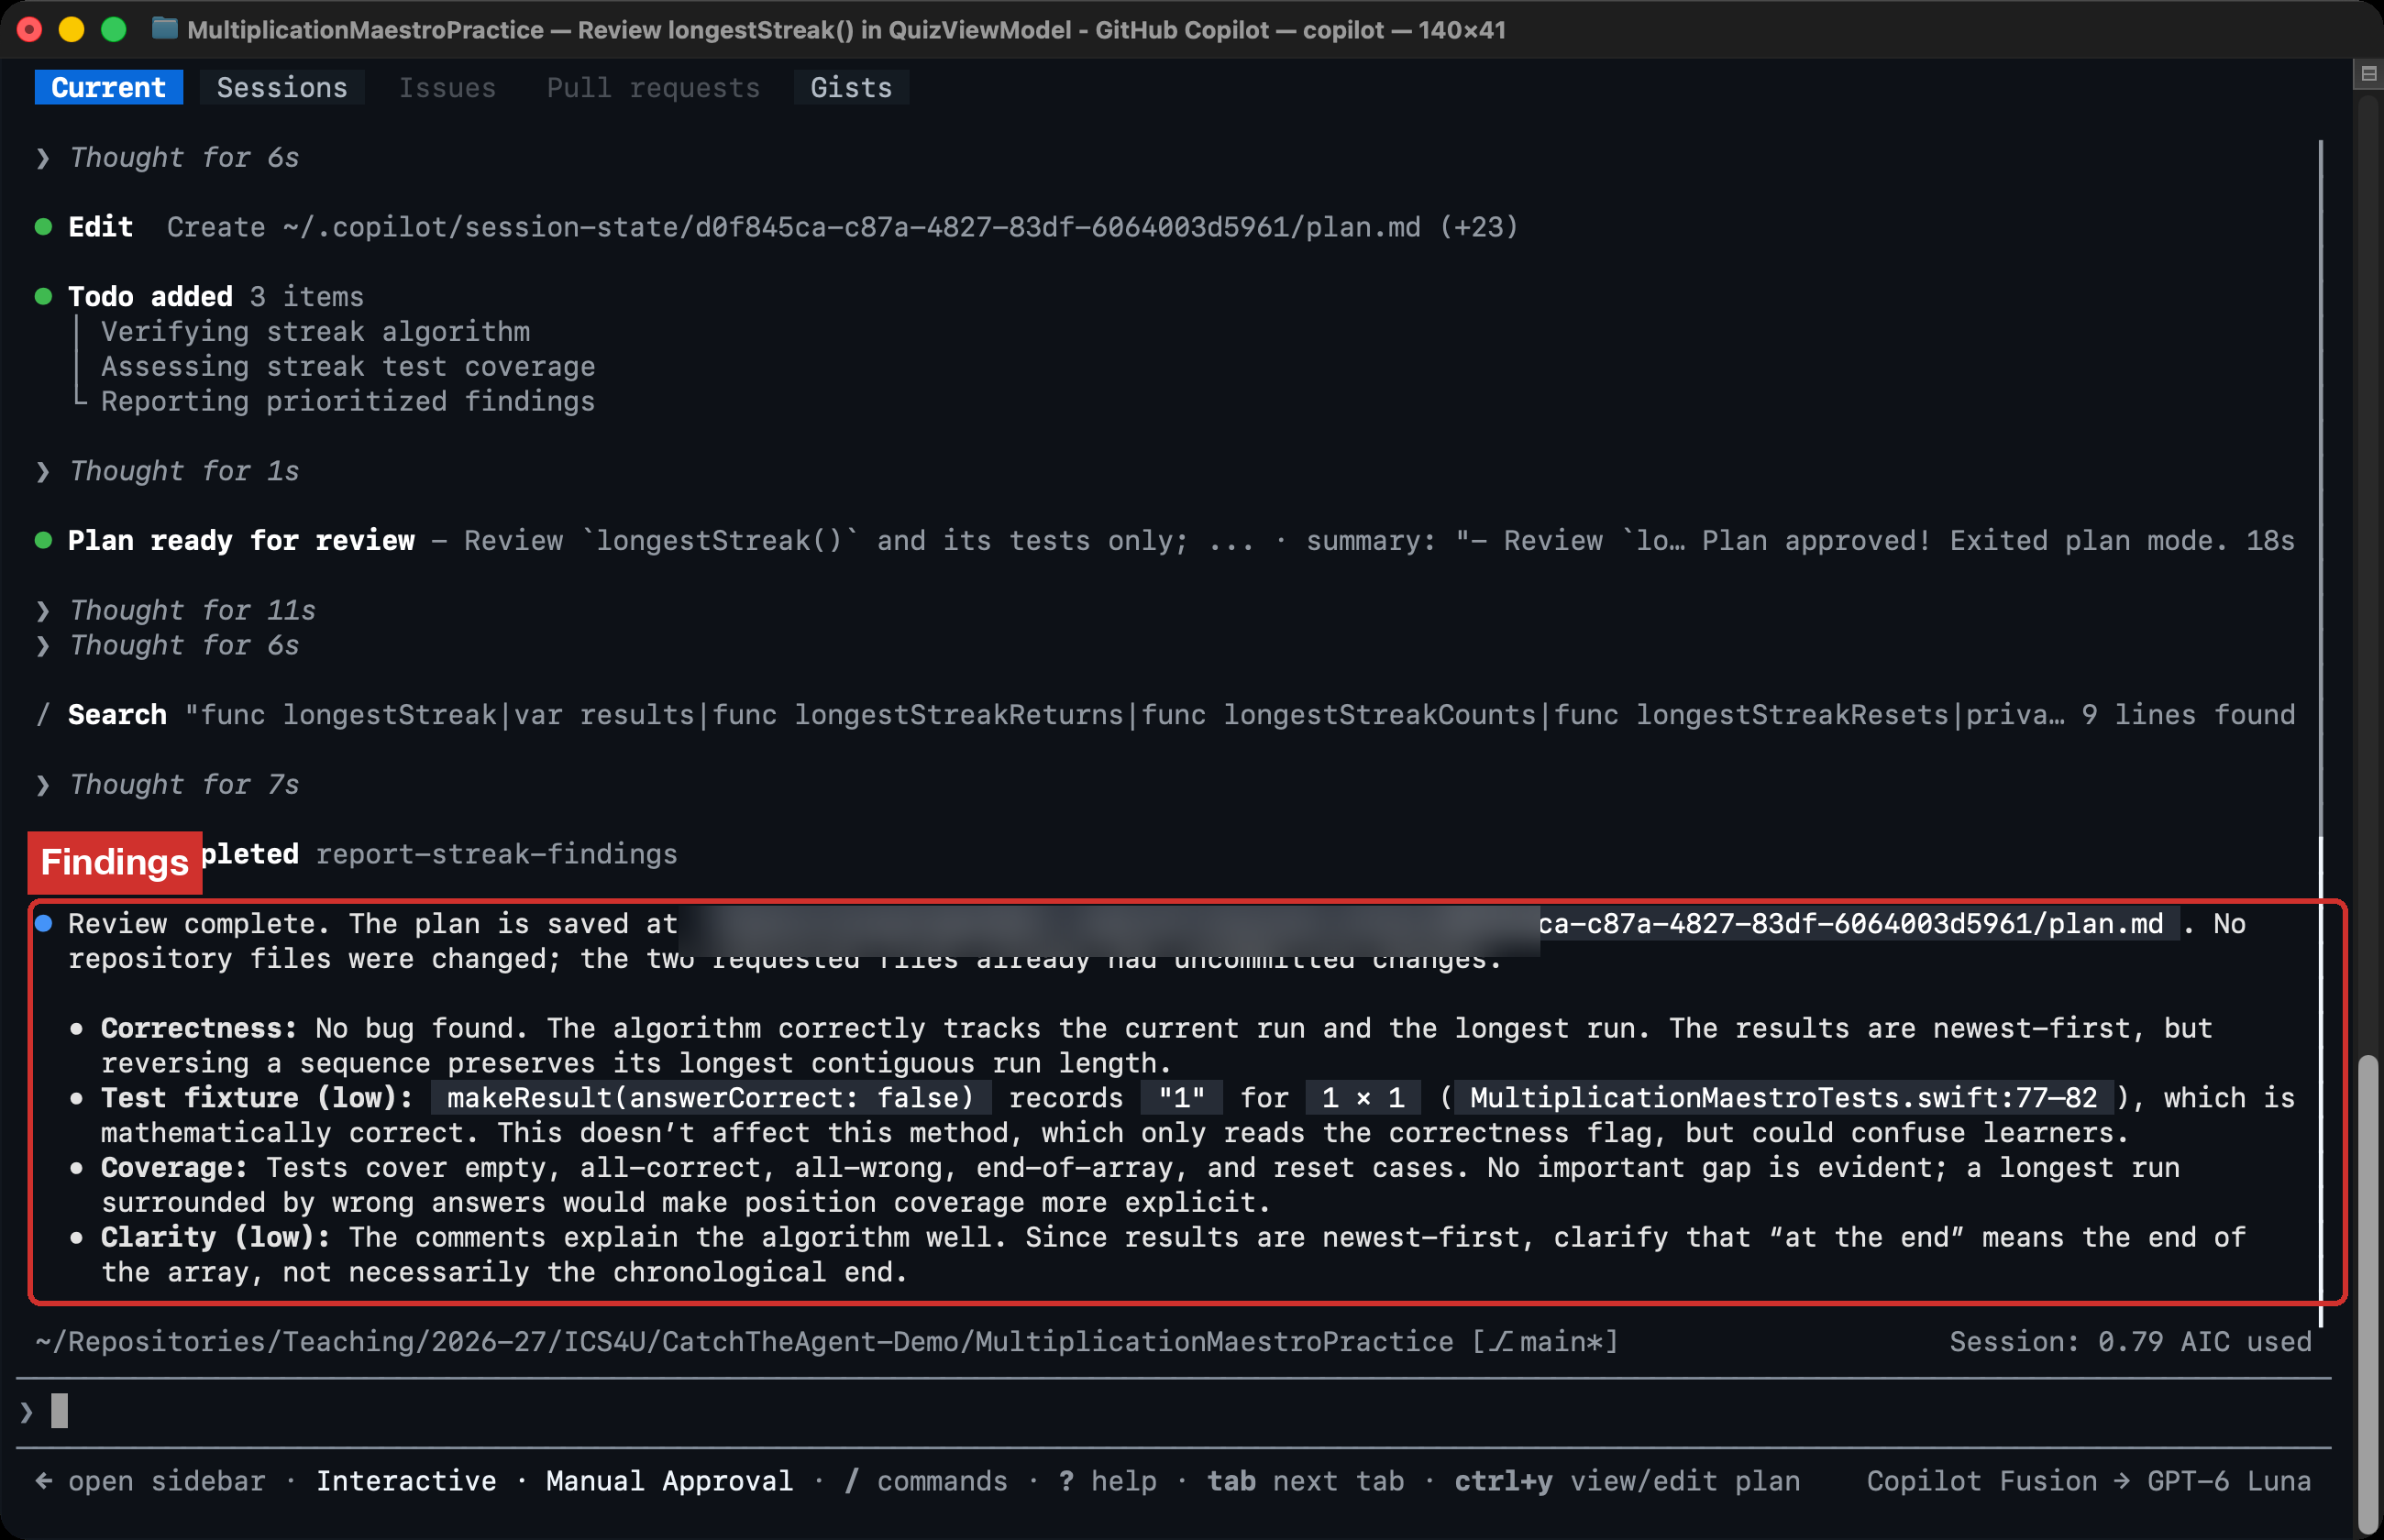
When I did this, the review found two things the first agent did not point out:
- The tests use a helper function to make results. Every result is 1 × 1 with a typed answer of
"1". That answer is correct, even for results marked wrong, so the test data does not match what it claims. The tests still work, but the data is confusing to read. - The list stores the newest answer first. So “a streak at the end of the list” means the oldest answers, not the newest.
You decide whether each finding matters. A reviewer can be wrong too.
9. Check one claim
An agent can invent a fact, or a source. Ask for the source, then check it yourself.
-
Paste this prompt and press Return:
In one or two sentences, what does @testable import do in my tests file? Give me a link to Apple's own documentation that supports your answer. -
If Copilot does not show a web address, paste this prompt. (When I did this, it linked a page by its title but did not show the address.)
Show me the full web address of that page, and quote the sentence on it that supports what you said.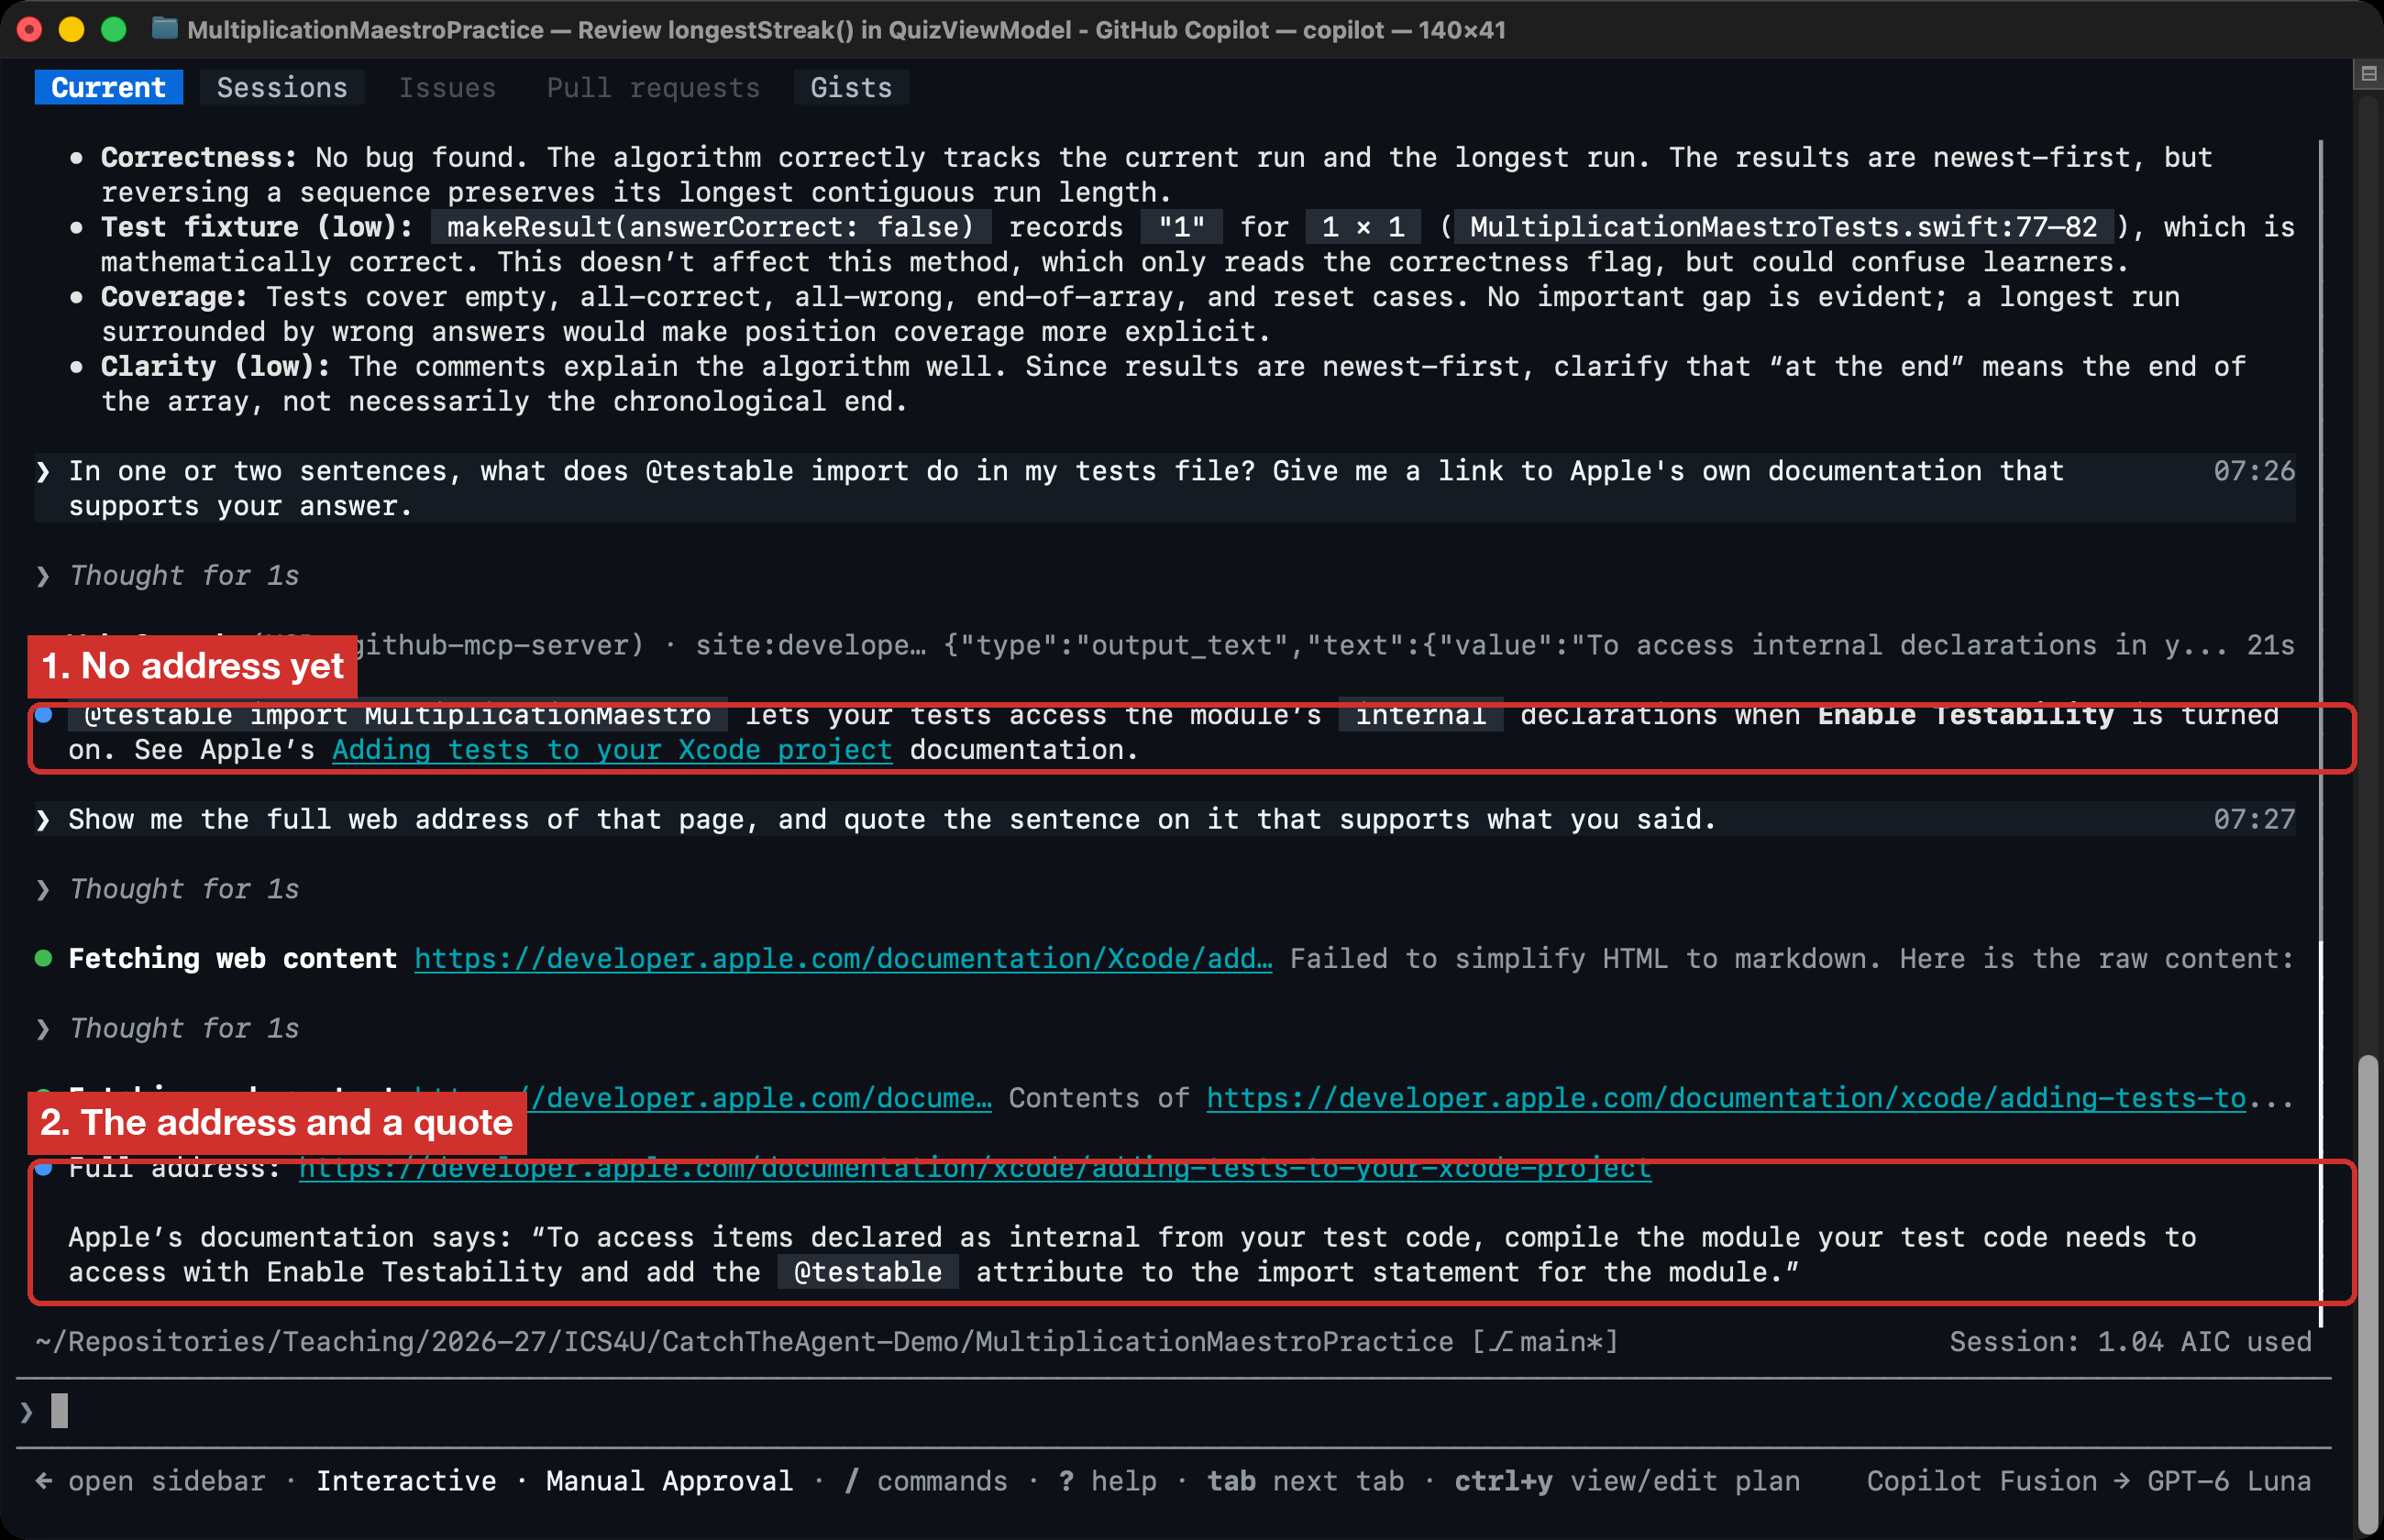
-
Copilot asks before it opens a web page. Read the address. Choose Yes only if it is a site you expect, such as
developer.apple.com.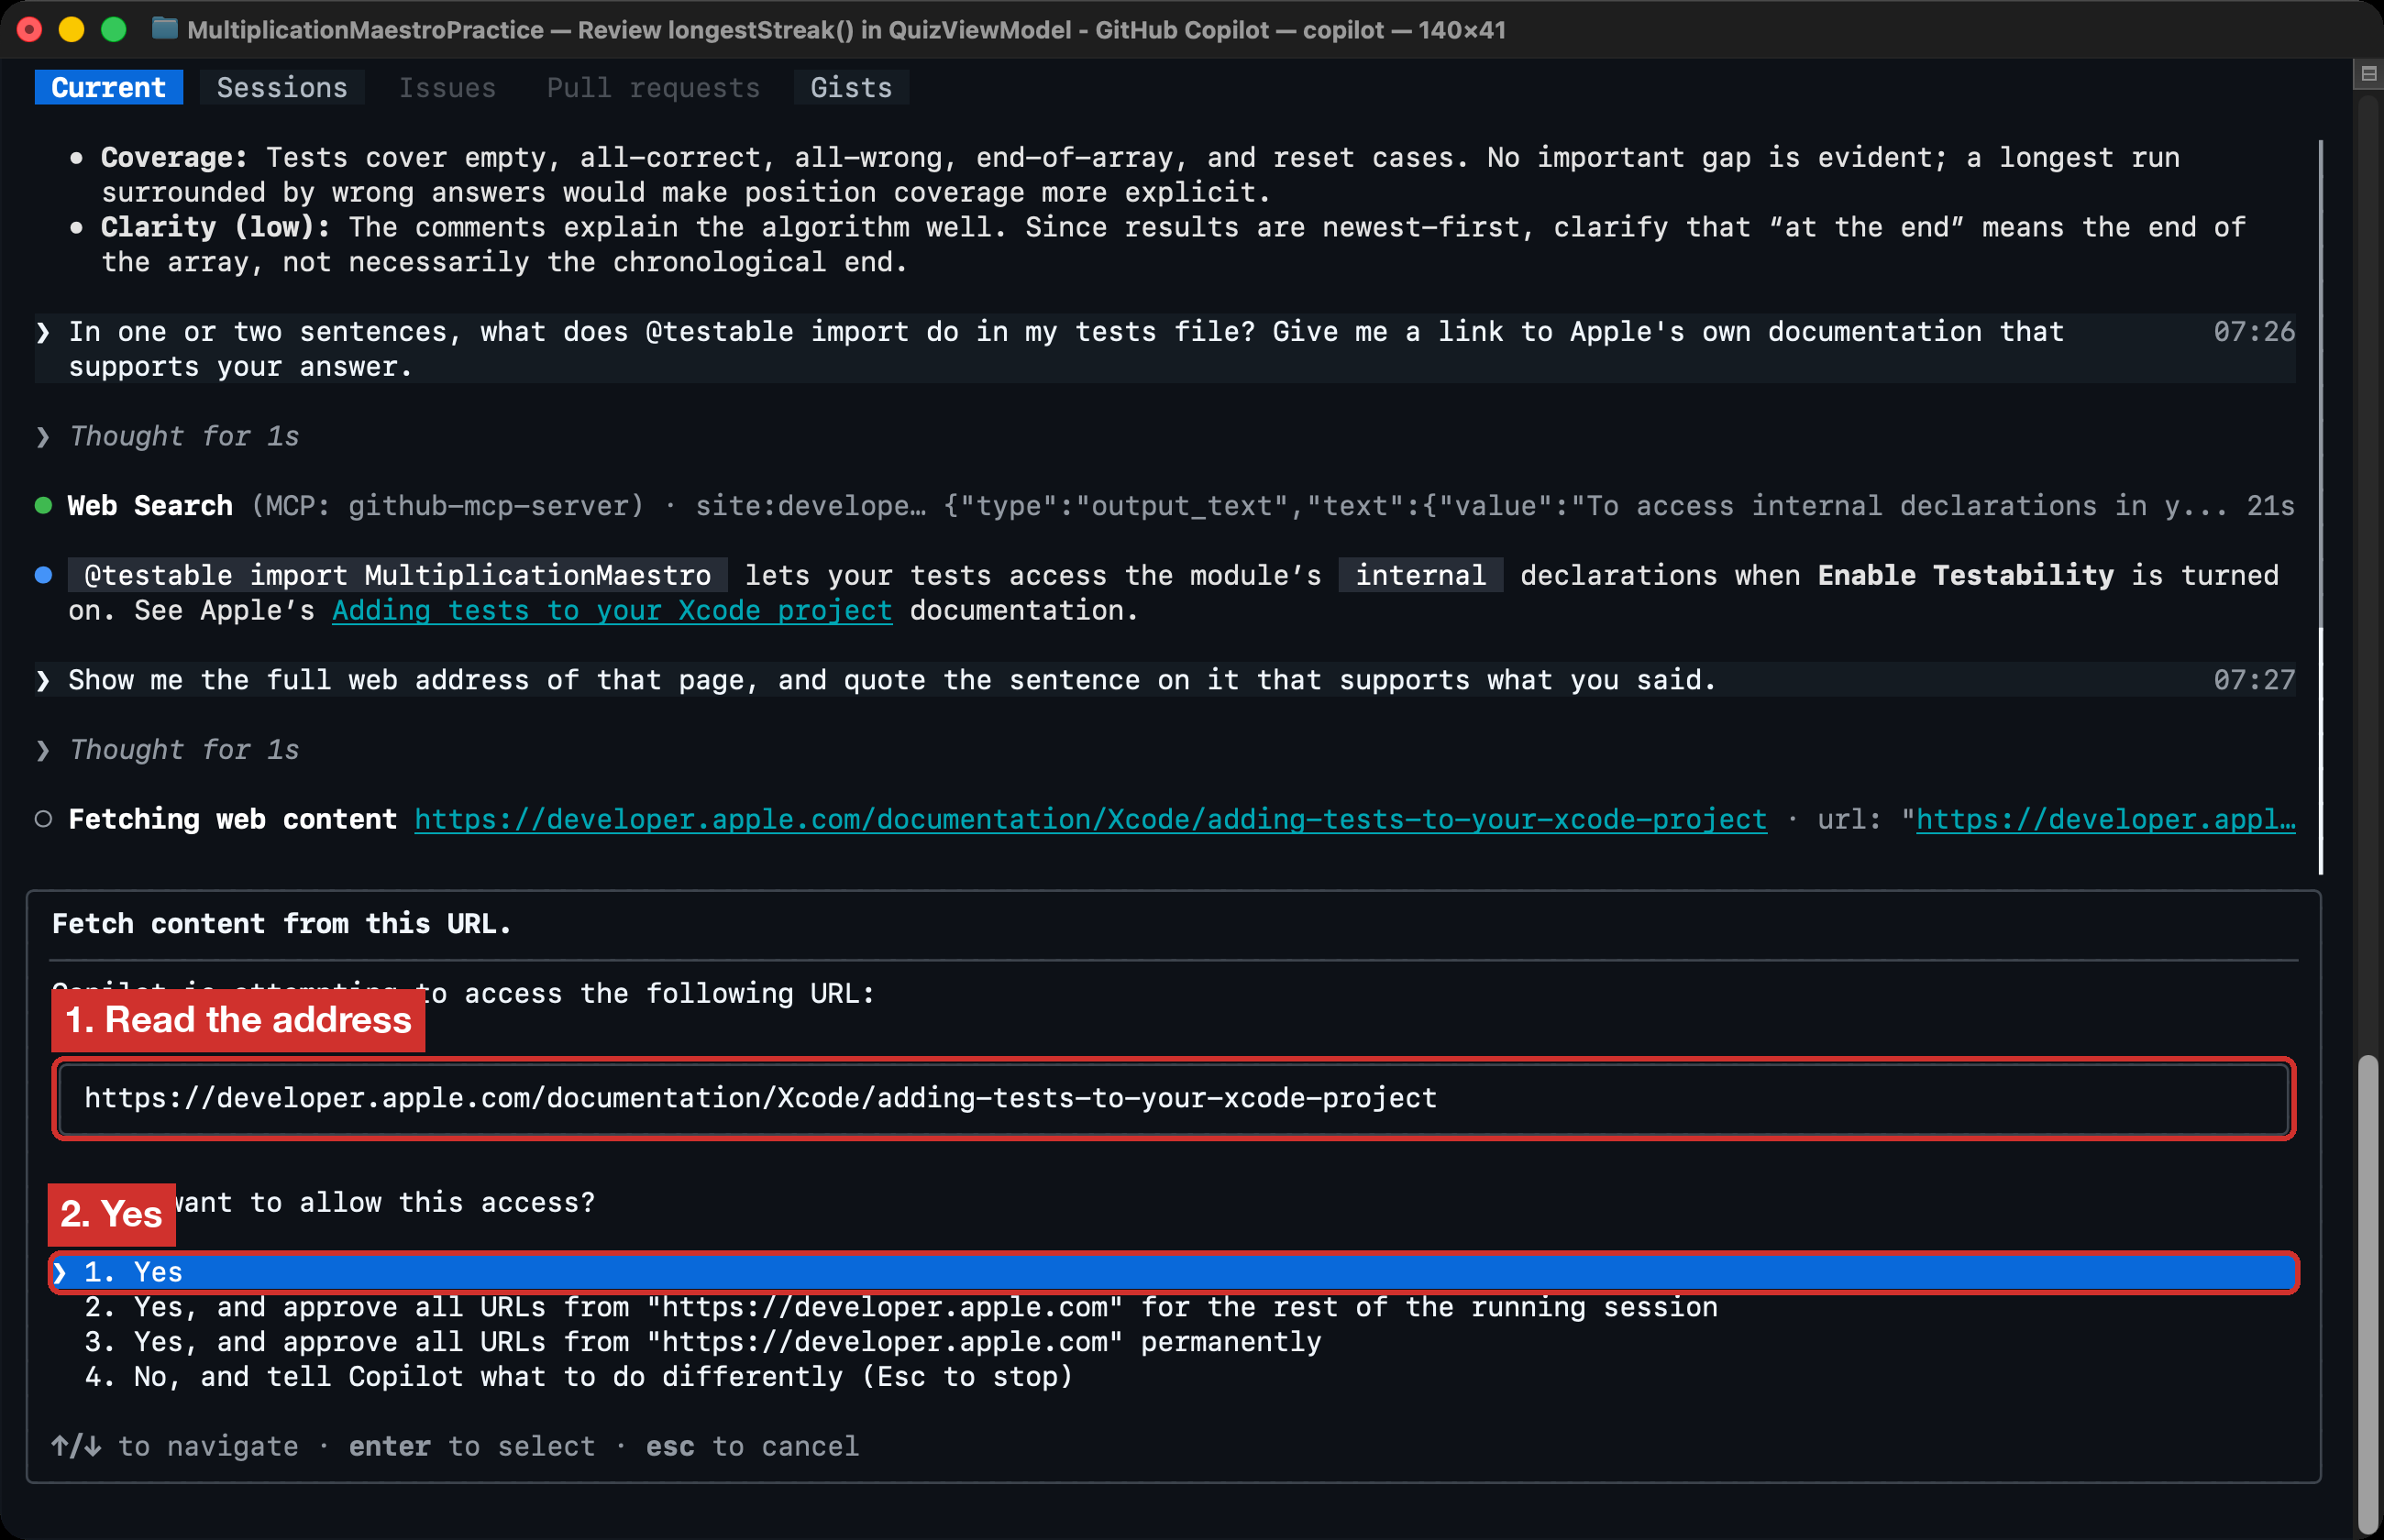
-
Open the address in your browser. Find the sentence. Does it really say what Copilot said?
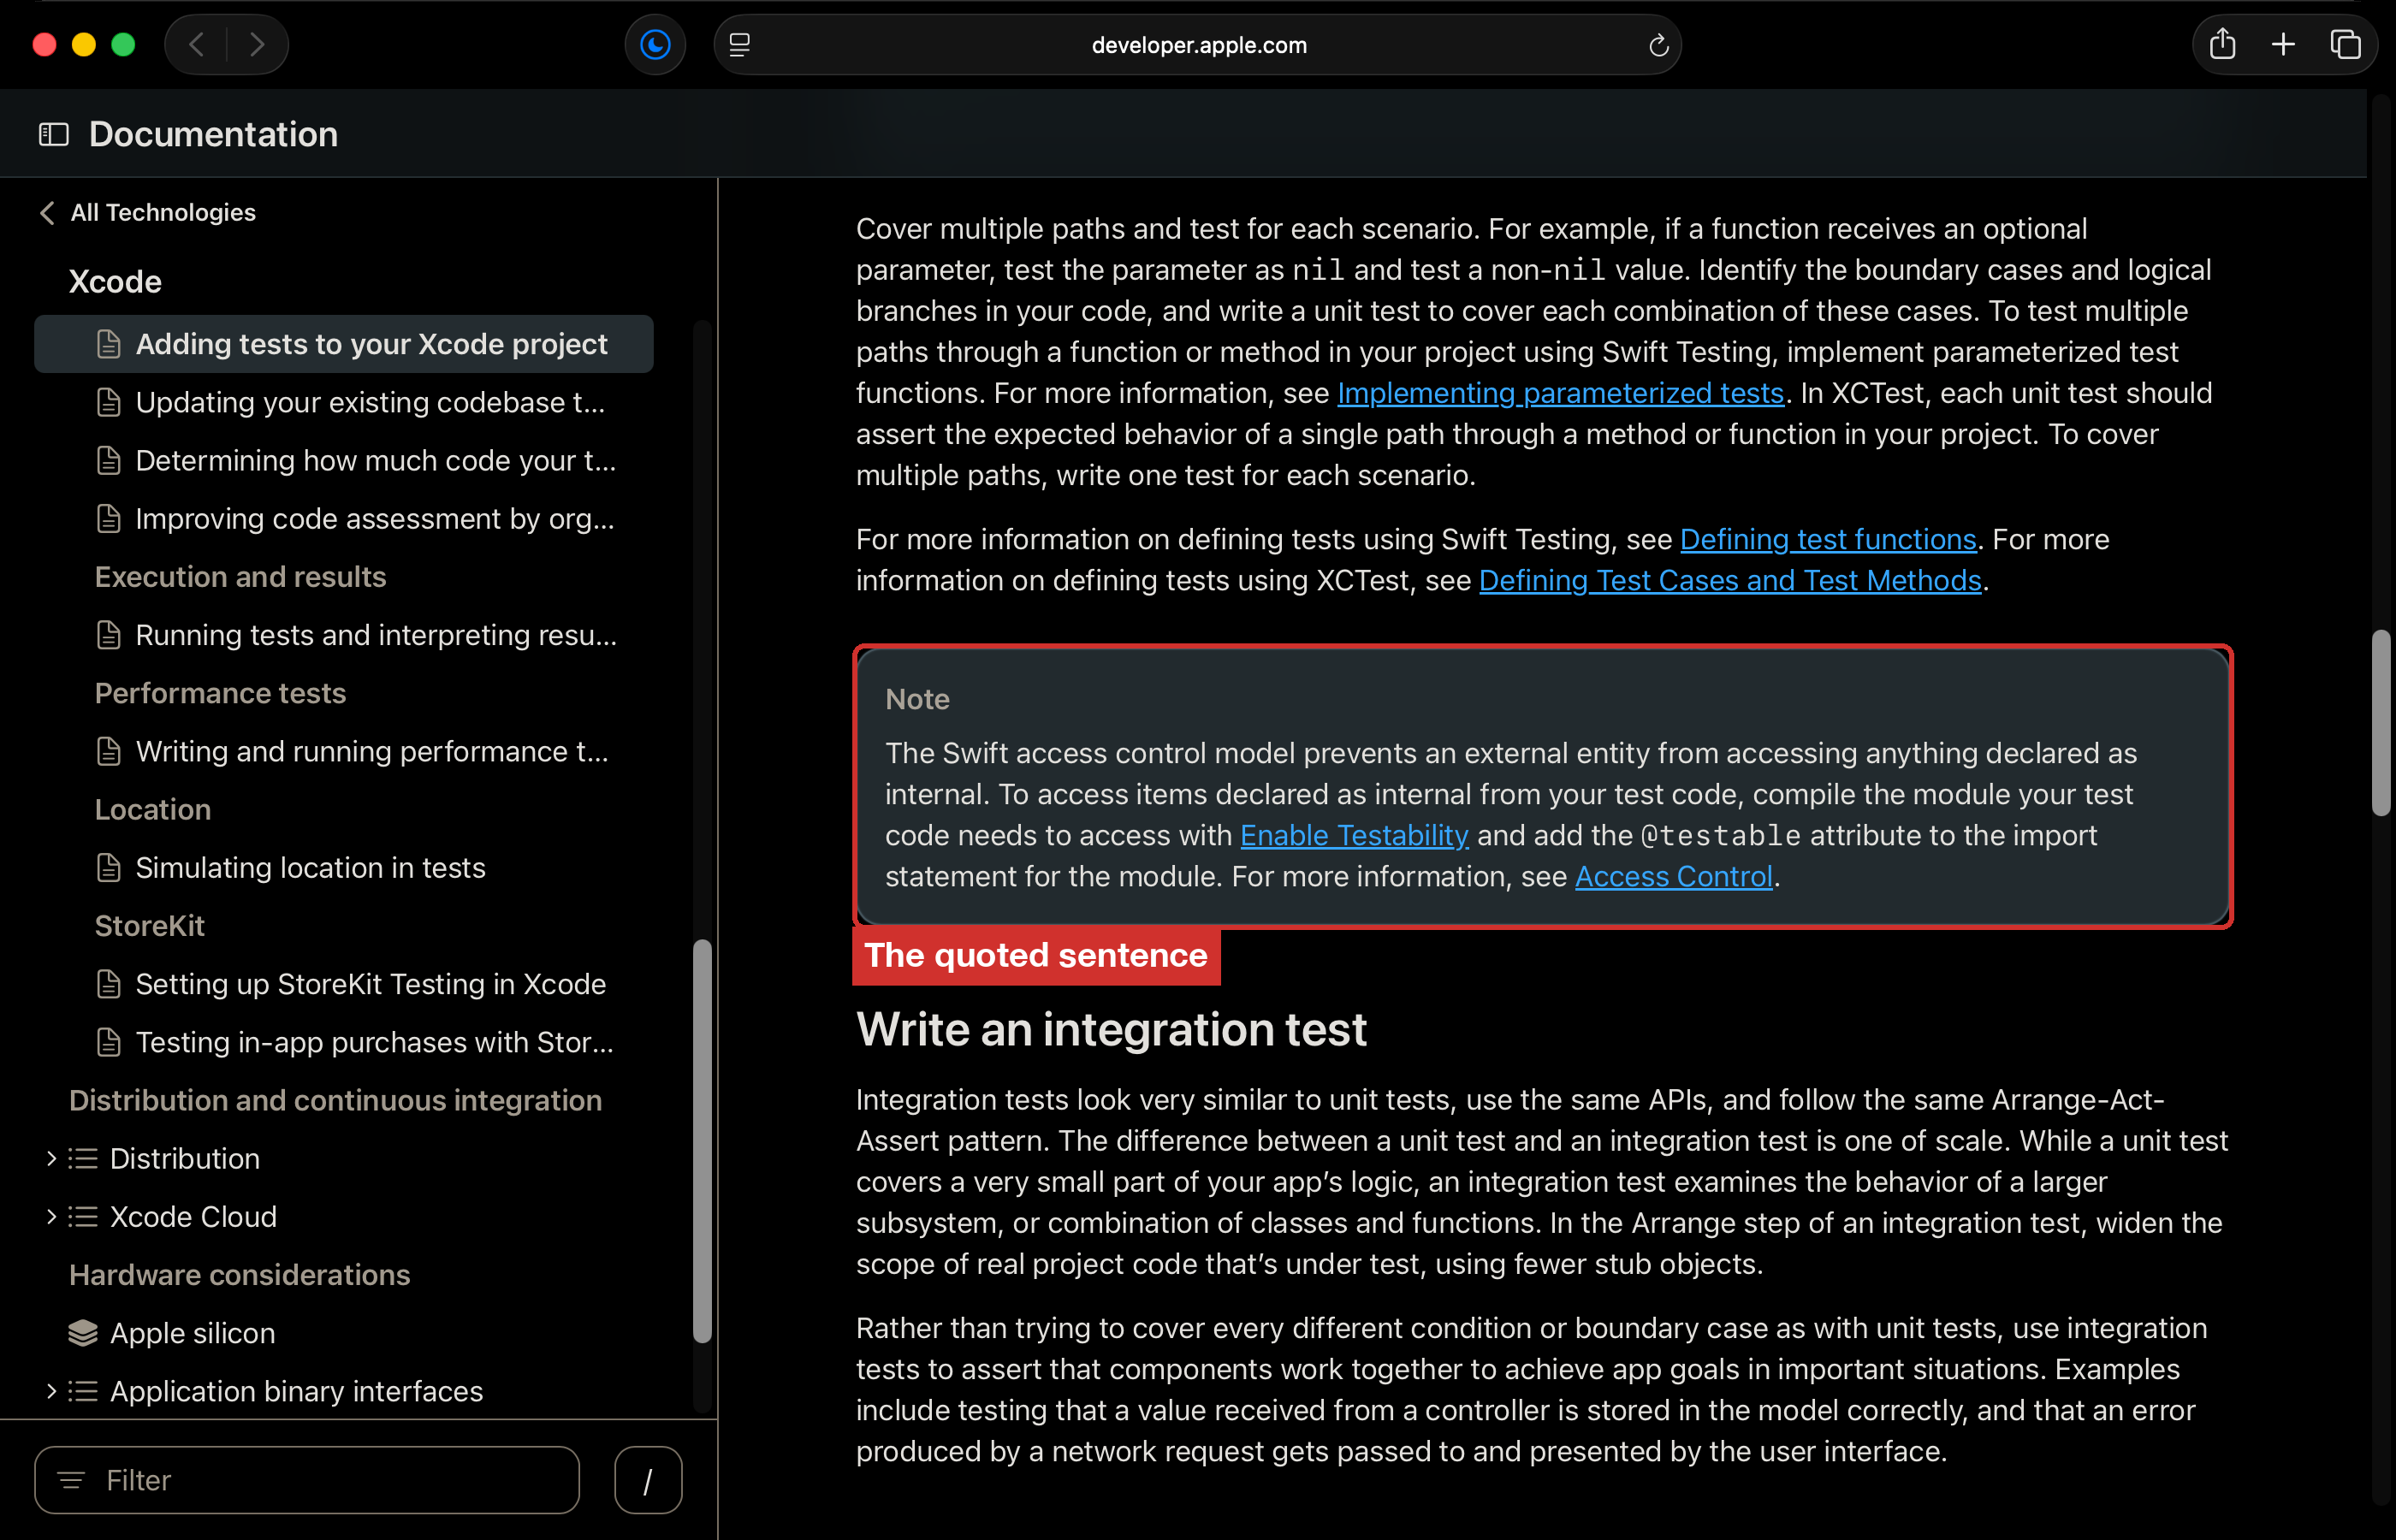
This time it did. Sometimes it will not. That is why you check.
10. Explain it without AI
- In Copilot, type
/exitand press Return. - In Xcode, open
longestStreak(). - Explain every line out loud, to a classmate or to yourself, without looking at the comments.
- Explain the new test from part 6: why does it fail when
currentStreak = 0is missing?
If you get stuck on a line, that is the line to study. On the AP Exam, nobody can explain it for you.
11. Acknowledge it, commit, and push
-
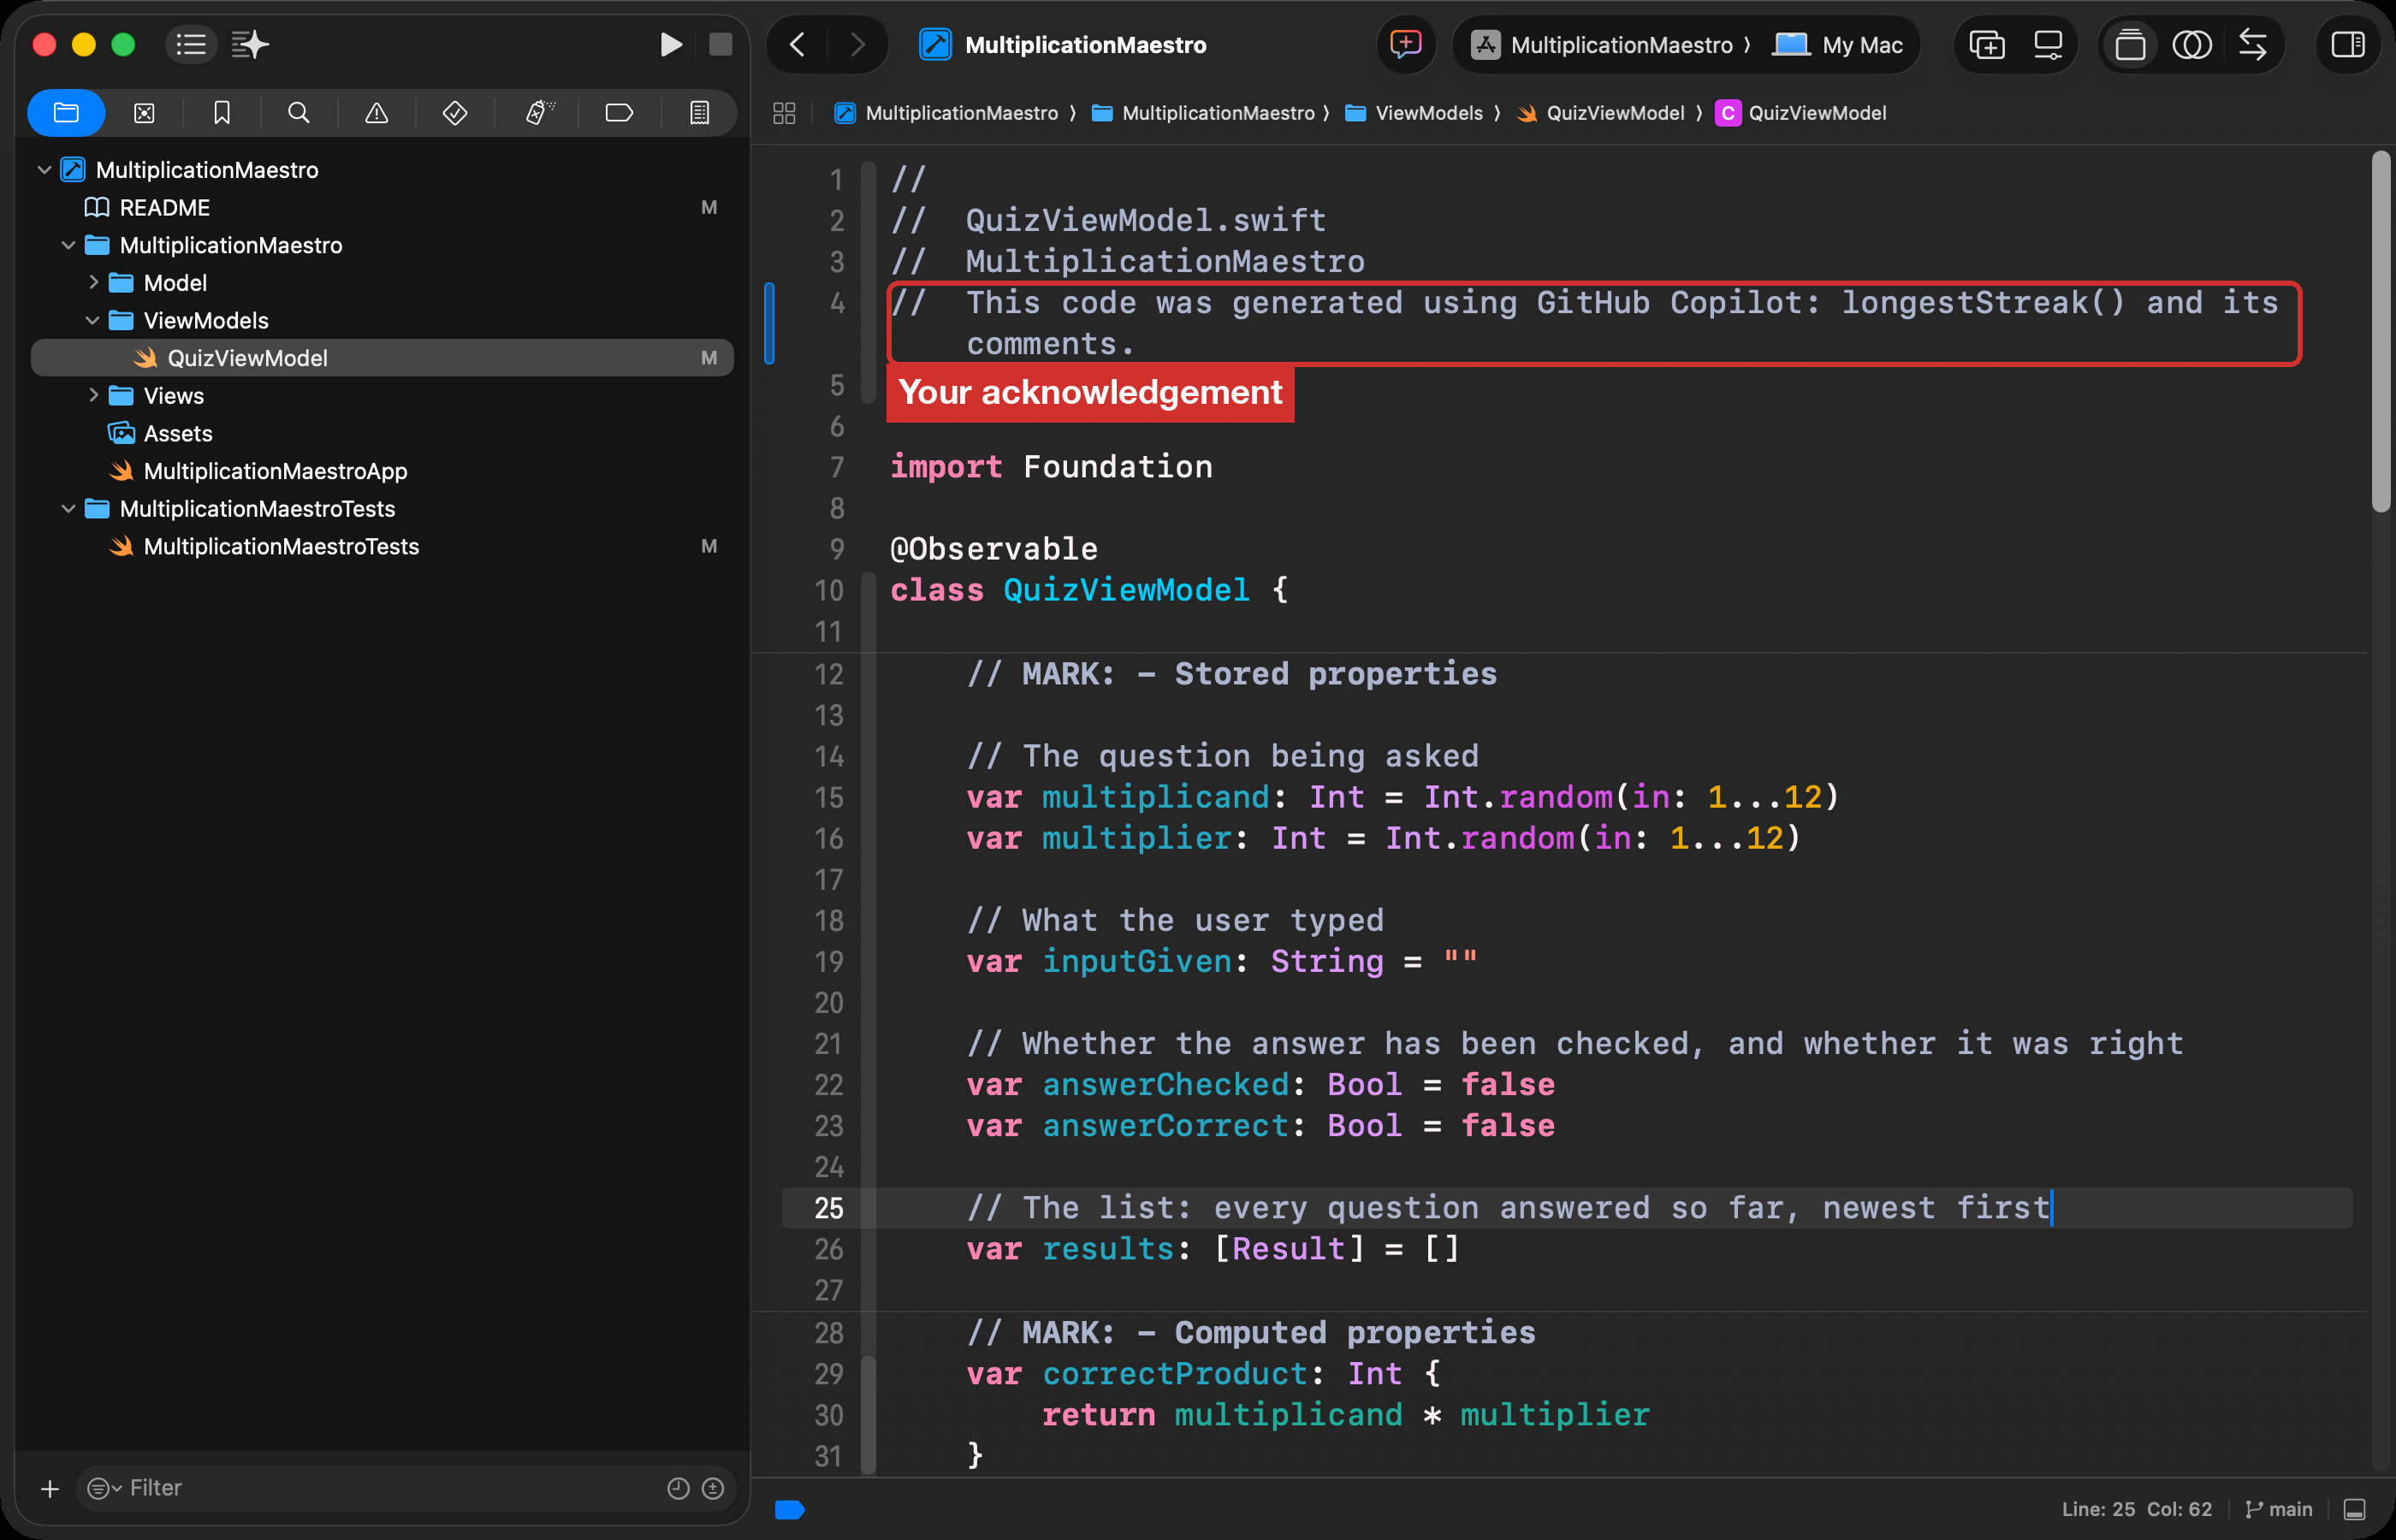
In each file Copilot changed, add a line to the comment header at the top. The line says what Copilot wrote:
//
//  QuizViewModel.swift
//  MultiplicationMaestro
//  This code was generated using GitHub Copilot: longestStreak() and its comments.
//
-
In
README.md, fill in “What I added” and “AI use”. Say which tool you used, and what for. Acknowledging AI in Your Code has more examples.If your project has no README, add one: choose File > New > File from Template…, pick Markdown File, and save it as
README.mdbeside your.xcodeprojfile. Add a “What I added” section and an “AI use” section. -
Commit and push in Xcode, with this commit message:
Added longestStreak(), five tests, comments, and AI acknowledgements.
Think about it
- Which step caught something you would have missed?
- What did the review find that the first agent did not?
- On your Create task, which of these steps will you use every time an agent writes code for you?
Curriculum connection
A4.2
develop and implement a formal testing plan (e.g., unit testing, integration testing, regression testing) for a software project to ensure program correctness;
Link to original
CRD-2.J
Identify inputs and corresponding expected outputs or behaviors that can be used to check the correctness of an algorithm or program.
CRD-2.J.1 In the development process, testing uses defined inputs to ensure that an algorithm or program is producing the expected outcomes. Programmers use the results from testing to revise their algorithms or programs.
CRD-2.J.2 Defined inputs used to test a program should demonstrate the different expected outcomes that are at or just beyond the extremes (minimum and maximum) of input data.
CRD-2.J.3 Program requirements are needed to identify appropriate defined inputs for testing.
Link to original
CRD-2.I
For errors in an algorithm or program: a. Identify the error. b. Correct the error.
CRD-2.I.1 A logic error is a mistake in the algorithm or program that causes it to behave incorrectly or unexpectedly.
CRD-2.I.2 A syntax error is a mistake in the program where the rules of the programming language are not followed.
CRD-2.I.3 A run-time error is a mistake in the program that occurs during the execution of a program. Programming languages define their own run-time errors.
CRD-2.I.4 An overflow error is an error that occurs when a computer attempts to handle a number that is outside of the defined range of values.
CRD-2.I.5 The following are effective ways to find and correct errors:
Link to original
- test cases
- hand tracing
- visualizations
- debuggers
- adding extra output statement(s) )
CRD-2.H
Acknowledge code segments used from other sources.
CRD-2.H.1 It is important to acknowledge any code segments that were developed collaboratively or by another source.
CRD-2.H.2 Acknowledgement of a code segment(s) written by someone else and used in a program can be in the program documentation. The acknowledgement should include the origin or original author’s name.
Link to original