You have not written Swift since last spring. Today you build a small app from scratch: a times-tables quiz called Multiplication Maestro. As you go, you review MVVM, and you see how a small app meets every requirement of the AP Create task. Commit after each step.
1. Create the project
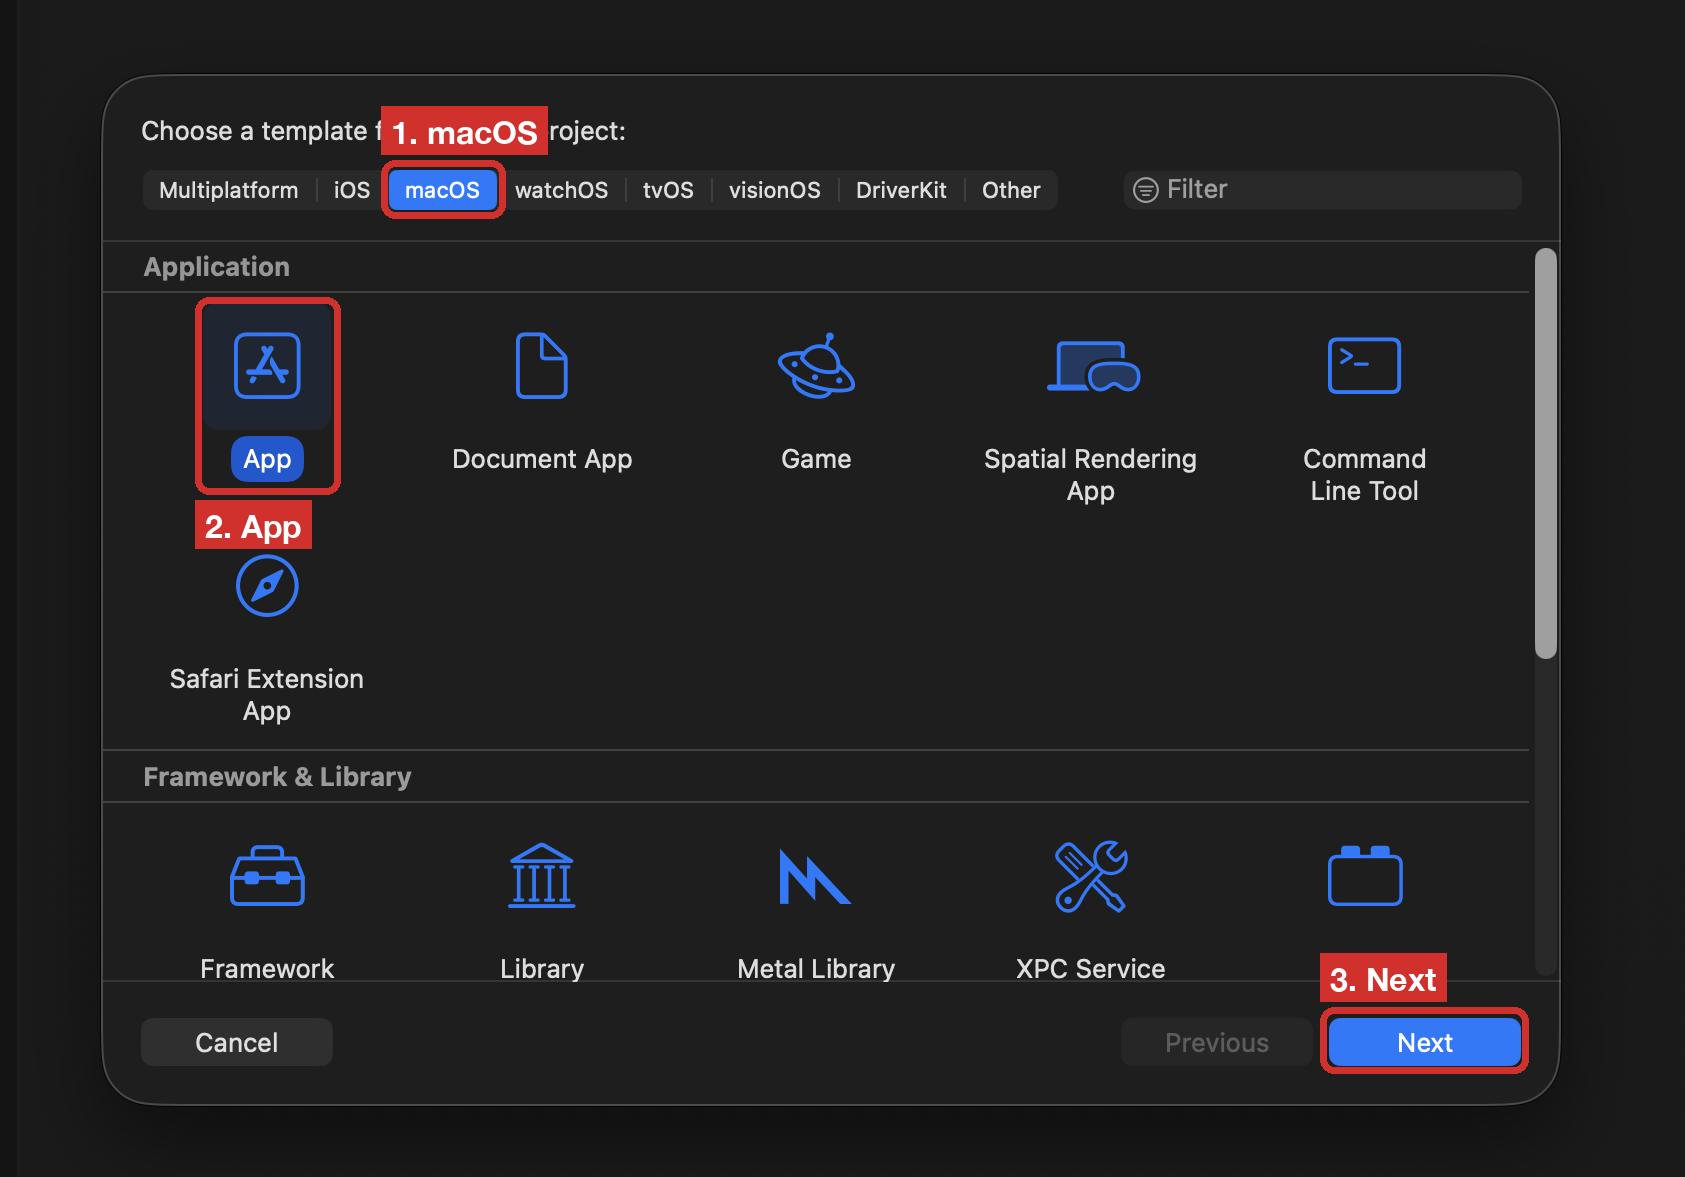
In Xcode, choose File > New > Project…, then Choose Template…. Pick macOS, then App, then Next:
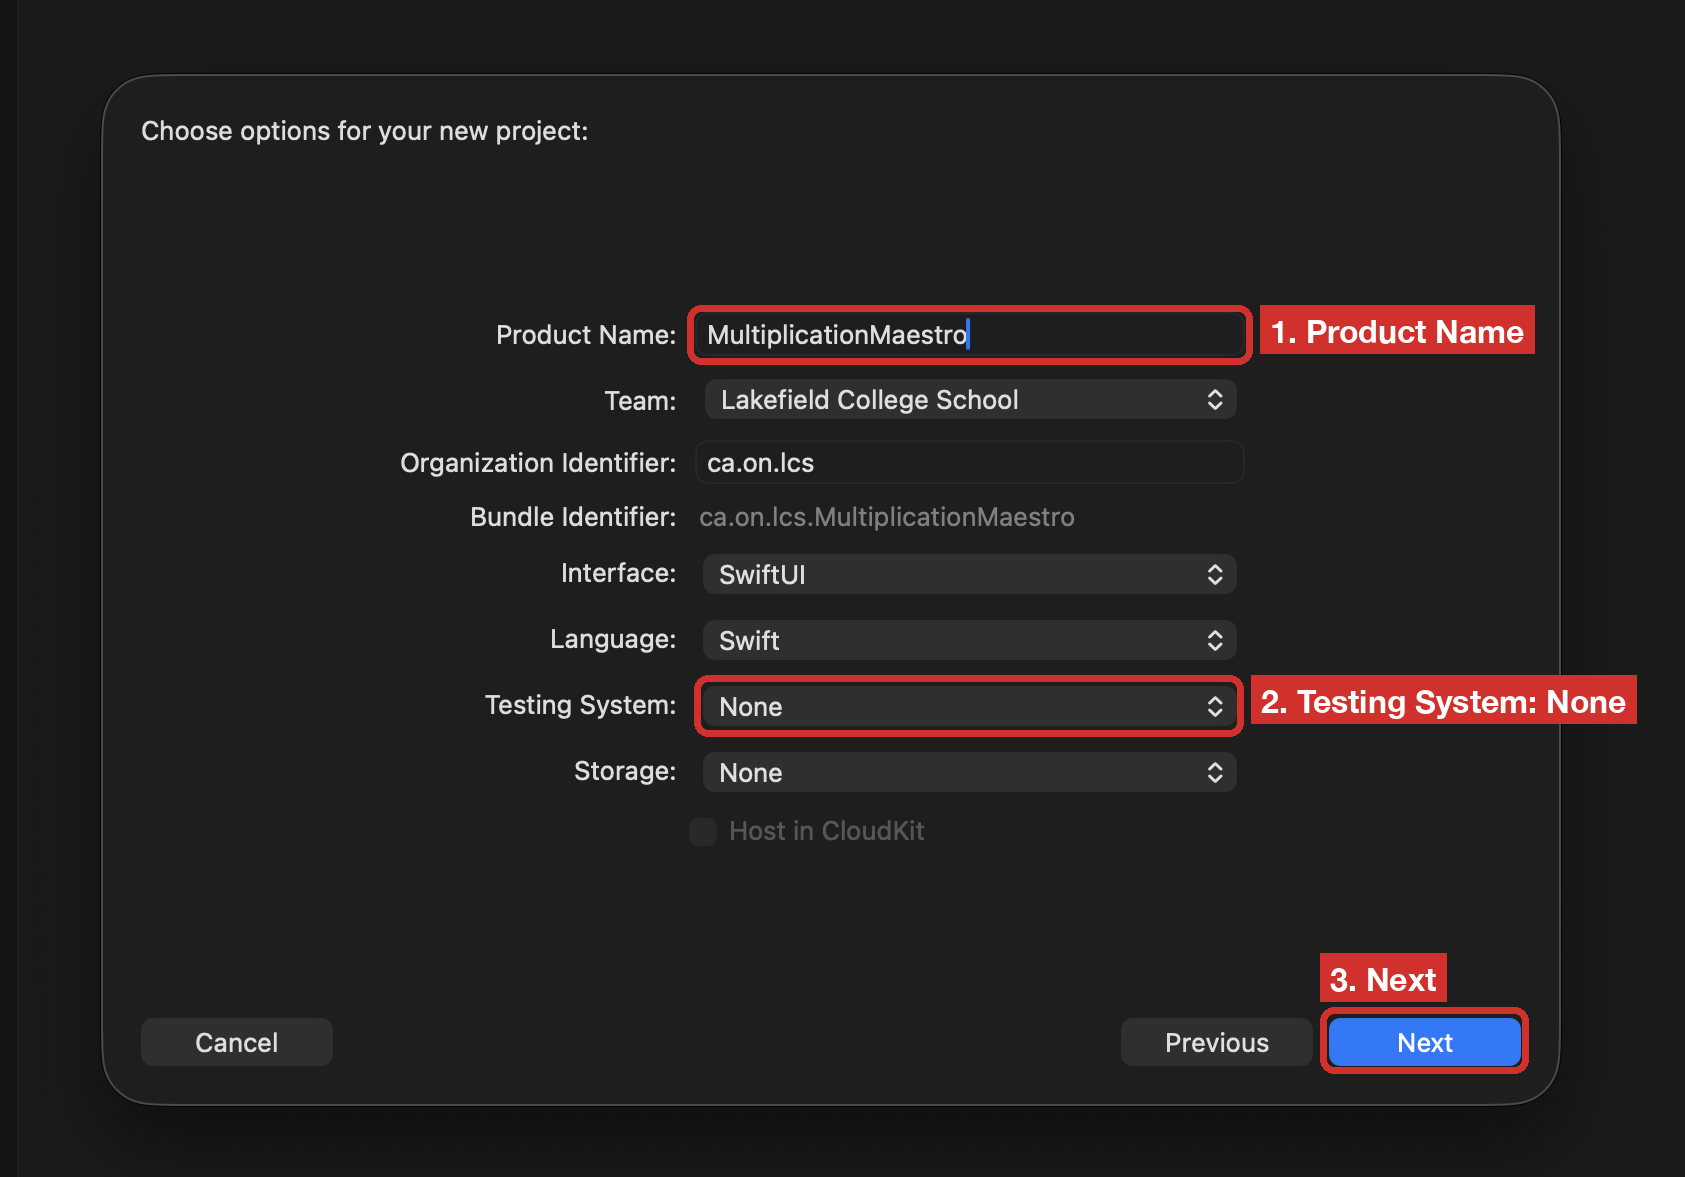
Name the product MultiplicationMaestro. Set Testing System to None. Then Next:
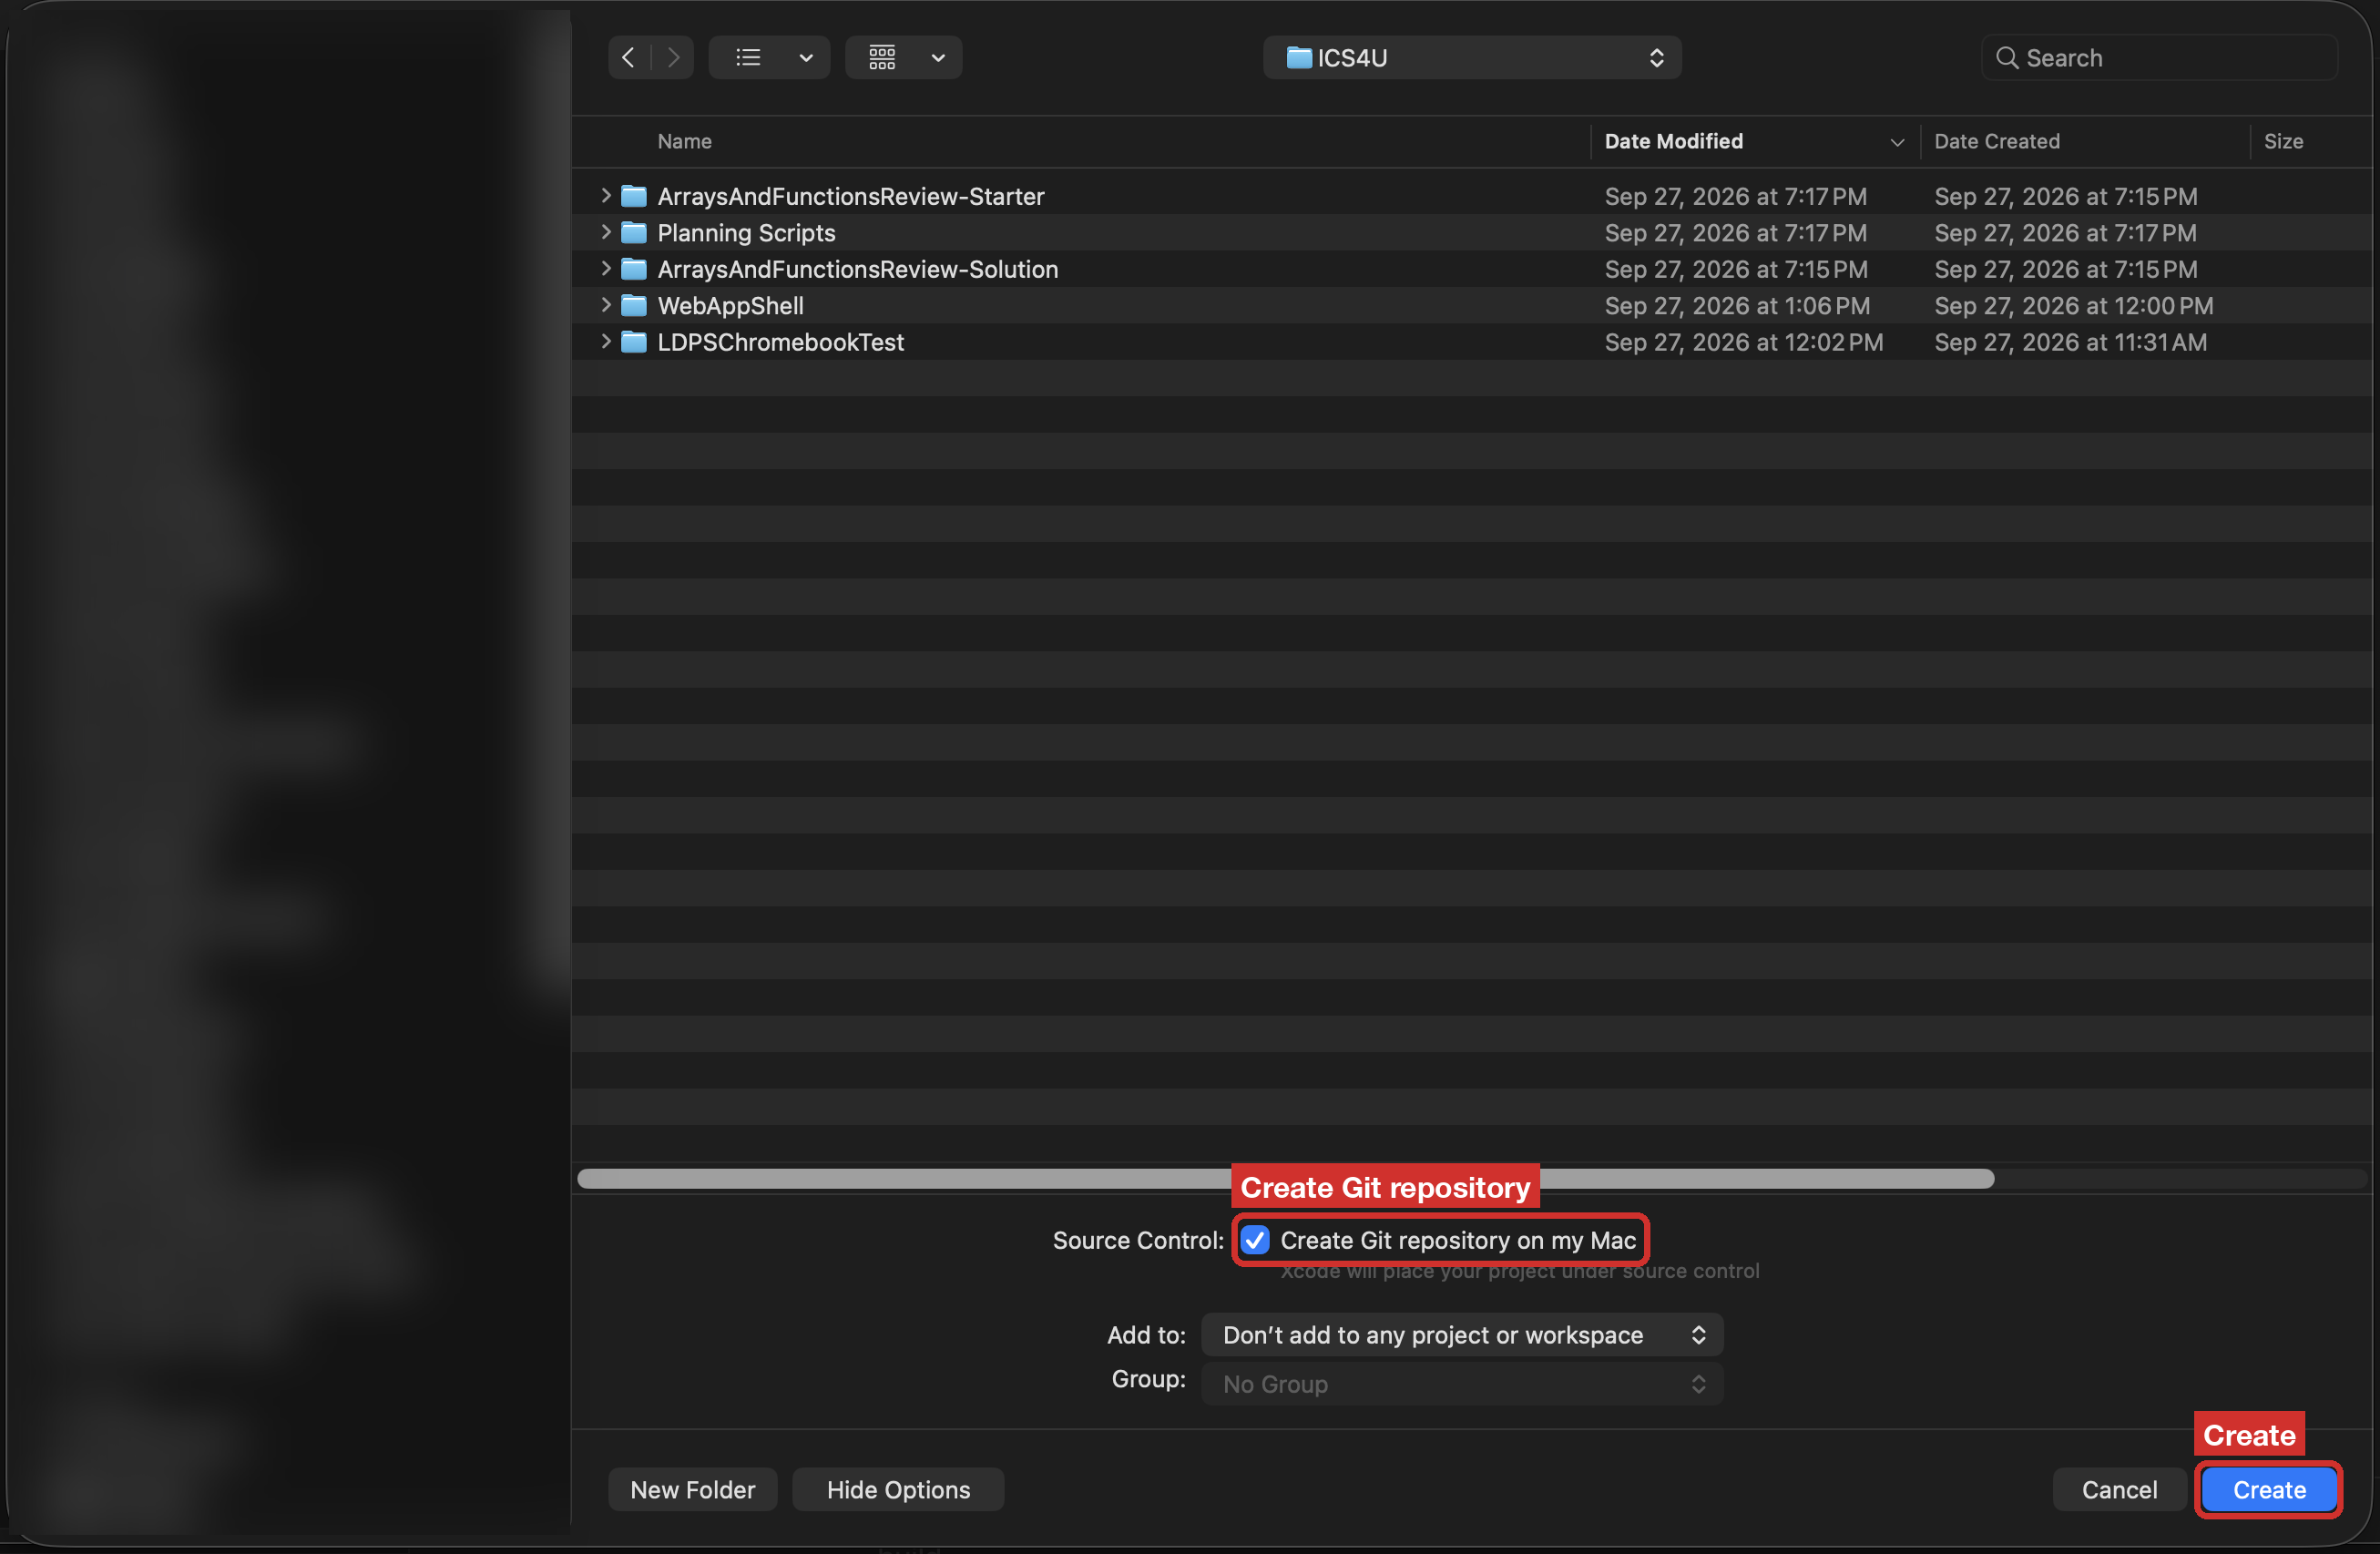
Save it in a folder for your Xcode projects, not in iCloud. Leave Create Git repository on my Mac ticked, then Create:
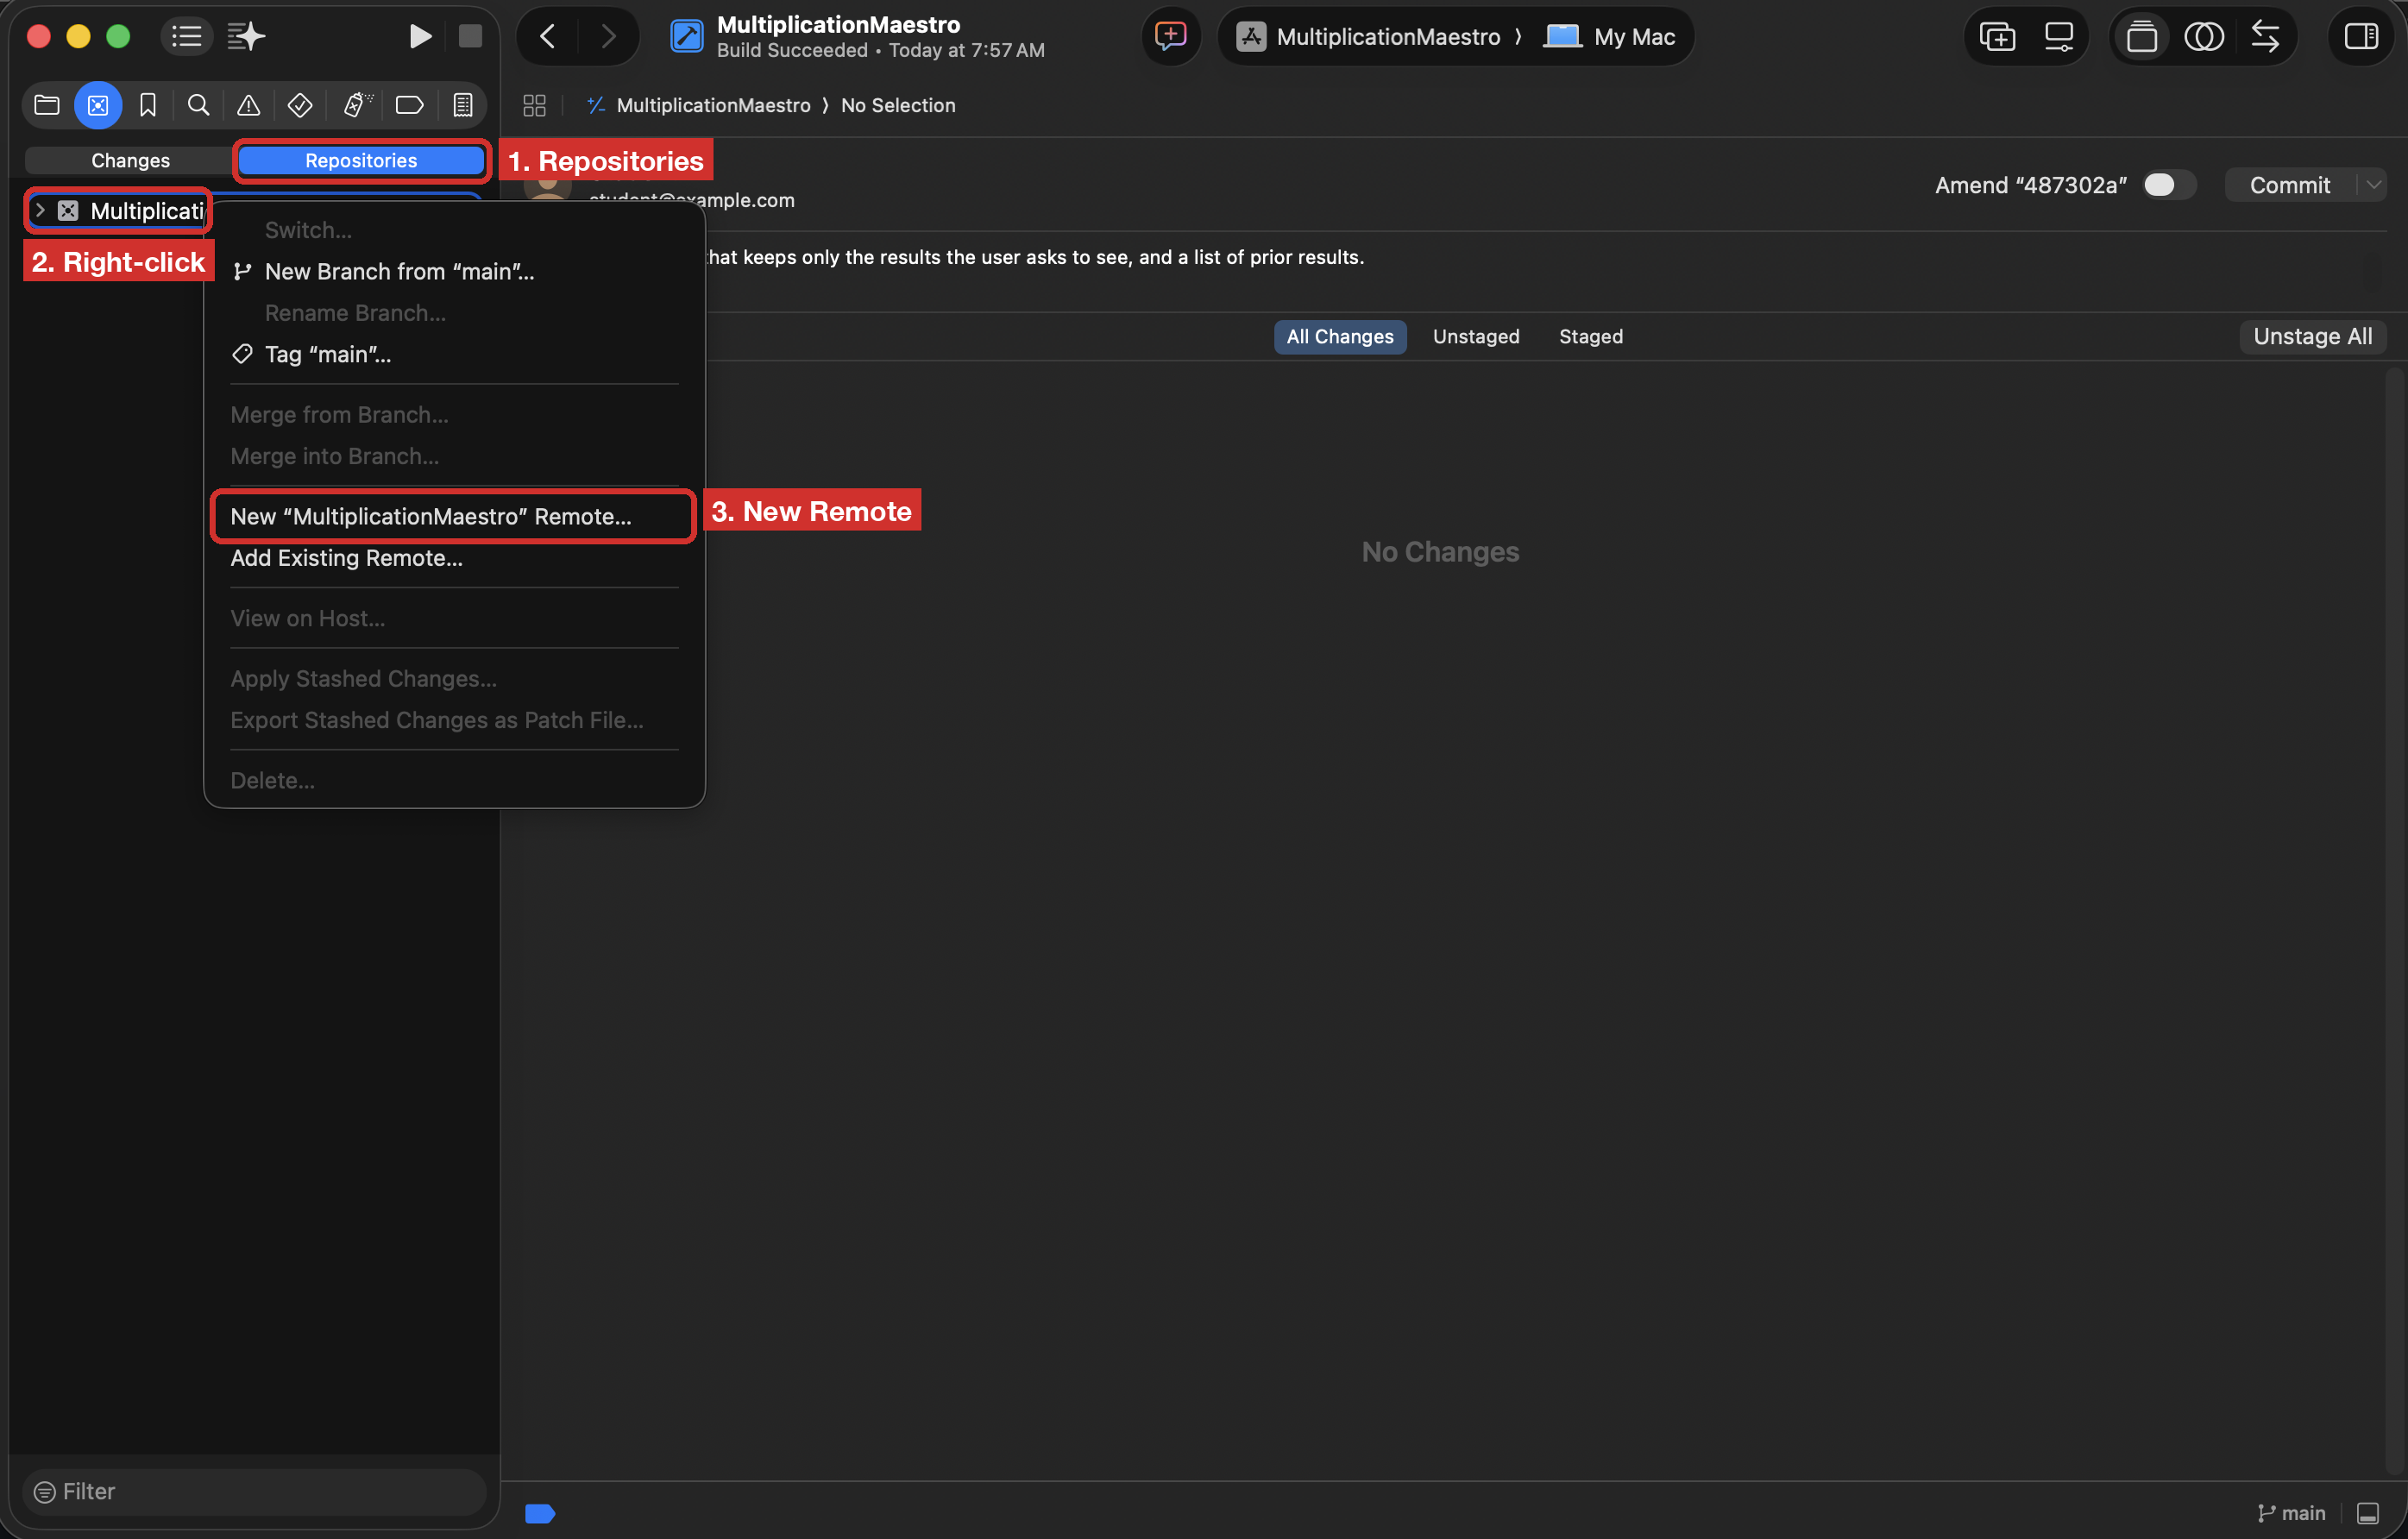
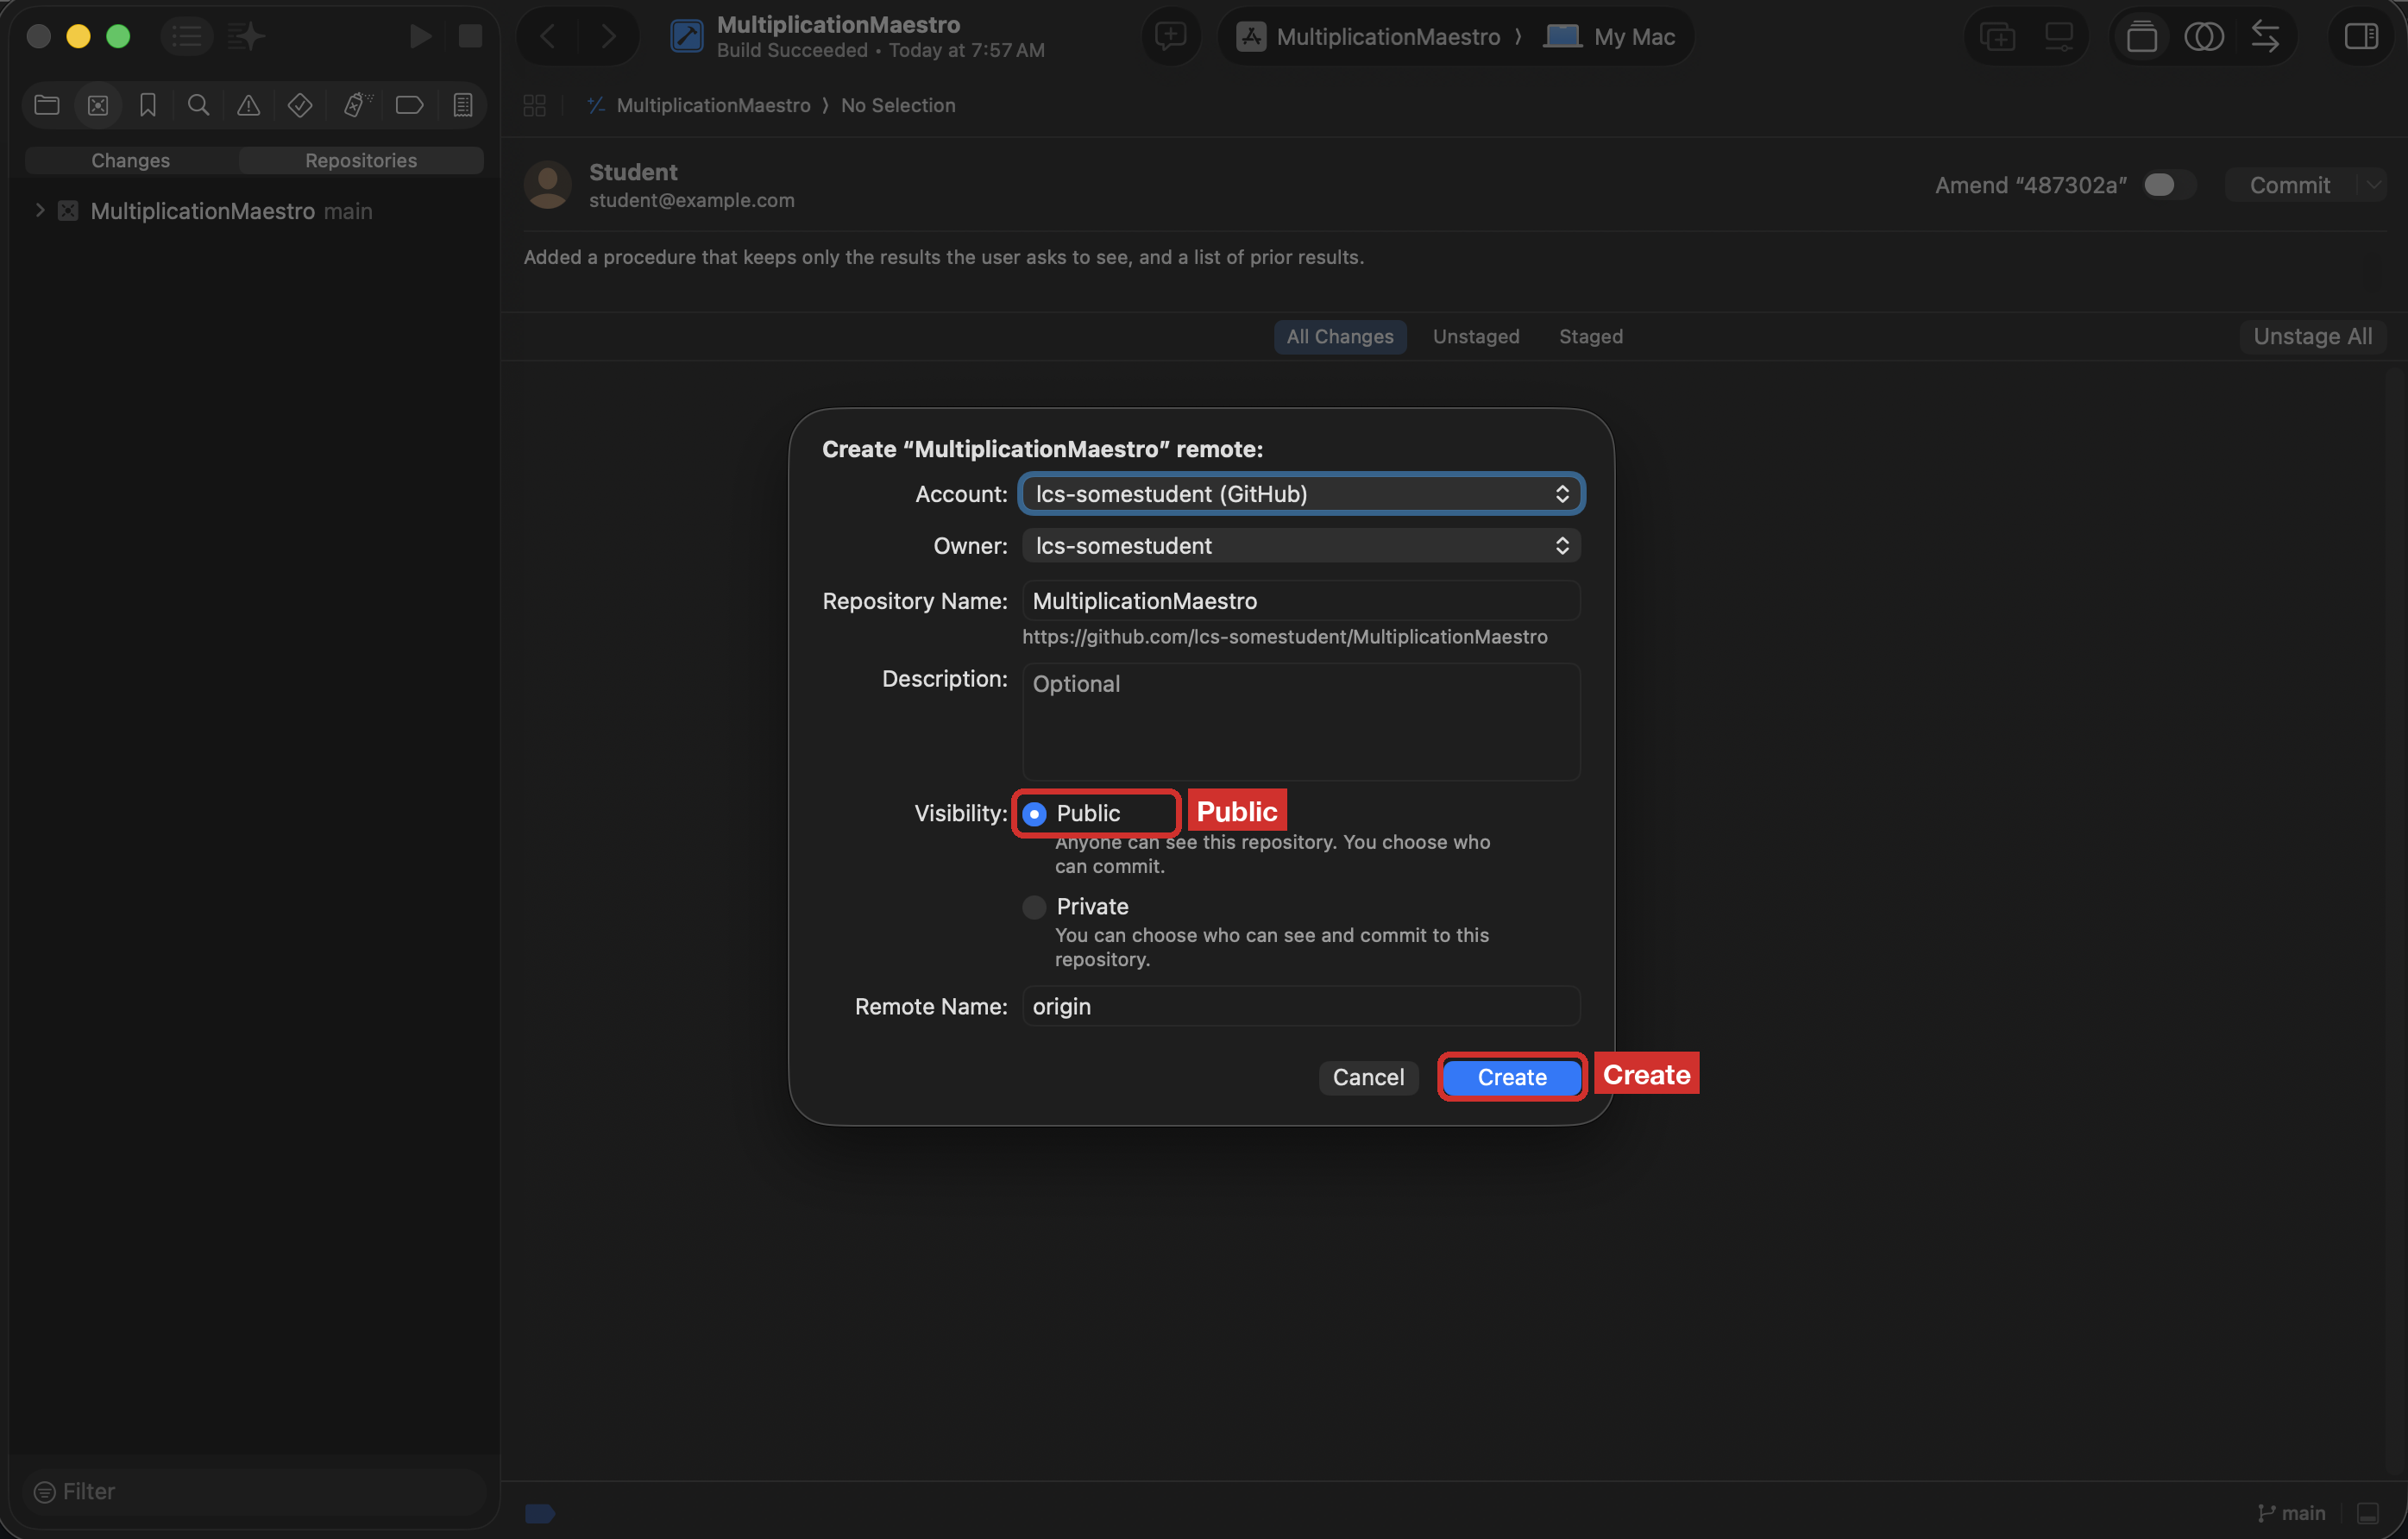
Now put the repository on GitHub. Press Command-2 to open the Source Control navigator and choose Repositories. Right-click MultiplicationMaestro and choose New “MultiplicationMaestro” Remote…:
Your own GitHub account is the owner. Leave Public chosen, then Create:
2. Organize your code into groups
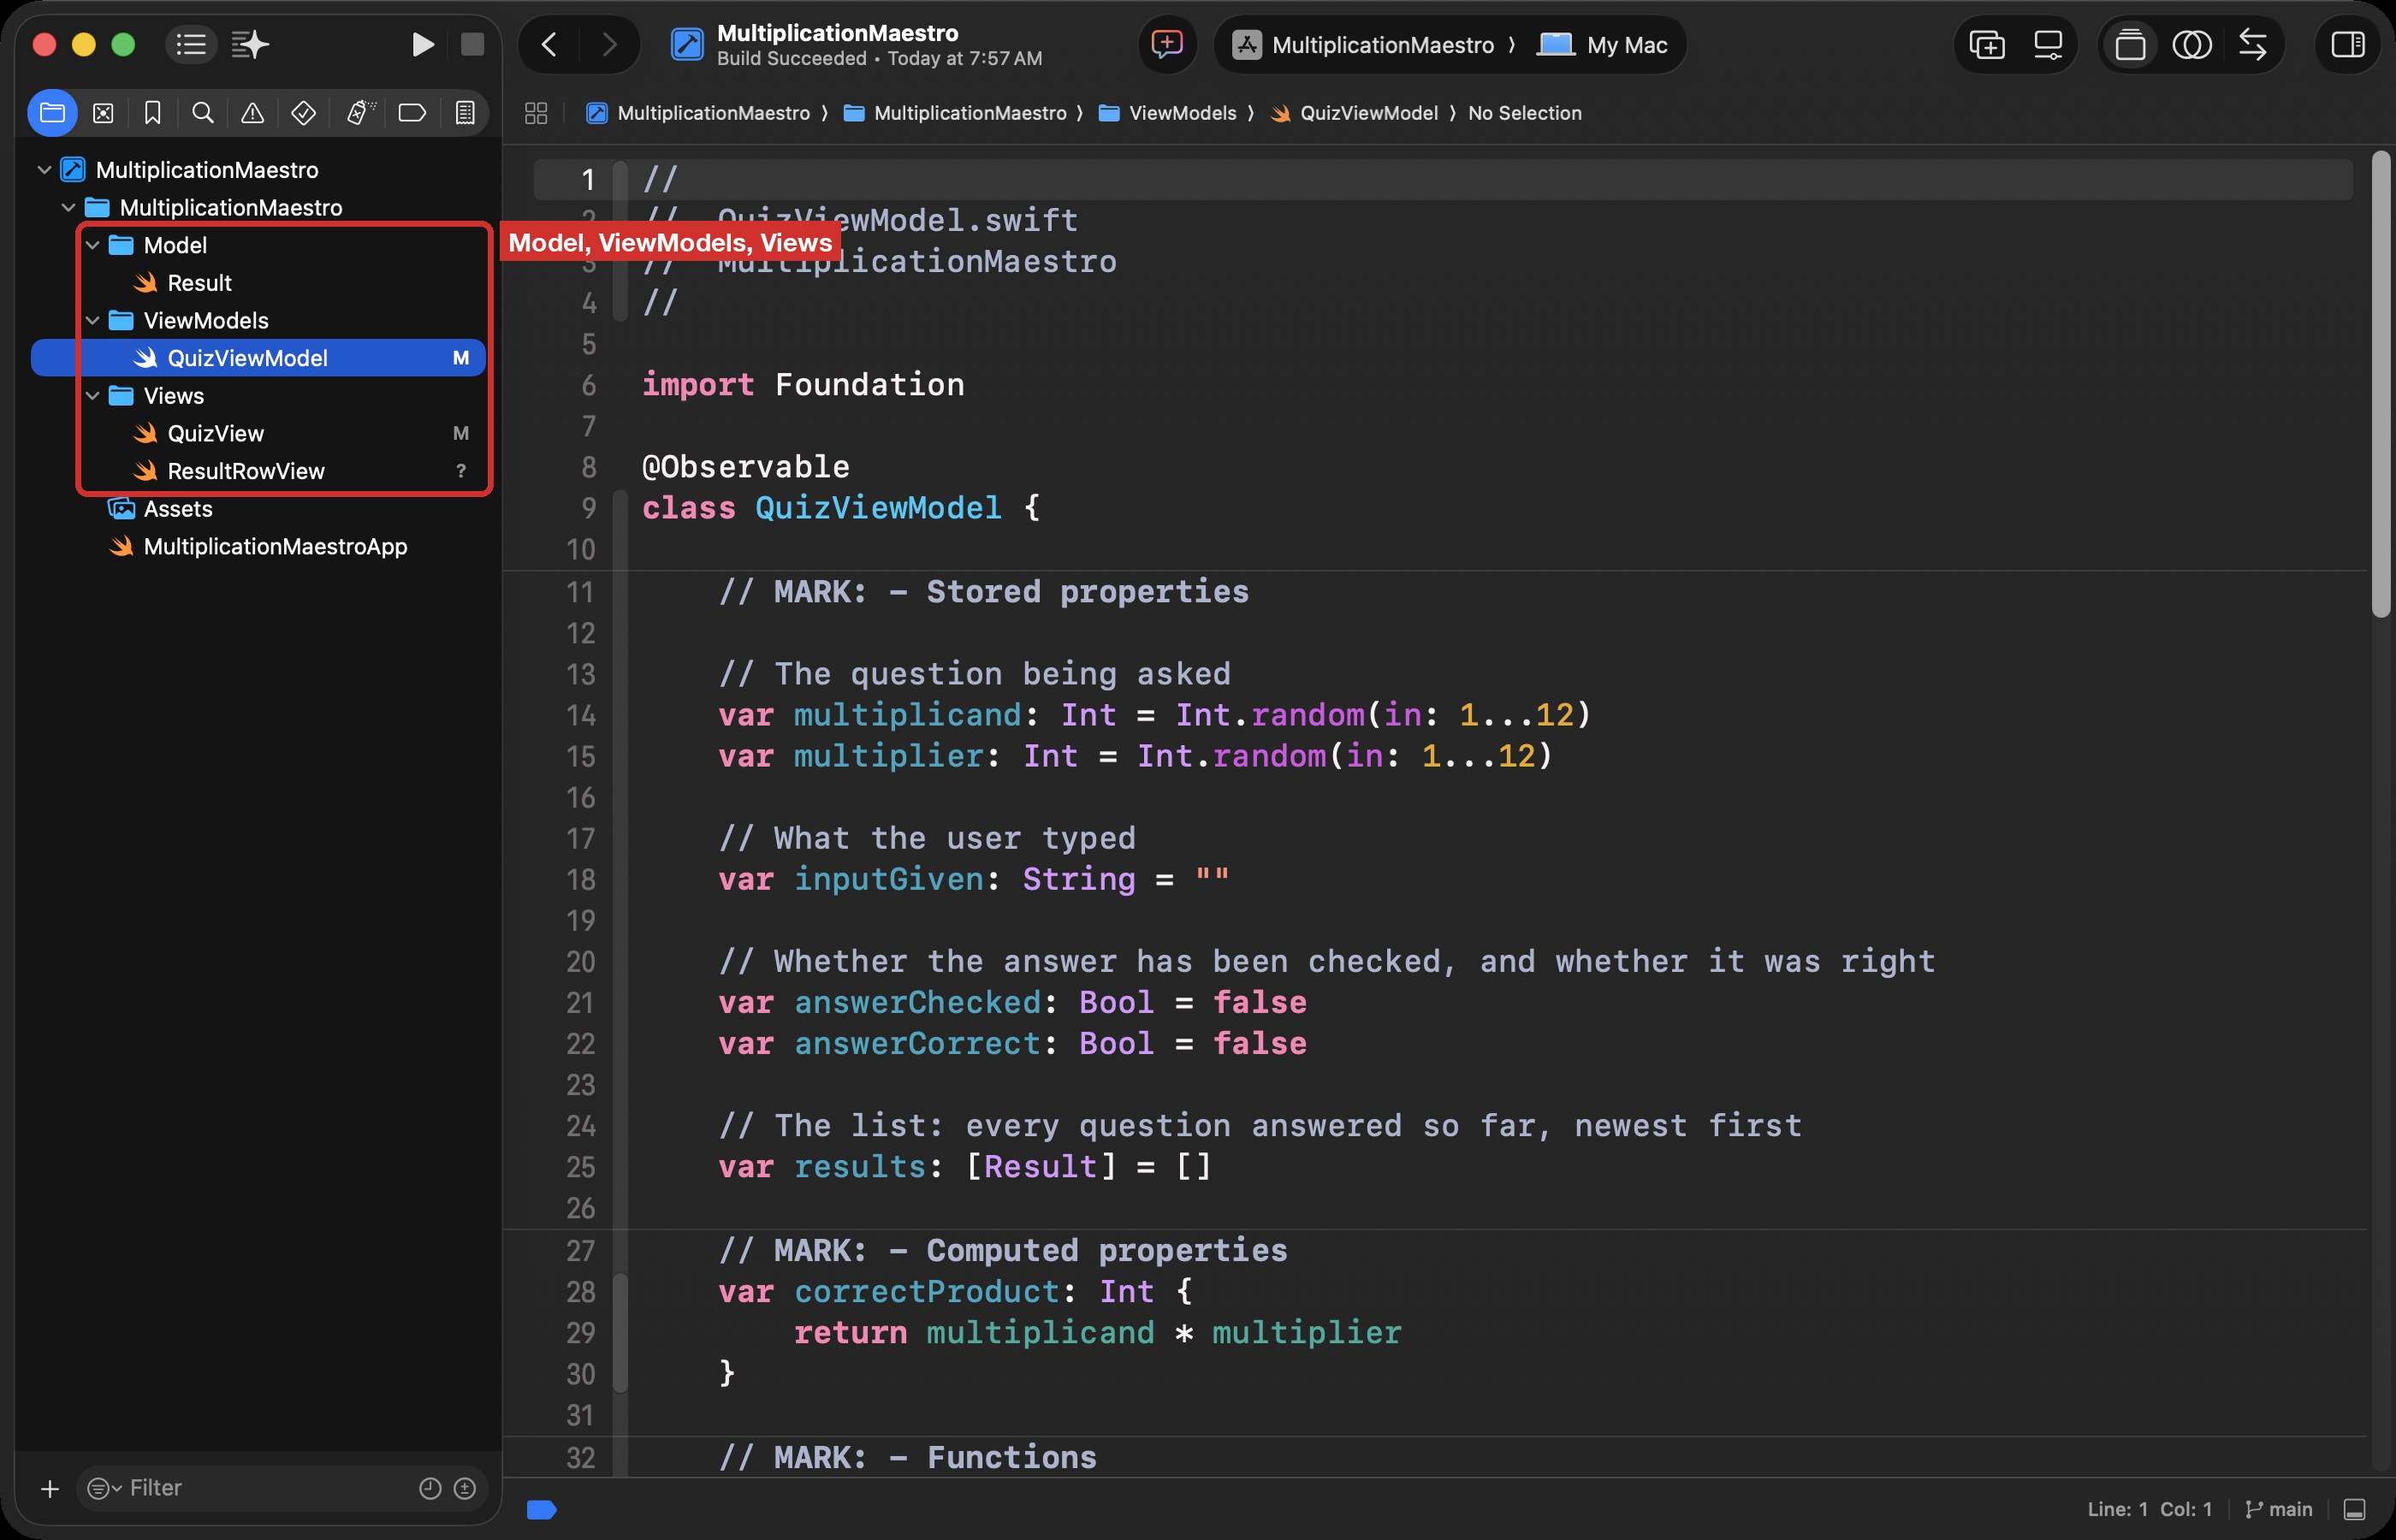
MVVM splits an app into three parts. Make one group for each, inside the blue MultiplicationMaestro folder in the Project navigator. In Xcode, a group is a folder: right-click that folder, choose New Folder, and name it. Make three:
- Model: the data. Here, the result of one question.
- ViewModels: the logic. It asks questions, checks answers, and keeps the list of results.
- Views: what the user sees.
When you finish this page, your groups look like this:
3. The model
Select the Model group, choose File > New > File from Template…, pick Swift File, and name it Result. Type this:
import Foundation

// The result of answering one question
struct Result: Identifiable {

    // MARK: - Stored properties
    let id = UUID()
    let multiplicand: Int
    let multiplier: Int
    let inputGiven: String
    let answerCorrect: Bool

    // MARK: - Computed properties
    var correctProduct: Int {
        return multiplicand * multiplier
    }
}Identifiable, with its id, lets SwiftUI show each result as its own row in a list.
Commit. Press Command-2 and choose Changes, then click Uncommitted Changes. Type the message Added a Model group with a model for the result of one question., choose Stage All, then Commit. Do the same at each commit below.
4. The view model
Select the ViewModels group and make a Swift file named QuizViewModel:
import Foundation

@Observable
class QuizViewModel {

    // MARK: - Stored properties

    // The question being asked
    var multiplicand: Int = Int.random(in: 1...12)
    var multiplier: Int = Int.random(in: 1...12)

    // What the user typed
    var inputGiven: String = ""

    // Whether the answer has been checked, and whether it was right
    var answerChecked: Bool = false
    var answerCorrect: Bool = false

    // The list: every question answered so far, newest first
    var results: [Result] = []

    // MARK: - Computed properties
    var correctProduct: Int {
        return multiplicand * multiplier
    }

    // MARK: - Functions

    // Check the answer, then save the result in the list
    func checkAnswer() {
        answerChecked = true

        if let answerGiven = Int(inputGiven) {
            if answerGiven == correctProduct {
                answerCorrect = true
            } else {
                answerCorrect = false
            }
        } else {
            // The input was not a whole number
            answerCorrect = false
        }

        let newResult = Result(
            multiplicand: multiplicand,
            multiplier: multiplier,
            inputGiven: inputGiven,
            answerCorrect: answerCorrect
        )
        results.insert(newResult, at: 0)
    }

    // Ask a new question
    func newQuestion() {
        multiplicand = Int.random(in: 1...12)
        multiplier = Int.random(in: 1...12)
        inputGiven = ""
        answerChecked = false
        answerCorrect = false
    }
}
@Observable means any view that reads these properties redraws when they change. Int(inputGiven) turns the typed text into a number, or gives back nothing when the text is not a whole number, so typing mangos counts as wrong instead of crashing.
Commit: Added a ViewModels group with a view model that asks a question, checks the answer, and saves each result in a list.
5. The view
Xcode made a view called ContentView. A file should be named for what it does, so rename it: click ContentView in the Project navigator, press Return, type QuizView, and press Return again. Drag QuizView into the Views group. Then replace everything in it with this:
import SwiftUI

struct QuizView: View {

    // MARK: - Stored properties
    @State var viewModel = QuizViewModel()

    // MARK: - Computed properties
    var body: some View {
        VStack(spacing: 20) {

            // The question
            Text("\(viewModel.multiplicand) × \(viewModel.multiplier)")
                .font(.system(size: 64))

            // The answer, and whether it was right
            HStack {
                TextField("Your answer", text: $viewModel.inputGiven)
                    .textFieldStyle(.roundedBorder)
                    .font(.largeTitle)

                if viewModel.answerChecked == true {
                    if viewModel.answerCorrect == true {
                        Image(systemName: "checkmark.circle")
                            .foregroundStyle(.green)
                    } else {
                        Image(systemName: "x.square")
                            .foregroundStyle(.red)
                    }
                }
            }
            .font(.largeTitle)

            // Check the answer, or move on
            if viewModel.answerChecked == false {
                Button("Check Answer") {
                    viewModel.checkAnswer()
                }
                .buttonStyle(.borderedProminent)
            } else {
                Button("New Question") {
                    viewModel.newQuestion()
                }
                .buttonStyle(.bordered)
            }

            Spacer()
        }
        .padding()
    }
}

#Preview {
    QuizView()
}
The view owns the view model with @State. The $ in $viewModel.inputGiven is a binding: what the user types goes straight into the view model. The view does no checking itself; its buttons call checkAnswer() and newQuestion().
Open MultiplicationMaestroApp and change ContentView() to QuizView():
WindowGroup {
    QuizView()
}
Press Command-R and answer a question. Then commit: Added a Views group; the quiz view shows the question, the answer field, and the buttons.
6. The procedure and the list of results
Add this procedure to QuizViewModel, just above newQuestion():
// The procedure: keep only the results the user asked to see
func keepResults(matching choice: String) -> [Result] {
    var matchingResults: [Result] = []

    for result in results {
        if choice == "All" {
            matchingResults.append(result)
        } else if choice == "Correct" && result.answerCorrect == true {
            matchingResults.append(result)
        } else if choice == "Incorrect" && result.answerCorrect == false {
            matchingResults.append(result)
        }
    }

    return matchingResults
}
Select the Views group and make a new SwiftUI View file named ResultRowView, for one row of the list. Replace everything in it with this:
import SwiftUI

// Shows one prior result in the list
struct ResultRowView: View {

    // MARK: - Stored properties
    let result: Result

    // MARK: - Computed properties
    var body: some View {
        HStack {
            Text("\(result.multiplicand) × \(result.multiplier) = \(result.inputGiven)")

            if result.answerCorrect == false {
                Text("(\(result.correctProduct))")
                    .foregroundStyle(.secondary)
            }

            Spacer()

            if result.answerCorrect == true {
                Image(systemName: "checkmark.circle")
                    .foregroundStyle(.green)
            } else {
                Image(systemName: "x.square")
                    .foregroundStyle(.red)
            }
        }
        .font(.title2)
    }
}

#Preview {
    ResultRowView(result: Result(multiplicand: 12, multiplier: 5, inputGiven: "50", answerCorrect: false))
}
In QuizView, add a second stored property under viewModel:
// Which results to show: All, Correct, or Incorrect
@State var choice: String = "All"
Then, in QuizView, replace the Spacer() at the bottom of the VStack with a picker and the list:
// Which results to show
Picker("Show", selection: $choice) {
    Text("All").tag("All")
    Text("Correct").tag("Correct")
    Text("Incorrect").tag("Incorrect")
}
.pickerStyle(.segmented)

// Prior results, from the procedure
List(viewModel.keepResults(matching: choice)) { result in
    ResultRowView(result: result)
}
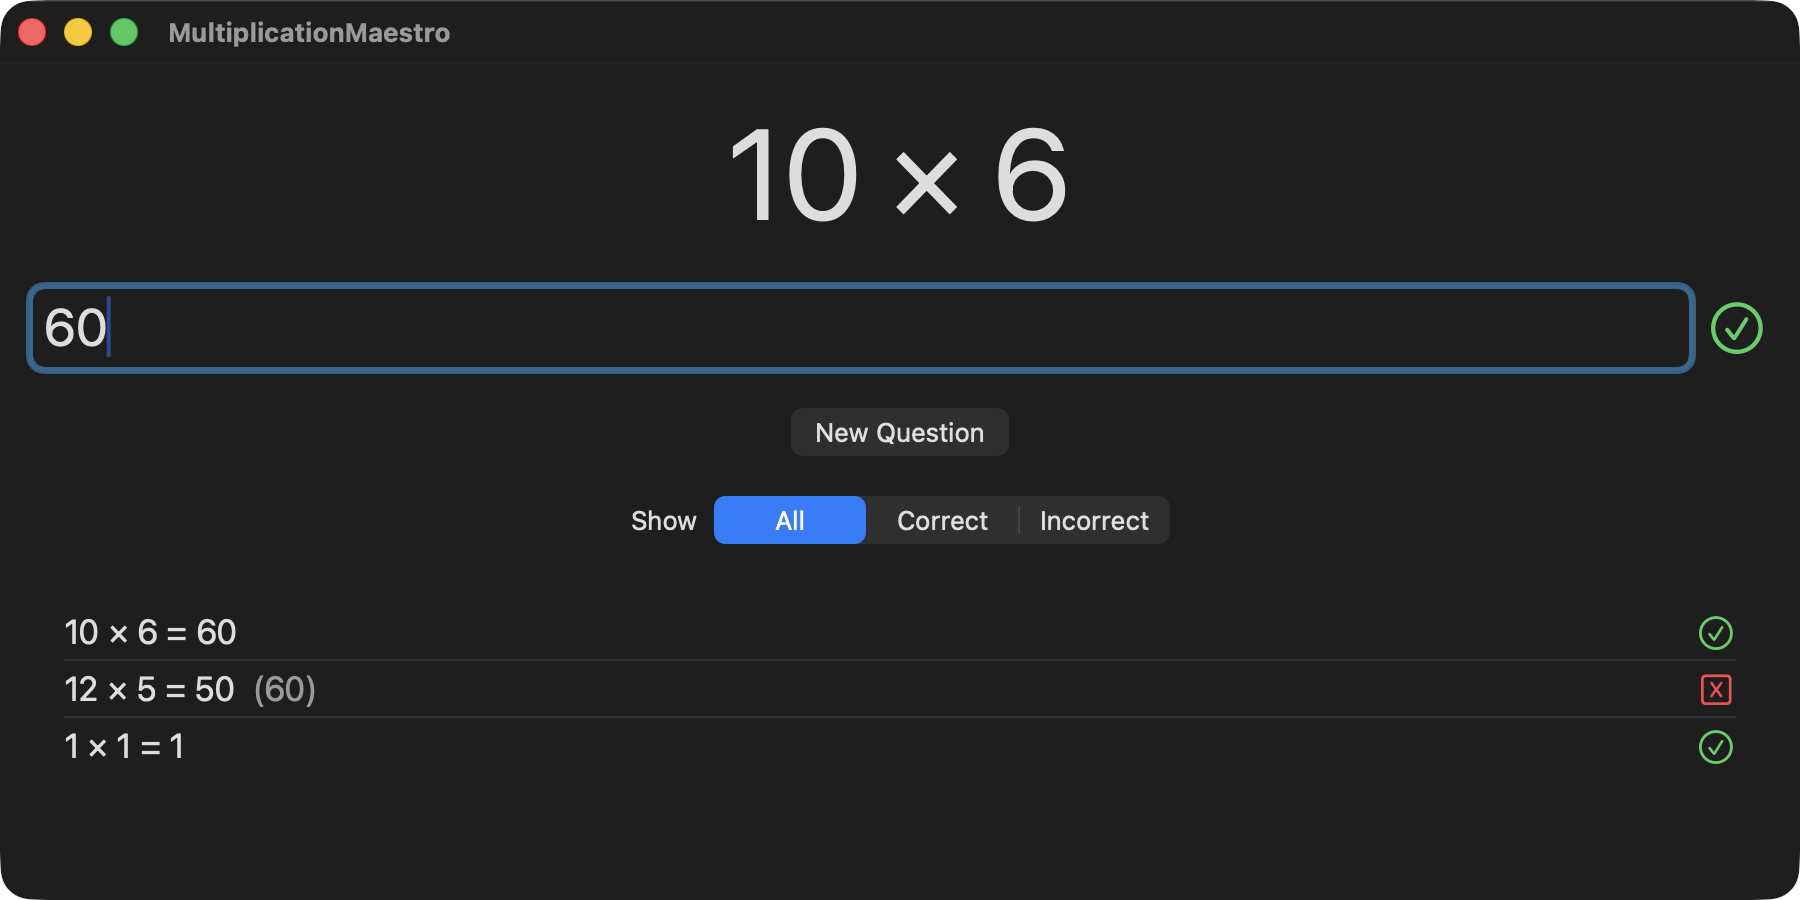
Run it and answer three questions, one of them wrong on purpose:
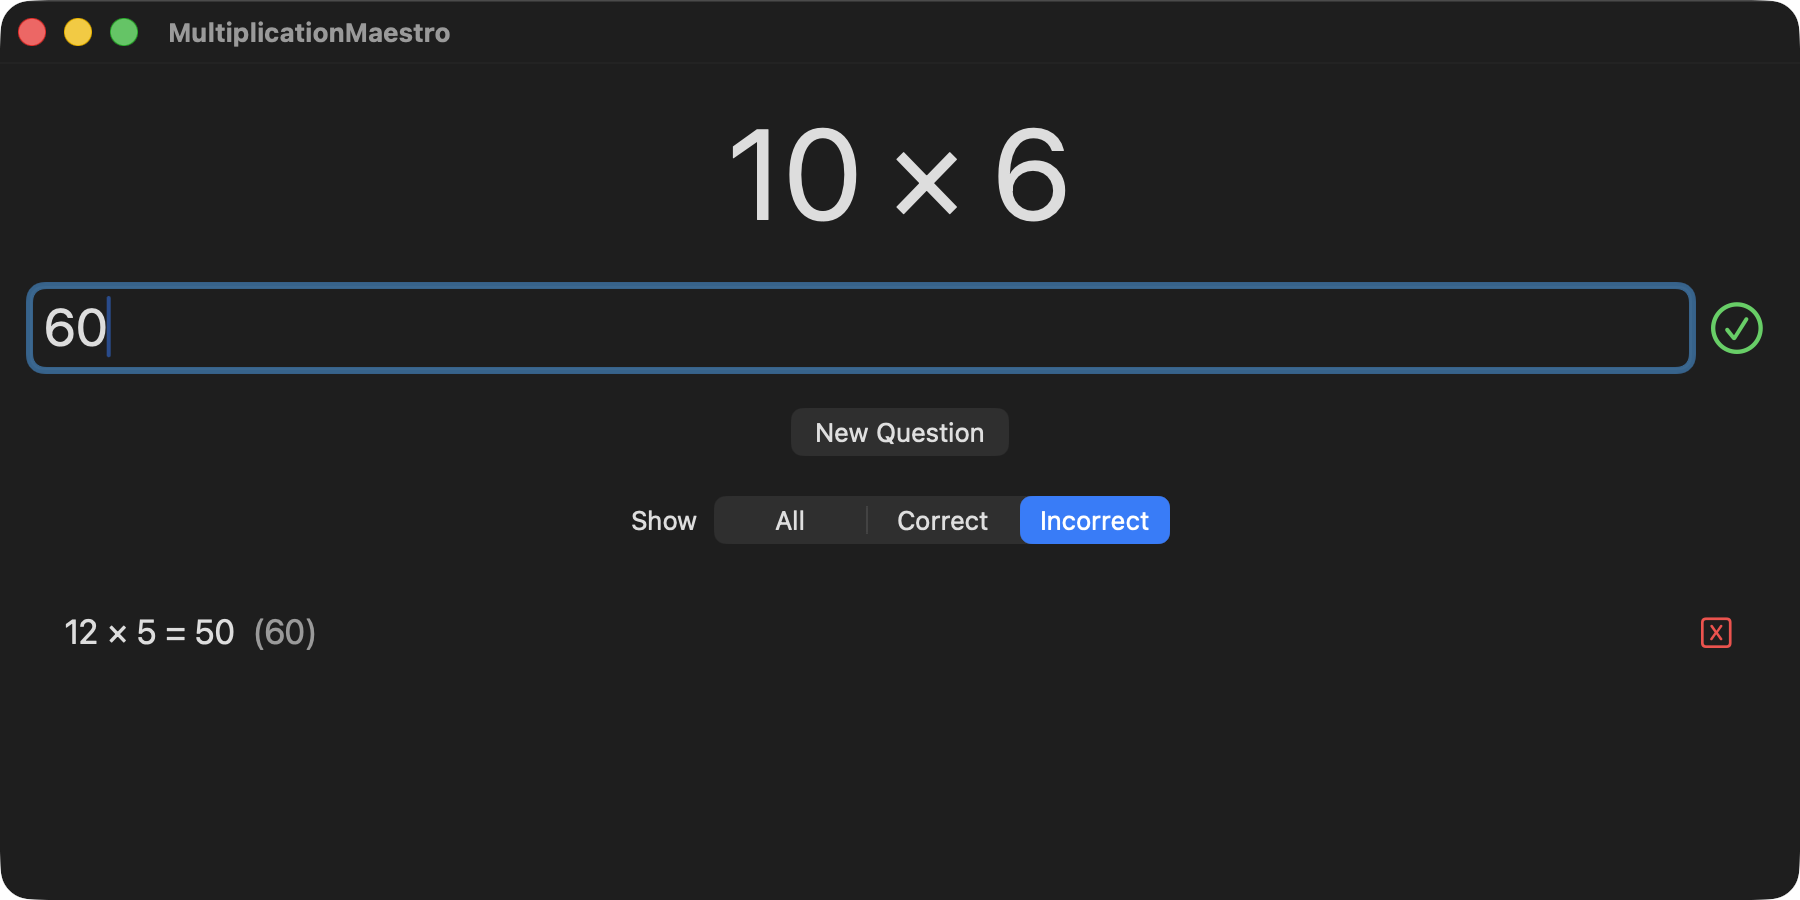
Choose Incorrect. Only the wrong answer stays, with the right product in brackets:
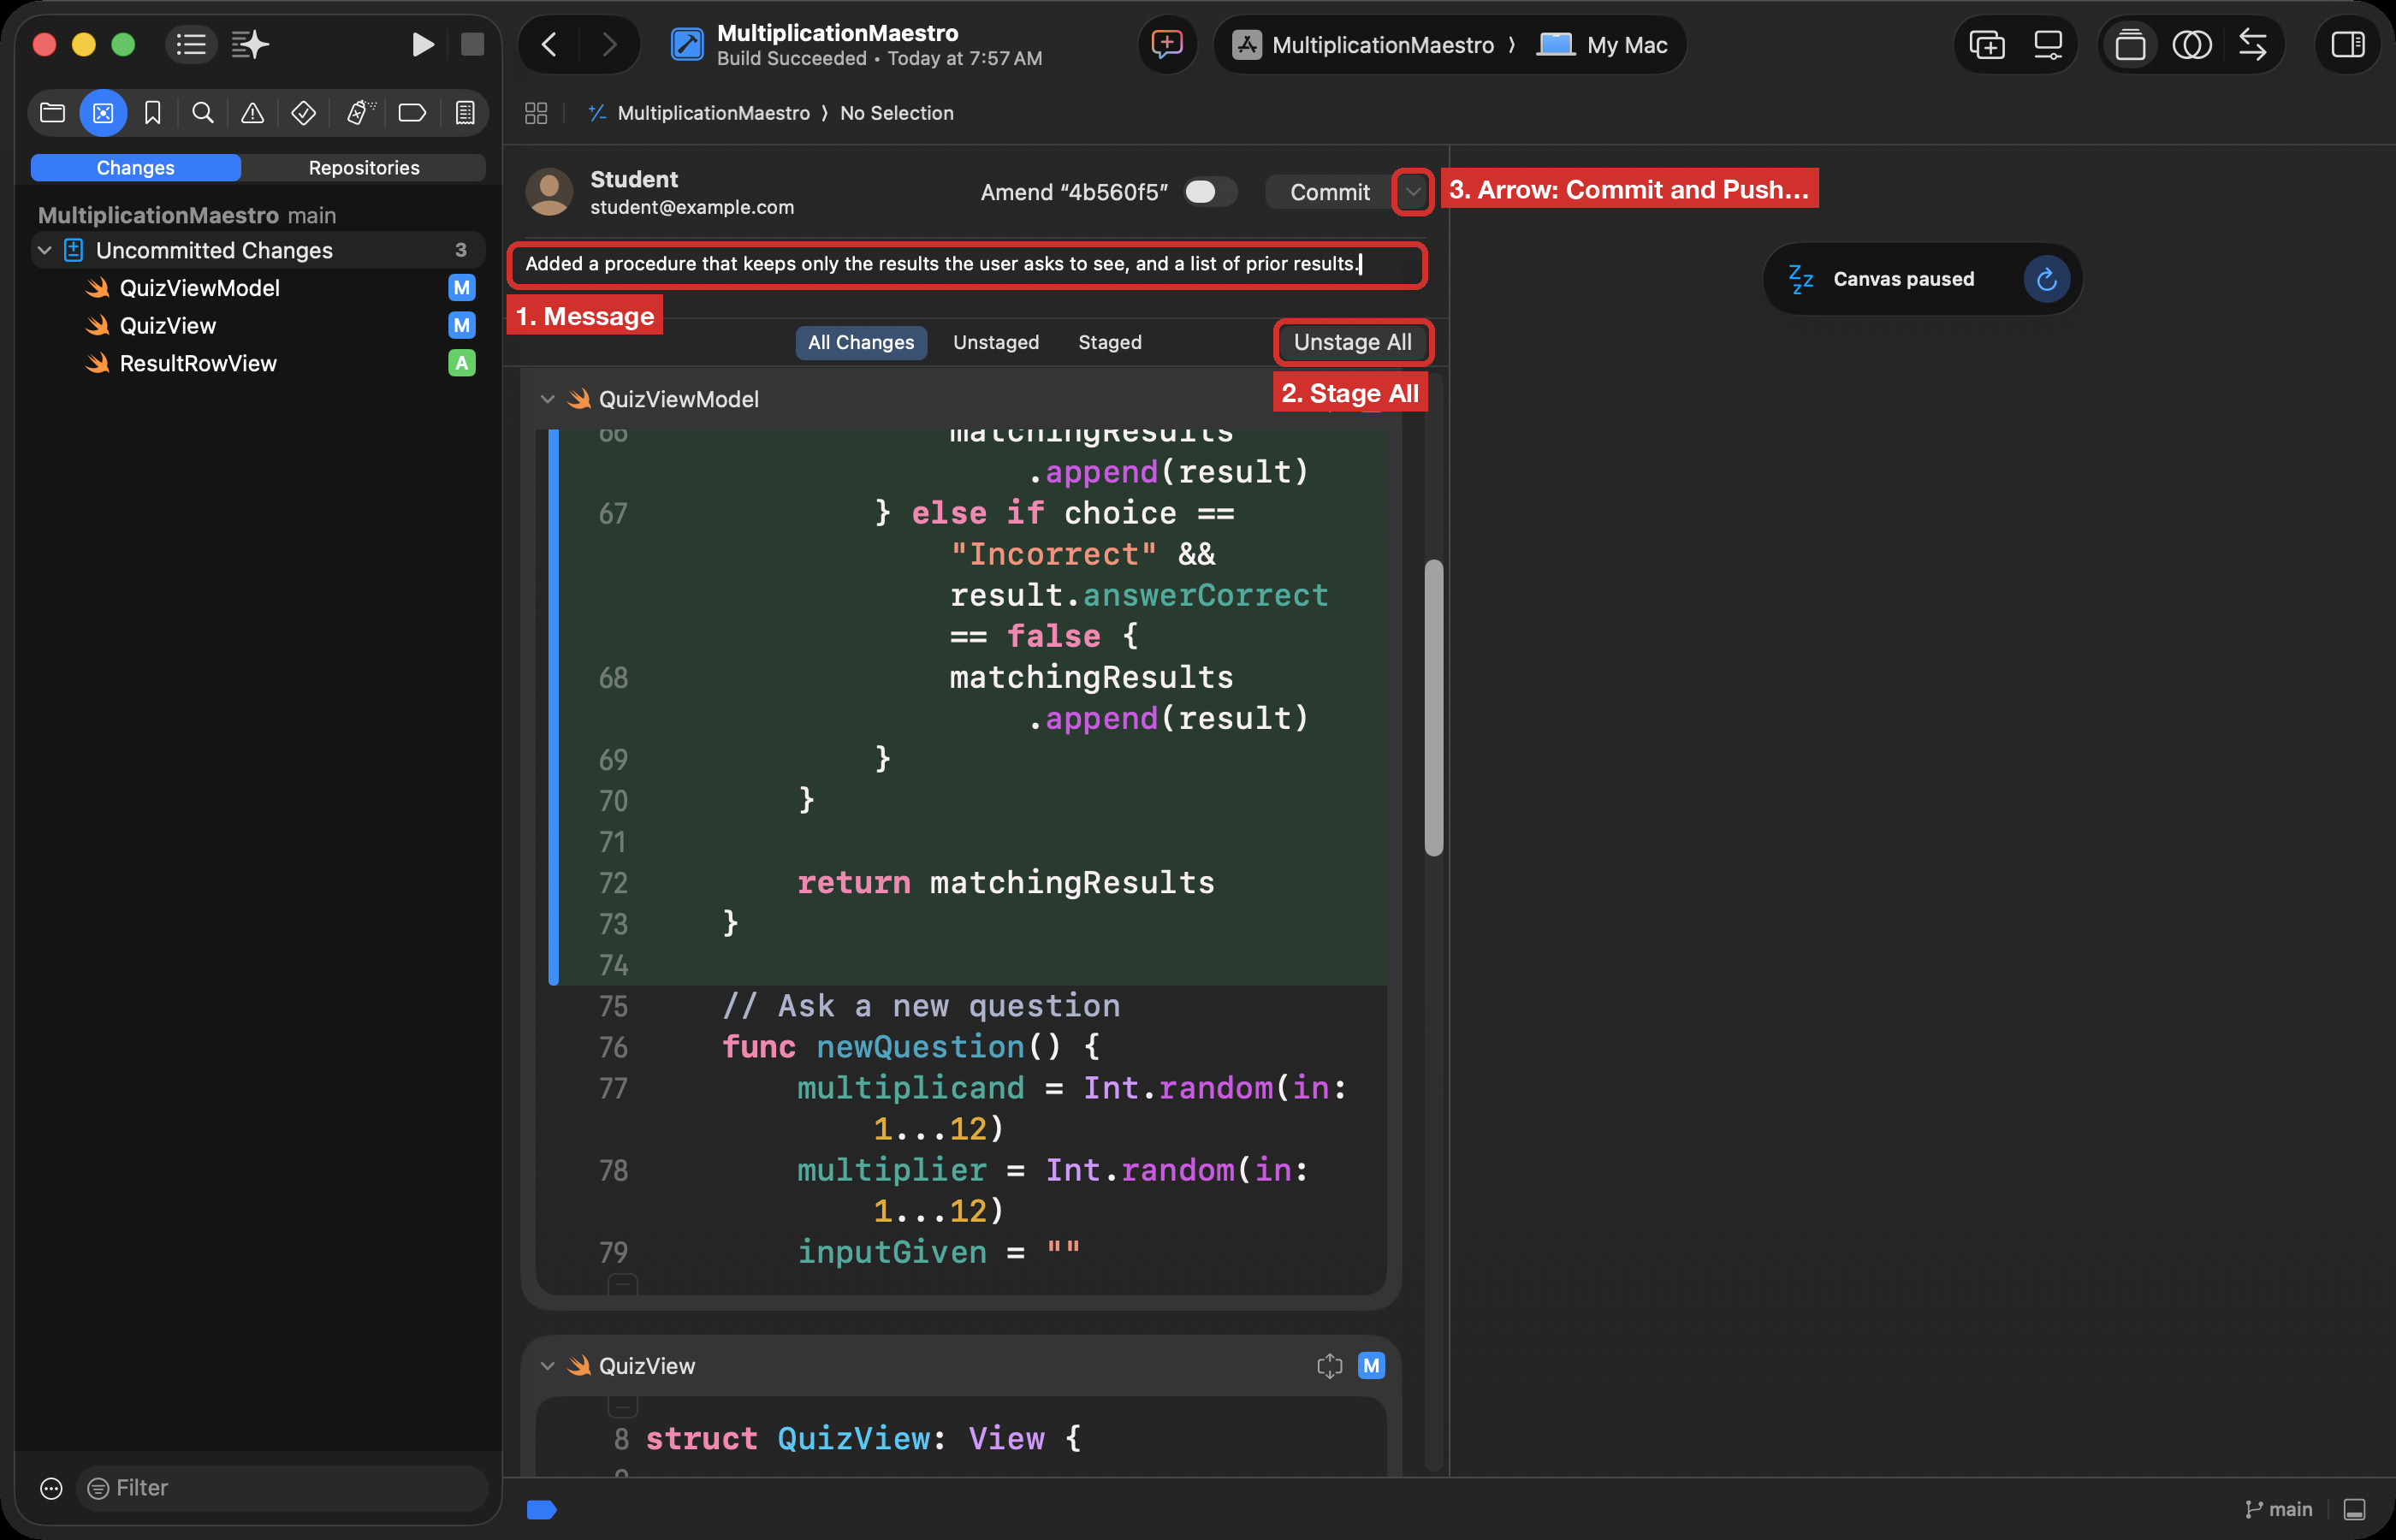
Commit and push. Type the message and choose Stage All (the button then reads Unstage All). Click the small arrow beside Commit and choose Commit and Push…. Refresh your repository on GitHub to check that your commits are there.
How this app meets the Create task requirements
Your own app must do each of these things, with your own idea and your own code: you cannot submit this app, or a copy of it with new names. Here is where Multiplication Maestro does them.
Input. The user types an answer, which goes into the view model:
TextField("Your answer", text: $viewModel.inputGiven)A list that stores data. Each answered question is added to results:
var results: [Result] = []results.insert(newResult, at: 0)The list is used, and it manages complexity. The list here is results. One loop, with one variable, handles any number of answered questions. Without the list, the app would need a separate variable for every question, could not know in advance how many to make, and could not show only the correct or incorrect ones.
for result in results {A procedure with a parameter. keepResults(matching:) has a name, a parameter choice that changes what it does, and a return type:
func keepResults(matching choice: String) -> [Result] {An algorithm with sequencing, selection, and iteration, all inside the procedure: the steps run in order (sequencing), if and else if decide which results to keep (selection), and for visits every result (iteration):
var matchingResults: [Result] = []

for result in results {
    if choice == "All" {
        matchingResults.append(result)
    } else if choice == "Correct" && result.answerCorrect == true {
        matchingResults.append(result)
    } else if choice == "Incorrect" && result.answerCorrect == false {
        matchingResults.append(result)
    }
}

return matchingResults
A call to the procedure. The view calls it with the user’s choice from the picker:
List(viewModel.keepResults(matching: choice)) { result in
    ResultRowView(result: result)
}
Output based on the input. The check mark or cross, and the list of results, both depend on what the user typed and chose:
if viewModel.answerCorrect == true {
    Image(systemName: "checkmark.circle")
        .foregroundStyle(.green)
} else {
    Image(systemName: "x.square")
        .foregroundStyle(.red)
}
On the AP exam, you answer written questions about your own list and your own procedure, like the ones above, with no AI beside you. The screenshots of your code in your Personalized Project Reference must not contain any comments.